OUTER REAR VIEW MIRROR INSTALLATION
CAUTION / NOTICE / HINT
Tech Tips
-
Use the same procedure for RHD and LHD vehicles.
-
The procedure listed below is for LHD vehicles.
-
Use the same procedure for the RH and LH sides.
-
The procedure listed below is for the LH side.
-
A bolt without a torque specification is shown in the standard bolt chart Click here.
PROCEDURE
-
INSTALL OUTER REAR VIEW MIRROR ASSEMBLY LH
-
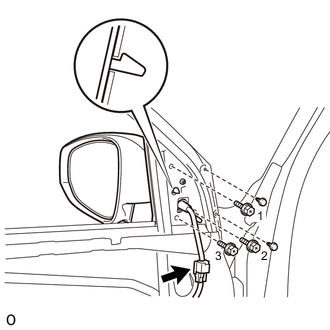
Attach the claw and 2 clips.
-
Temporarily install the outer rear view mirror assembly LH to the front door panel with the 3 screws.
Note
When reusing the outer rear view mirror assembly LH, be sure to temporarily install the screws by hand so that the threads of the mirror are threaded correctly.
-
Tighten the 3 screws.
- Torque:
- 9.0 N*m { 92 kgf*cm, 80 in.*lbf }
Note
-
As the threads of the mirror may become stripped, causing the mirror to fall off, do not tighten the screws with more than the specified torque.
-
When retightening the screws, do not retighten a screw more than 2 times. However, if the screw is being installed in the same location it was removed from, it is acceptable to retighten it 3 times.
-
Connect the connector.
-
-
INSTALL FRONT DOOR TRIM BOARD SUB-ASSEMBLY LH
-
INSTALL FRONT DOOR INSIDE HANDLE BEZEL PLUG LH
-
INSTALL FRONT DOOR ASSIST GRIP COVER LH
-
INSTALL POWER WINDOW REGULATOR MASTER SWITCH ASSEMBLY WITH FRONT DOOR ARMREST BASE PANEL (for Driver Side)
-
INSTALL POWER WINDOW REGULATOR SWITCH ASSEMBLY WITH FRONT DOOR ARMREST BASE PANEL (for Front Passenger Side)
-
INSTALL FRONT DOOR LOWER FRAME BRACKET GARNISH LH