FUEL LID LOCK CONTROL CABLE ASSEMBLY(for RHD) REMOVAL
PROCEDURE
-
REMOVE FRONT SEAT ASSEMBLY LH
-
for Manual Seat
-
for Power Seat
-
-
REMOVE FRONT SEAT ASSEMBLY RH
Tech Tips
Use the same procedure as for the LH side.
-
REMOVE REAR CONSOLE BOX SUB-ASSEMBLY
-
REMOVE NO. 2 CONSOLE BOX MOUNTING BRACKET
-
REMOVE PARKING BRAKE LEVER SUB-ASSEMBLY
-
REMOVE PACKAGE TRAY TRIM POCKET SUB-ASSEMBLY (w/ Partition Net)
-
REMOVE TONNEAU COVER ASSEMBLY (w/ Tonneau Cover)
-
REMOVE DECK BOARD ASSEMBLY (w/o Spare Tire, for Compact Spare Tire)
-
REMOVE DECK BOARD ASSEMBLY (for Full Size Spare Tire)
-
REMOVE DECK FLOOR BOX LH
-
REMOVE REAR FLOOR FINISH PLATE (w/o Spare Tire, for Compact Spare Tire)
-
REMOVE REAR DECK TRIM COVER (for Full Size Spare Tire)
-
REMOVE REAR NO. 1 FLOOR MAT SUPPORT SIDE PLATE (w/o Spare Tire, for Compact Spare Tire)
-
REMOVE REAR NO. 1 FLOOR MAT SUPPORT SIDE PLATE (for Full Size Spare Tire)
-
REMOVE REAR SEAT ASSEMBLY
-
for LH Side
-
for RH Side
-
-
REMOVE FRONT DOOR SCUFF PLATE LH
-
REMOVE FRONT DOOR SCUFF PLATE RH
Tech Tips
Use the same procedure as for the LH side.
-
REMOVE COWL SIDE TRIM BOARD LH
-
REMOVE COWL SIDE TRIM BOARD RH
-
REMOVE FRONT DOOR OPENING TRIM WEATHERSTRIP LH
-
REMOVE FRONT DOOR OPENING TRIM WEATHERSTRIP RH
Tech Tips
Use the same procedure as for the LH side.
-
REMOVE REAR DOOR SCUFF PLATE LH
-
REMOVE REAR DOOR SCUFF PLATE RH
Tech Tips
Use the same procedure as for the LH side.
-
REMOVE REAR DOOR OPENING TRIM WEATHERSTRIP LH
-
REMOVE REAR DOOR OPENING TRIM WEATHERSTRIP RH
Tech Tips
Use the same procedure as for the LH side.
-
REMOVE DECK TRIM SIDE PANEL ASSEMBLY LH
-
REMOVE SEAT BELT ANCHOR COVER CAP
-
REMOVE OUTER LAP BELT ANCHOR COVER
-
REMOVE LOWER CENTER PILLAR GARNISH LH
-
REMOVE LOWER CENTER PILLAR GARNISH RH
Tech Tips
Use the same procedure as for the LH side.
-
REMOVE FUEL LID LOCK OPEN LEVER SUB-ASSEMBLY
-
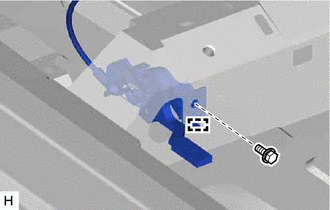
Remove the bolt and detach the guide.
-
Disconnect the fuel lid lock control cable sub-assembly and remove the fuel lid lock open lever sub-assembly.
-
-
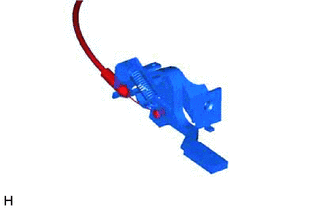
REMOVE FUEL LID LOCK CONTROL CABLE SUB-ASSEMBLY
-
Partially remove the floor carpet.
Tech Tips
It is not necessary to fully remove the floor carpet. Partially remove it so that the fuel lid lock control cable sub-assembly can be removed.
-
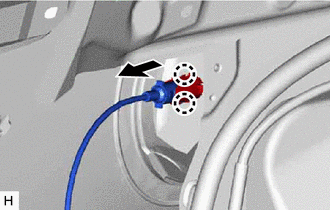
Detach the 2 claws and disconnect the fuel lid lock control cable sub-assembly from the fuel filler opening lid lock retainer in the direction indicated by the arrow in the illustration.
-
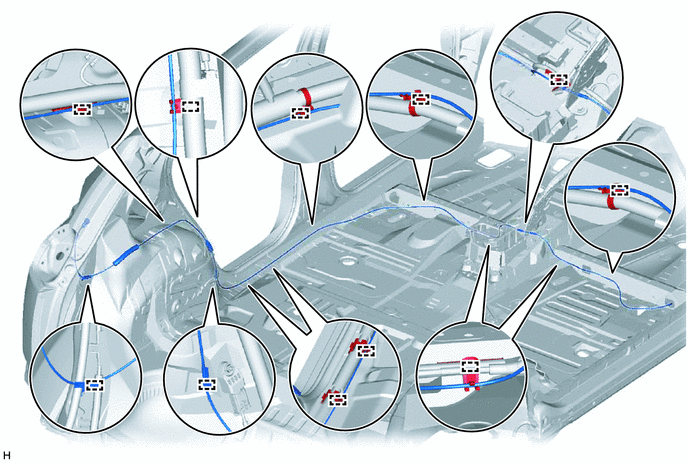
Detach the 12 clamps and remove the fuel lid lock control cable sub-assembly.
-
-
REMOVE FUEL FILLER OPENING LID LOCK RETAINER
-
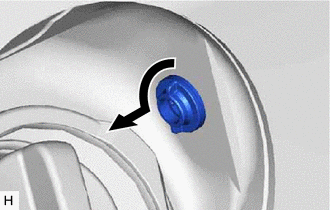
Turn the fuel filler opening lid lock retainer counterclockwise and remove the fuel filler opening lid lock retainer as shown in the illustration.
-