BACK DOOR DISASSEMBLY
PROCEDURE
-
REMOVE BACK DOOR CENTER GARNISH
-
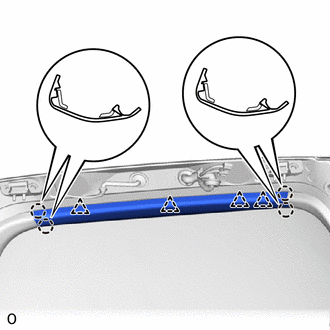
Detach the 4 claws and 4 clips and remove the back door center garnish.
-
-
REMOVE BACK DOOR SIDE GARNISH LH
-
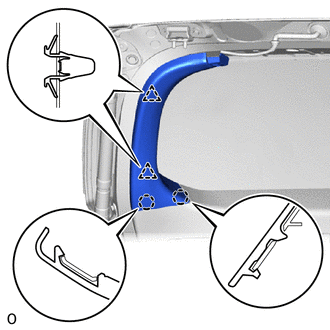
Detach the 2 claws and 2 clips and remove the back door side garnish LH.
-
-
REMOVE BACK DOOR SIDE GARNISH RH
Tech Tips
Use the same procedure described for the LH side.
-
REMOVE BACK DOOR TRIM BOARD ASSEMBLY
-

Detach the 13 clips and remove the back door trim board.
-
-
REMOVE BACK DOOR SERVICE HOLE COVER LH
-
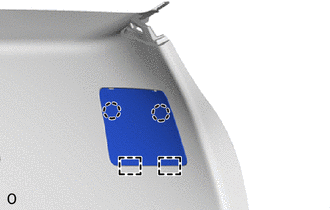
Detach the 2 claws and 2 guides and remove the back door service hole cover LH.
-
-
REMOVE BACK DOOR SERVICE HOLE COVER RH
Tech Tips
Use the same procedure described for the LH side.
-
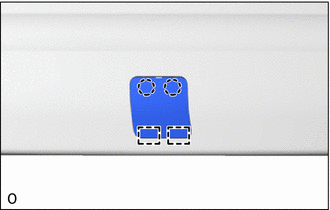
REMOVE BACK DOOR NO. 1 SERVICE HOLE COVER
-
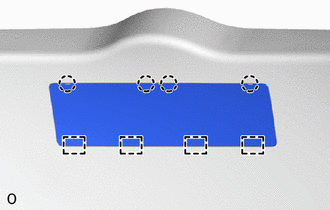
Detach the 4 claws and 4 guides and remove the back door No. 1 service hole cover.
-
-
REMOVE BACK DOOR NO. 2 SERVICE HOLE COVER
-
Detach the 2 claws and 2 guides and remove the back door No. 2 service hole cover.
-
-
REMOVE DOOR CONTROL SWITCH ASSEMBLY (w/ Power Back Door)
-
REMOVE DOOR PULL HANDLE
-
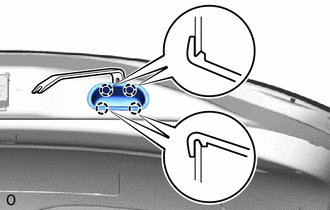
Using a moulding remover, detach the 4 claws as shown in the illustration and remove the door pull handle.
-
-
REMOVE BACK DOOR LOCK ASSEMBLY
-
REMOVE WIRELESS DOOR LOCK BUZZER
-
REMOVE MULTIPLEX NETWORK DOOR ECU (w/ Power Back Door)
-
REMOVE REAR WIPER ARM COVER
-
REMOVE REAR WIPER ARM AND BLADE ASSEMBLY
-
REMOVE NO. 1 REAR WIPER LINK PIVOT WASHER
-
REMOVE REAR WIPER MOTOR ASSEMBLY
-
REMOVE POWER BACK DOOR SENSOR ASSEMBLY LH (w/ Power Back Door)
-
REMOVE POWER BACK DOOR SENSOR ASSEMBLY RH (w/ Power Back Door)
Tech Tips
Use the same procedure described for the LH side.
-
REMOVE REAR LIGHT ASSEMBLY LH
-
REMOVE REAR LIGHT ASSEMBLY RH
Tech Tips
Use the same procedure described for the LH side.
-
REMOVE BACK DOOR GLASS CHANNEL LH
-
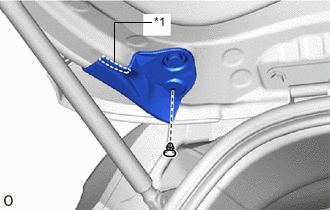
*1 Double-sided Tape Remove the clip.
-
Detach the double-sided tape to remove the back door glass channel LH.
-
-
REMOVE BACK DOOR GLASS CHANNEL RH
Tech Tips
Use the same procedure described for the LH side.
-
REMOVE REAR SPOILER
-
REMOVE REAR WASHER NOZZLE SUB-ASSEMBLY
-
REMOVE BACK DOOR OUTSIDE GARNISH SUB-ASSEMBLY
-
REMOVE BACK DOOR OPENER SWITCH ASSEMBLY
-
REMOVE TELEVISION CAMERA ASSEMBLY (w/ Television Camera)
Click here
-
REMOVE LICENSE PLATE LIGHT ASSEMBLY LH
-
REMOVE LICENSE PLATE LIGHT ASSEMBLY RH
Tech Tips
Use the same procedure described for the LH side.
-
REMOVE POWER BACK DOOR UNIT ASSEMBLY SET LH (w/ Power Back Door)
-
REMOVE POWER BACK DOOR UNIT ASSEMBLY SET RH (w/ Power Back Door)
Tech Tips
Use the same procedure described for the LH side.
-
REMOVE BACK DOOR STAY ASSEMBLY LH (w/o Power Back Door)
-
REMOVE BACK DOOR STAY ASSEMBLY RH (w/o Power Back Door)
Tech Tips
Use the same procedure described for the LH side.
-
REMOVE BACK DOOR DAMPER STAY UPPER BRACKET LH (w/o Power Back Door)
-
REMOVE BACK DOOR DAMPER STAY UPPER BRACKET RH (w/o Power Back Door)
Tech Tips
Use the same procedure described for the LH side.
-
REMOVE BACK DOOR DAMPER STAY LOWER BRACKET LH (w/o Power Back Door)
-
REMOVE BACK DOOR DAMPER STAY LOWER BRACKET RH (w/o Power Back Door)
Tech Tips
Use the same procedure described for the LH side.
-
REMOVE BACK DOOR PANEL CUSHION
-

Detach the 2 clips to remove the 2 back door cushions.
-