LIGHT CONTROL RHEOSTAT INSPECTION
PROCEDURE
-
INSPECT LIGHT CONTROL RHEOSTAT
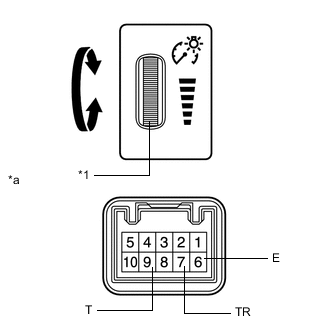
*1 Knob *a Component without harness connected
(Light Control Rheostat)
-
Inspect the light control rheostat.
-
Measure the resistance according to the value(s) in the table below.
Standard Resistance Tester Connection Switch Condition Specified Condition 9 (T) - 6 (E) Always 10 +/-2 kΩ 7 (TR) - 6 (E) Knob turned fully upward 10 +/-2 kΩ 7 (TR) - 6 (E) Knob turned fully downward Below 50 Ω 7 (TR) - 6 (E) Knob turned from fully upward to fully downward 10 +/-2 kΩ → Below 50 Ω If the result is not as specified, replace the light control rheostat.
-
-
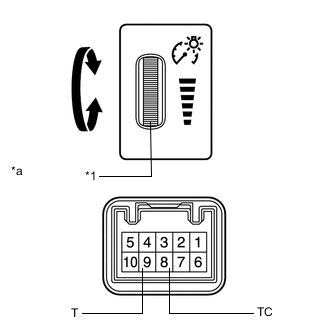
*1 Knob *a Component without harness connected
(Light Control Rheostat)
Inspect the TAIL cancel switch.
Tech Tips
The TAIL cancel switch is built into the light control rheostat.
-
Measure the resistance according to the value(s) in the table below.
Standard Resistance Tester Connection Switch Condition Specified Condition 9 (T) - 8 (TC) Knob turned fully upward
(TAIL cancel condition)
10 kΩ or higher 9 (T) - 8 (TC) Knob not turned fully upward Below 1 Ω If the result is not as specified, replace the light control rheostat.
-
-