REAR SEAT ASSEMBLY(for LH Side) REASSEMBLY
CAUTION / NOTICE / HINT
CAUTION:
Wear protective gloves. Sharp areas on the seatback frame, seat cushion frame and reclining adjuster may injure your hands.
Tech Tips
A bolt without a torque specification is shown in the standard bolt chart.
PROCEDURE
-
INSTALL SEPARATE TYPE REAR SEATBACK COVER
-
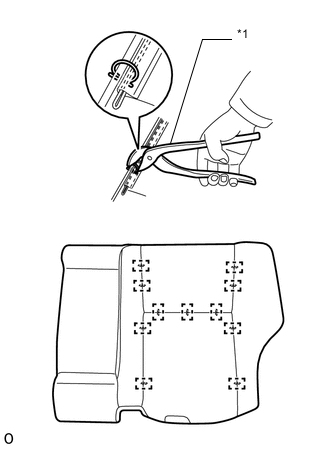
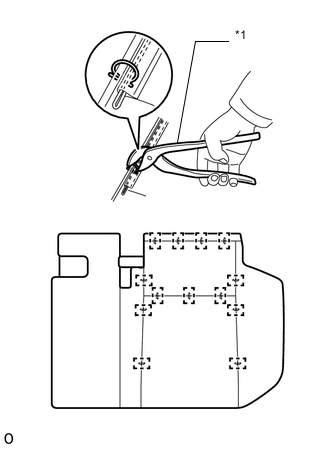
*1 Hog Ring Pliers Set the separate type rear seatback cover in place.
-
Using hog ring pliers, install the separate type rear seatback cover to the separate type rear seatback pad with 11 new hog rings.
Note
-
Be careful not to damage the separate type rear seatback cover.
-
Be sure to securely install the hog rings as shown in the illustration while preventing wrinkles from forming on the separate type rear seatback cover.
-
-
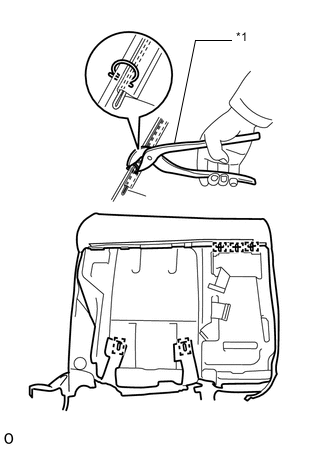
*1 Hog Ring Pliers Using hog ring pliers, install 5 new hog rings.
Note
-
Be careful not to damage the separate type rear seatback cover.
-
Be sure to securely install the hog rings as shown in the illustration while preventing wrinkles from forming on the separate type rear seatback cover.
-
-
Install the separate type rear seatback cover (with pad) to the rear seatback frame sub-assembly LH.
-
Attach the 9 clamps.
-
Attach the 8 claws to install the 4 rear seat headrest supports.
-
-
INSTALL REAR SEATBACK BOARD LH
-
Attach the clamp and 7 claws to install the rear seatback board LH.
-
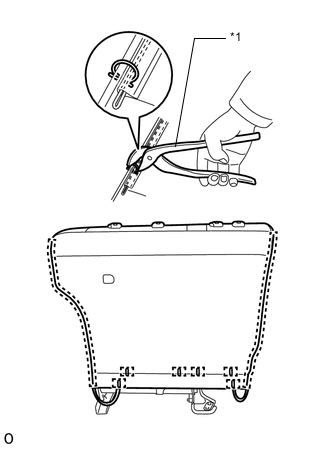
*1 Hog Ring Pliers Using hog ring pliers, install 6 new hog rings and attach the 2 pieces of fastening tape.
Note
-
Be careful not to damage the separate type rear seatback cover.
-
Be sure to securely install the hog rings as shown in the illustration while preventing wrinkles from forming on the separate type rear seatback cover.
-
-
-
INSTALL REAR NO. 1 SEATBACK ASSEMBLY LH
-
Install the rear No. 1 seatback assembly LH to the rear seat reclining adjuster assembly LH with the 3 bolts.
- Torque:
- 42 N*m { 428 kgf*cm, 31 ft.*lbf }
-
-
INSTALL REAR SEAT INNER BELT ASSEMBLY LH
-
Install the rear seat inner belt assembly LH with the bolt.
- Torque:
- 42 N*m { 428 kgf*cm, 31 ft.*lbf }
-
-
INSTALL NO. 2 SEAT ADJUSTER CONTROL CABLE ASSEMBLY
-
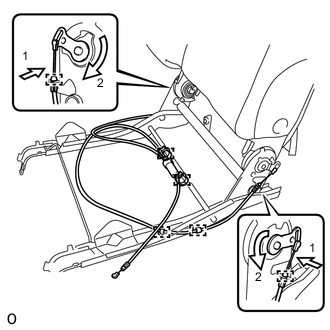
Install the No. 2 seat adjuster control cable assembly in the order shown in the illustration.
-
Attach the 2 clamps of the cable ends.
-
Attach the 4 clamps.
-
-
INSTALL REAR SEAT REAR CUSHION MOULDING LH
-
Attach the clamp and claw to install the rear seat rear cushion moulding LH.
-
w/ Seat Belt Warning System:
Attach the 2 clamps.
-
-
INSTALL REAR SEATBACK COVER LH
-
Attach the claw to install the rear seatback cover LH.
-
Install the clip and screw.
-
-
INSTALL REAR SEAT COVER LH
-
Attach the claw to install the rear seat cover LH.
-
Install the clip and screw.
-
-
INSTALL REAR SEAT CUSHION MOULDING LH
-
Attach the 3 hooks and claw to install the rear seat cushion moulding LH.
-
-
INSTALL SEPARATE TYPE REAR SEAT CUSHION COVER
-
*1 Hog Ring Pliers Set the separate type rear seat cushion cover in place.
-
Using hog ring pliers, install the separate type rear seat cushion cover to the rear seat cushion pad LH with 13 new hog rings.
Note
-
Be careful not to damage the separate type rear seat cushion cover.
-
Be sure to securely install the hog rings as shown in the illustration while preventing wrinkles from forming on the separate type rear seat cushion cover.
-
-
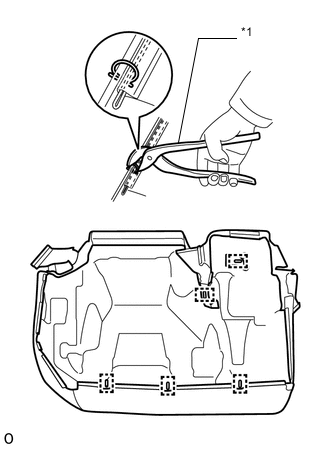
*1 Hog Ring Pliers Using hog ring pliers, install 5 new hog rings.
Note
-
Be careful not to damage the separate type rear seat cushion cover.
-
Be sure to securely install the hog rings as shown in the illustration while preventing wrinkles from forming on the separate type rear seat cushion cover.
-
-
Install the separate type rear seat cushion cover (with pad) to the rear seat spring assembly with the 20 hooks.
-
-
INSTALL REAR NO. 1 SEAT CUSHION ASSEMBLY LH
-
Install the rear No. 1 seat cushion assembly LH with the 2 bushes and 2 bolts.
- Torque:
- 21 N*m { 214 kgf*cm, 15 ft.*lbf }
-
Attach the 2 claws to install the rear seatback cover.
-
Install the 3 clamps.
-
Connect the cable in the order shown in the illustration.
-
Attach the clamp of the cable end.
-
Install the 2 bushes and 2 bolts.
- Torque:
- 21 N*m { 214 kgf*cm, 15 ft.*lbf }
-
-
INSTALL RECLINING ADJUSTER RELEASE HANDLE LH
-
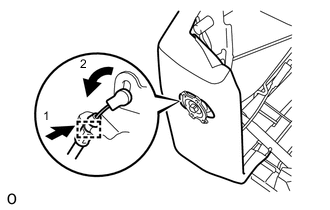
Install the reclining adjuster release handle LH with the 3 screws.
-
-
INSTALL REAR SEATBACK NO. 1 BOARD CAP
-
Attach the 3 claws to install the rear seatback No. 1 board cap.
-
-
INSTALL REAR SEAT NO. 1 CENTER ARMREST PLATE
-
Install the rear seat No. 1 center armrest plate.
-
-
INSTALL REAR SEAT CENTER ARMREST ASSEMBLY
-
Install the rear seat center armrest assembly with the washer and bolt.
-
-
INSTALL REAR SEAT LOWER CUSHION HINGE COVER LH
-
Attach the clamp and 4 claws to install the rear seat lower cushion hinge cover LH.
-
-
INSTALL REAR SEAT NO. 3 CUSHION HINGE COVER
-
Attach the clamp and 4 claws to install the rear seat No. 3 cushion hinge cover.
-
Attach the clamp.
-
-
INSTALL CENTER ARMREST HINGE COVER RH
-
Attach the clamp to install the center armrest hinge cover RH.
-
-
INSTALL REAR CENTER SEAT LAP TYPE BELT ASSEMBLY LH
-
INSTALL REAR SEAT CENTER HEADREST ASSEMBLY
-
INSTALL REAR SEAT HEADREST ASSEMBLY