TELEMATICS TRANSCEIVER INSTALLATION
PROCEDURE
-
INSTALL ANTENNA DIVIDER
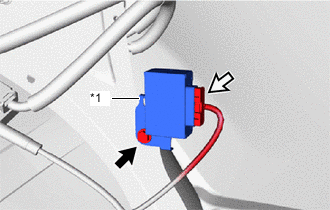
*1 Guide 
Bolt 
Connector
-
Install the antenna divider with the bolt.
- Torque:
- 7.0 N*m { 71 kgf*cm, 62 in.*lbf }
-
Connect the connector.
-
-
INSTALL TELEMATICS TRANSCEIVER
-
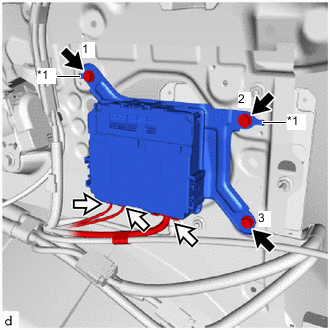
*1 Guide Bolt Connector Connect the connectors.
-
Attach the 2 guides to temporarily install the telematics transceiver.
-
Install the telematics transceiver with the 3 bolts.
Tech Tips
Tighten the bolts in the order shown in the illustration.
- Torque:
- 7.0 N*m { 71 kgf*cm, 62 in.*lbf }
-
-
INSTALL DECK TRIM SIDE PANEL ASSEMBLY RH
-
INSTALL REAR SEAT ASSEMBLY
-
INSTALL REAR NO. 1 FLOOR MAT SUPPORT SIDE PLATE
-
INSTALL REAR DECK TRIM COVER (for Full Size Spare Tire)
-
INSTALL REAR FLOOR FINISH PLATE (w/o Spare Tire, for Compact Spare Tire)
Tech Tips
Use the same procedure described for the rear No. 3 floor board side.
-
INSTALL REAR NO. 2 FLOOR BOARD
-
INSTALL DECK FLOOR BOX LH
-
INSTALL DECK BOARD ASSEMBLY
-
INSTALL TONNEAU COVER ASSEMBLY (w/ Tonneau Cover)
-
INSTALL PACKAGE TRAY TRIM POCKET SUB-ASSEMBLY (w/ Partition Net)
-
INSTALL REAR DOOR OPENING TRIM WEATHERSTRIP RH
-
INSTALL REAR DOOR SCUFF PLATE RH