REAR COIL SPRING REMOVAL
CAUTION / NOTICE / HINT
Tech Tips
-
Use the same procedure for the RH and LH sides.
-
The procedure listed below is for the LH side.
PROCEDURE
-
REMOVE REAR WHEEL
-
REMOVE REAR HEIGHT CONTROL SENSOR SUB-ASSEMBLY LH (w/ Automatic Headlight Beam Level Control System)
-
REMOVE REAR STABILIZER LINK ASSEMBLY LH
-
LOOSEN REAR NO. 2 SUSPENSION ARM ASSEMBLY LH

-
Loosen the 2 bolts of the suspension arm.
Note
-
Do not remove the bolts and nuts, only loosen them.
-
Since a stopper nut is used, loosen the bolt.
-
-
-
REMOVE REAR COIL SPRING LH
-
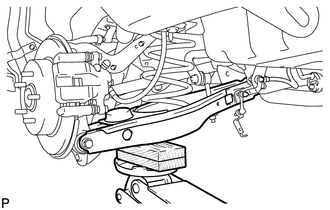
Support the No. 2 suspension arm LH with a jack.
Note
Place a wooden or rubber block between the jack and arm.
-
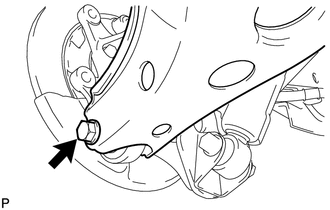
Remove the bolt located on the rear axle carrier of the rear No. 2 suspension arm.
-
Lower the jack gradually to remove the rear coil spring together with the rear upper coil spring insulator.
-
-
REMOVE REAR UPPER COIL SPRING INSULATOR LH
-
Remove the rear upper coil spring insulator from the rear coil spring.
-
-
REMOVE REAR LOWER COIL SPRING INSULATOR LH
-
Remove the rear lower coil spring insulator from the rear No. 2 suspension arm.
-