FRONT LOWER BALL JOINT INSTALLATION

CAUTION / NOTICE / HINT
Tech Tips
-
Use the same procedure for the RH and LH sides.
-
The procedure listed below is for the LH side.
PROCEDURE
-
INSTALL FRONT LOWER BALL JOINT ASSEMBLY LH
-
Secure the front axle assembly between aluminum plates in a vise.
Note
When using a vise, do not overtighten it.
-
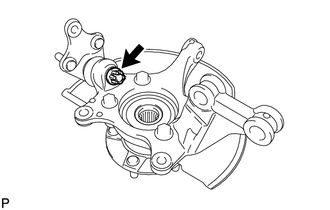
Install the front lower ball joint to the front axle assembly with the nut.
- Torque:
- 133 N*m { 1356 kgf*cm, 98 ft.*lbf }
-
Install a new cotter pin.
Note
If the holes for the cotter pin are not aligned, align the holes by tightening the nut as necessary up to an additional 60°.
-
-
INSTALL FRONT AXLE ASSEMBLY LH
-
CONNECT FRONT LOWER NO. 1 SUSPENSION ARM SUB-ASSEMBLY LH
-
CONNECT TIE ROD END SUB-ASSEMBLY LH
-
INSTALL FRONT DISC
-
CONNECT FRONT DISC BRAKE CALIPER ASSEMBLY LH
-
CONNECT FRONT FLEXIBLE HOSE
-
CONNECT FRONT SPEED SENSOR LH
-
INSTALL FRONT AXLE SHAFT NUT LH
-
INSTALL FRONT WHEEL
- Torque:
- 103 N*m { 1050 kgf*cm, 76 ft.*lbf }
-
INSPECT AND ADJUST FRONT WHEEL ALIGNMENT
-
CHECK SPEED SENSOR SIGNAL