MANUAL TRANSAXLE ASSEMBLY INSTALLATION
PROCEDURE
-
INSTALL TRANSFER AND TRANSAXLE SETTING STUD BOLT
-
Transfer Side:
-
Clean the bolt holes.
-
Apply adhesive 1324 to 2 or 3 threads on one half of a new transfer and transaxle setting stud bolt A as shown in the illustration.
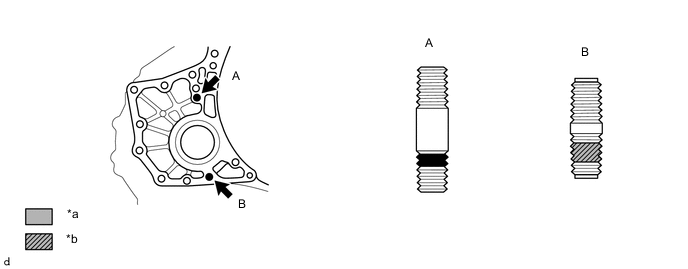
*a Toyota Genuine Adhesive 1324 *b Sealant Adhesive Toyota Genuine Adhesive 1324, Three Bond 1324 or equivalent Note
-
Do not apply adhesive 1324 to the ends of the stud bolt.
-
Install the stud bolt immediately after applying adhesive to prevent the adherence of foreign matter.
-
-
Install the 2 new transfer and transaxle setting stud bolts to the transaxle case positions shown in the illustration.
- Torque:
- 39.2 N*m { 400 kgf*cm, 29 ft.*lbf }
Note
Install the stud bolt so that the side that has sealant and adhesive is facing the automatic transaxle assembly.
Tech Tips
Stud bolt length:
Stud bolt A: 69 mm (2.72 in.)
Stud bolt B: 47 mm (1.85 in.)
-
-
INSTALL TRANSFER ASSEMBLY
-
INSTALL MANUAL TRANSAXLE ASSEMBLY
-
Align the input shaft with the clutch disc and install the manual transaxle assembly to the engine.
-
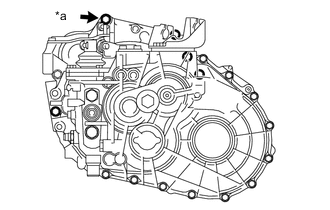
*a Temporarily Temporarily install the manual transaxle assembly with the bolt (*a).
-
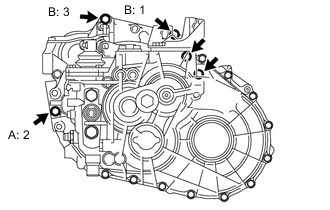
Tighten the 3 bolts labeled A and B in the order shown in the illustration, and then install the 2 bolts.
- Torque:
- for Bolt A
- 46 N*m { 469 kgf*cm, 34 ft.*lbf }
- for Bolt B
- 64 N*m { 653 kgf*cm, 47 ft.*lbf }
-
-
INSTALL STIFFENER PLATE LH
-
INSTALL STIFFENER PLATE RH
-
INSTALL OIL PAN INSULATOR
-
INSTALL ENGINE MOUNTING BRACKET LH
Tech Tips
Perform this procedure only when replacement of the engine mounting bracket LH is necessary.
-
Install the engine mounting bracket LH with the 4 bolts.
- Torque:
- 64 N*m { 653 kgf*cm, 47 ft.*lbf }
-
-
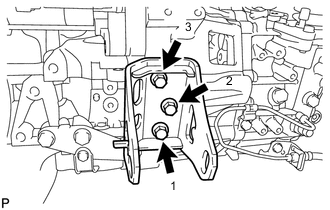
INSTALL REAR ENGINE MOUNTING BRACKET
-
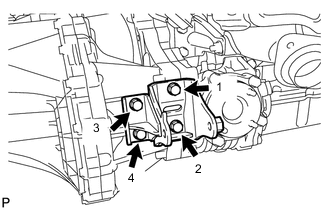
Install the rear engine mounting bracket with the 4 bolts in the order shown in the illustration.
- Torque:
- 45 N*m { 459 kgf*cm, 33 ft.*lbf }
-
-
INSTALL FRONT ENGINE MOUNTING BRACKET
-
Temporarily install the rear engine mounting bracket with the 5 bolts.
-
Tighten the 3 bolts of the front engine mounting bracket in the order shown in the illustration.
- Torque:
- 64 N*m { 653 kgf*cm, 47 ft.*lbf }
-
-
INSTALL STARTER ASSEMBLY
-
INSTALL ENGINE ASSEMBLY WITH MANUAL TRANSAXLE
for 1AD-FTV:
for 2AD-FTV: