CLUTCH ACCUMULATOR(for Gasoline) INSTALLATION
PROCEDURE
-
INSTALL CLUTCH ACCUMULATOR ASSEMBLY
-
Temporarily install the clutch accumulator assembly to the manual transaxle assembly with the 3 bolts.
-

Tighten the 3 bolts in the order shown in the illustration.
- Torque:
- 12 N*m { 122 kgf*cm, 9 ft.*lbf }
-
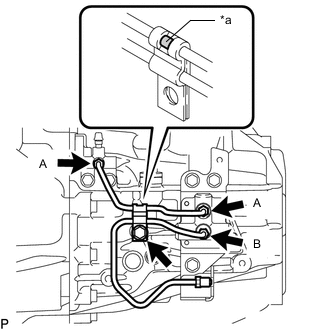
*a Paint Mark Temporarily install the bleeder to accumulator tube labeled A and accumulator to flexible hose tube labeled B.
-
Install the clamp with the bolt.
- Torque:
- 12 N*m { 122 kgf*cm, 9 ft.*lbf }
Tech Tips
Align the clamp and paint mark as shown in the illustration and install the clamp.
-
Using a 10 mm union nut wrench, tighten the bleeder to accumulator tube labeled A and accumulator to flexible hose tube labeled B.
- Torque:
- 15 N*m { 153 kgf*cm, 11 ft.*lbf }
Note
Use the formula to calculate special torque values for situations where a union nut wrench is combined with a torque wrench Click here.
-
Connect the accumulator to flexible hose tube and clutch hose.
-
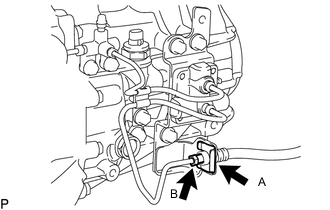
Install the clutch hose with a new clip labeled A.
-
Using a 10 mm union nut wrench, tighten the accumulator to flexible hose tube labeled B.
- Torque:
- 15 N*m { 153 kgf*cm, 11 ft.*lbf }
Note
Use the formula to calculate special torque values for situations where a union nut wrench is combined with a torque wrench Click here.
-
-
BLEED CLUTCH LINE
for 2AR-FE:
for 3ZR-FE:
for 3ZR-FAE:
-
INSPECT FLUID LEVEL
-
INSPECT FOR FLUID LEAK
Tech Tips
Check for leaks in the clutch system.
-
INSTALL BATTERY BRACKET REINFORCEMENT
-
for 2AR-FE:
-
for 3ZR-FAE
w/o Stop And Start System: Click here
w/ Stop And Start System: Click here
-
for 3ZR-FE:
for 1.0 kW Type: Click here
for 1.3 kW Type: Click here
-
-
INSTALL REAR ENGINE UNDER COVER LH
-
INSTALL NO. 1 ENGINE UNDER COVER