ECM INSTALLATION
CAUTION / NOTICE / HINT
PROCEDURE
-
INSTALL NO. 2 ECM BRACKET
-
Install the No. 2 ECM bracket with the 2 screws.
- Torque:
- 3.0 N*m { 31 kgf*cm, 27 in.*lbf }
-
-
INSTALL NO. 1 ECM BRACKET
-
Install the No. 1 ECM bracket with the 2 screws.
- Torque:
- 3.0 N*m { 31 kgf*cm, 27 in.*lbf }
-
-
INSTALL ECM
-
Install the ECM with the 3 bolts.
- Torque:
- 6.5 N*m { 66 kgf*cm, 58 in.*lbf }
-
Connect the 2 ECM connectors and lower the 2 levers.
Note
-
When connecting a connector, make sure that dirt, water and other foreign matter is not stuck between the connector and ECM.
-
Make sure that the 2 levers are securely lowered.
-
-
-
INSTALL AIR CLEANER CASE
-
Install the air cleaner case with the 2 bolts.
- Torque:
- 5.0 N*m { 51 kgf*cm, 44 in.*lbf }
-
Attach the harness clamp.
-
-
INSTALL AIR CLEANER CAP SUB-ASSEMBLY
-
Install the air cleaner filter element to the air cleaner case.
-
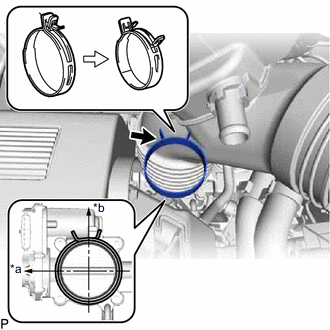
*a RH Side *b Rear Align the protrusion on the end of the air cleaner cap sub-assembly with the edge of the throttle with motor body assembly and connect the hose. Then, release the lock of the air cleaner cap sub-assembly clamp to secure the clamp.
-
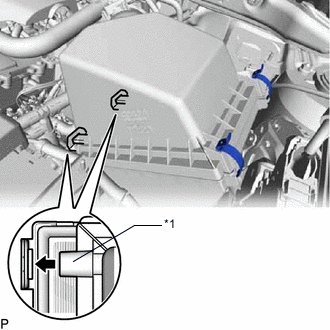
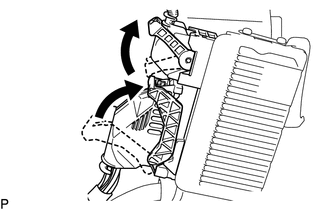
*1 Hinge Insert the hinge part of the air cleaner cap sub-assembly into the air cleaner case, and then attach the 2 hook clamps.
-
Connect the No. 2 PCV hose to the cylinder head cover.
-
Connect the fuel vapor feed hose and No. 2 fuel vapor feed hose to the purge VSV, and slide the 2 clamps to secure it.
-
Attach the 2 wire harness clamps.
-
Connect the purge VSV connector.
-
Connect the mass air flow meter sub-assembly connector.
-
-
CONNECT CABLE TO NEGATIVE BATTERY TERMINAL
Note
When disconnecting the cable, some systems need to be initialized after the cable is reconnected.
-
PERFORM REGISTRATION
-
w/ Canister Pump Module:
When replacing the ECM, input the Vehicle Identification Number (VIN) into the new ECM.
-
w/o Canister Pump Module
When replacing the ECM, input the Vehicle Identification Number (VIN) into the new ECM.
-
-
RESET MEMORY (for Automatic Transaxle)
-
When replacing the ECM, perform the Reset Memory procedure (A/T initialization).
-