СВЕЧА НАКАЛИВАНИЯ (для моделей без контроллера свечей накаливания) УСТАНОВКА
PROCEDURE
-
INSTALL GLOW PLUG ASSEMBLY
-
Clean the glow plug assembly installation holes in the cylinder head sub-assembly.
-
Using a 10 mm deep socket wrench, install the 4 glow plug assemblies.
- Torque:
- 12.5 N*m { 127 kgf*cm, 9 ft.*lbf }
-
-
INSTALL NO. 1 GLOW PLUG CONNECTOR
-
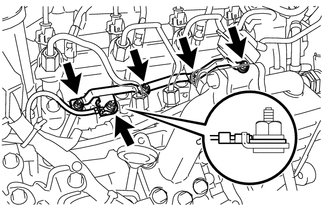
Install the No. 1 glow plug connector with the 4 nuts.
- Torque:
- 2.2 N*m { 22 kgf*cm, 19 in.*lbf }
-
Connect the wire harness with the nut.
- Torque:
- 3.8 N*m { 39 kgf*cm, 34 in.*lbf }
Note
Install the glow terminal in the correct direction.
-
Install the 5 screw grommets.
Note
Push the screw grommet into the threaded portion of the glow plug by hand, and then turn it clockwise.
-
-
INSTALL NO. 3 ENGINE COVER BRACKET
-
Install the No. 3 engine cover bracket with the bolt.
- Torque:
- 9.0 N*m { 92 kgf*cm, 80 in.*lbf }
-
Connect the wire harness clamp.
-
-
CONNECT CABLE TO NEGATIVE BATTERY TERMINAL
Note
When disconnecting the cable, some systems need to be initialized after the cable is reconnected.
-
INSTALL NO. 1 ENGINE COVER (w/ No. 1 Engine Cover)