FRONT SEAT ASSEMBLY REASSEMBLY
CAUTION / NOTICE / HINT
Tech Tips
-
Use the same procedure for the RH side and LH side.
-
The following procedure is for the LH side.
PROCEDURE
-
INSTALL OUTER SEAT TRACK COVER LH
-
Engage 2 claws to install the outer seat track cover LH.
-
-
INSTALL SEAT TRACK COVER RH
Tech Tips
Perform the same procedure as for the outer seat track cover LH.
-
INSTALL FRONT UPPER SEAT TRACK RAIL COVER LH
-
Engage the 2 claws to install the front upper seat track rail cover LH.
-
-
INSTALL FRONT UPPER SEAT TRACK RAIL COVER RH
Tech Tips
Perform the same procedure as for the front upper seat track rail cover LH.
-
INSTALL REAR UPPER SEAT TRACK RAIL COVER LH
Tech Tips
Perform the same procedure as for the front upper seat track rail cover LH.
-
INSTALL REAR UPPER SEAT TRACK RAIL COVER RH
Tech Tips
Perform the same procedure as for the front upper seat track rail cover LH.
-
INSTALL FRONT SEAT CUSHION SPRING SUB-ASSEMBLY
-
Engage each hook to install the front seat cushion spring sub-assembly to the front seat adjuster assembly.
-
-
INSTALL FRONT SEATBACK SPRING SUB-ASSEMBLY (w/o Lumbar Support)
-
Engage the 6 hooks to install the front seatback spring sub-assembly to the front seatback frame sub-assembly.
-
-
INSTALL FRONT SEATBACK SPRING SUB-ASSEMBLY (w/ Lumbar Support)
-
INSTALL SEPARATE TYPE FRONT SEATBACK SPRING ASSEMBLY
-
Using a T50 "TORX" socket wrench, install the separate type front seatback spring assembly to the separate type front seat cushion spring assembly with the 4 bolts.
- Torque:
- 40 N*m { 408 kgf*cm, 30 ft.*lbf }
-
-
INSTALL FRONT SEAT WIRE (w/ Lumbar Support)
-
Connect each connector and engage each clamp to install the front seat wire.
-
-
INSTALL RECLINING CONTROL LEVER
-
Install the reclining control lever with the bolt.
- Torque:
- 14 N*m { 143 kgf*cm, 10 ft.*lbf }
-
-
INSTALL RECLINING ADJUSTER INSIDE COVER LH
-
Engage the 2 guides to install the reclining adjuster inside cover LH.
-
-
INSTALL RECLINING ADJUSTER INSIDE COVER RH
Tech Tips
Perform the same procedure as for the LH side.
-
INSTALL FRONT SEATBACK HEATER ASSEMBLY (w/ Seat Heater System)
for Standard Seat Type: Click here
for Sports Seat Type: Click here
-
INSTALL SEPARATE TYPE FRONT SEATBACK COVER (for Standard Seat Type)
-
Engage the 2 hooks to install the separate type front seatback cover to the separate type front seatback pad.
-
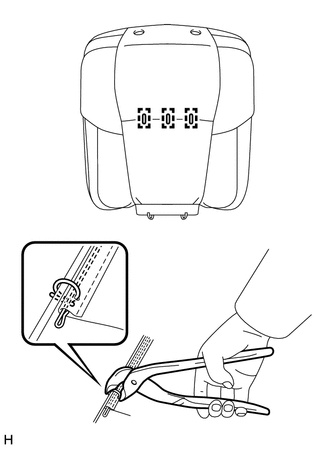
Using hog ring pliers, install 3 new hog rings.
Note
-
Be careful not to damage the separate type front seatback cover.
-
Be sure to securely install the hog rings as shown in the illustration while preventing wrinkles from forming on the separate type front seatback cover.
-
-
-
INSTALL SEPARATE TYPE FRONT SEATBACK COVER (for Sports Seat Type)
-
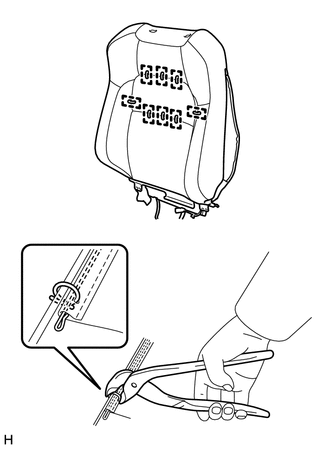
Using hog ring pliers, install the separate type front seatback cover to the separate type front seatback pad with 8 new hog rings.
Note
-
Be careful not to damage the separate type front seatback cover.
-
Be sure to securely install the hog rings as shown in the illustration while preventing wrinkles from forming on the separate type front seatback cover.
-
-
-
INSTALL FRONT SEAT AIRBAG ASSEMBLY
-
INSTALL SEPARATE TYPE FRONT SEATBACK COVER WITH PAD
-
Temporarily install the separate type front seatback cover with pad.
-
Engage each claw to install the 2 front seat headrest supports.
-
Engage the 2 hooks.
CAUTION:
-
For vehicles with a front seat airbag assembly, the separate type front seatback cover must be securely installed. Otherwise, the front seat airbag assembly may not deploy properly.
-
Make sure that the strap is not twisted after engaging each hook.
-
Engage the 2 hooks securely.
-
-
for Standard Seat Type:
-
Engage the 2 hooks.
-
-
Close the 2 fasteners.
-
Engage the hook.
-
-
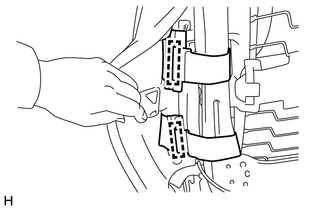
CONNECT FRONT SEAT AIRBAG ASSEMBLY
-
Engage the claw to connect the front seat airbag assembly wire harness.
-
Engage the wire harness guide.
-
Engage the 3 clamps.
-
-
INSTALL FRONT SEAT CUSHION HEATER ASSEMBLY (w/ Seat Heater System)
-
INSTALL SEPARATE TYPE FRONT SEAT CUSHION COVER
-
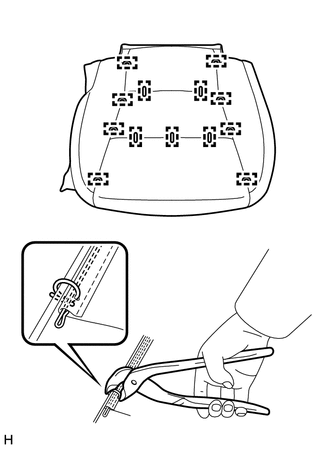
Using hog ring pliers, install the separate type front seat cushion cover to the separate type front seat cushion pad with 13 new hog rings.
Note
-
Be careful not to damage the separate type front seat cushion cover.
-
Be sure to securely install the hog rings as shown in the illustration while preventing wrinkles from forming on the separate type front seat cushion cover.
-
-
-
INSTALL SEPARATE TYPE FRONT SEAT CUSHION COVER WITH PAD
-
Temporarily install the separate type front seat cushion cover with pad.
-
Engage each hook.
-
w/ Seat Heater System:
-
Connect the 2 connectors to install the front seat cushion heater assembly wire harness.
-
Engage the 3 clamps.
-
-
for Front Passenger Side:
-
Engage the claw to install the connector.
-
-
-
INSTALL FRONT LUMBAR POWER SEAT SWITCH (w/ Lumbar Support)
-
INSTALL FRONT SEAT CUSHION SHIELD
-
w/ Lumbar Support:
-
Engage the guide.
-
Connect the connector to the front lumbar power seat switch.
-
-
Engage the 2 claws and guide to install the front seat cushion shield.
-
Using a T20 "TORX" socket wrench, install the 2 screws.
- Torque:
- 2.0 N*m { 20 kgf*cm, 18 in.*lbf }
-
-
INSTALL VERTICAL ADJUSTING HANDLE (w/ Vertical Adjuster)
-
Using a T20 "TORX" socket wrench, install the vertical adjusting handle with the screw.
- Torque:
- 3.0 N*m { 31 kgf*cm, 27 in.*lbf }
-
-
INSTALL RECLINING ADJUSTER RELEASE HANDLE
-
Engage the claw to install the reclining adjuster release handle.
-
-
INSTALL FRONT SEAT INNER CUSHION SHIELD
-
Engage the guide to install the front seat inner cushion shield.
-
Using a T20 "TORX" socket wrench, install the 2 screws.
- Torque:
- 2.0 N*m { 20 kgf*cm, 18 in.*lbf }
-
-
CONNECT SEPARATE TYPE FRONT SEATBACK COVER
-
Connect the 2 rubber bands to connect the separate type front seatback cover.
-
-
CONNECT SEPARATE TYPE FRONT SEAT CUSHION COVER
-
Engage the 2 hooks to connect the separate type front seat cushion cover.
-
-
INSTALL FRONT SEAT INNER BELT ASSEMBLY (for Driver Side)
-
INSTALL FRONT SEAT INNER BELT ASSEMBLY (for Front Passenger Side)