REAR LIGHT ASSEMBLY REMOVAL
CAUTION / NOTICE / HINT
Tech Tips
-
Use the same procedure for the RH and LH sides.
-
The procedure described below is for the LH side.
PROCEDURE
-
REMOVE BACK DOOR UPPER TRIM PANEL ASSEMBLY (for Wagon)
-
REMOVE BACK DOOR UPPER TRIM PANEL ASSEMBLY (for Hatchback)
w/o Back Door Side Garnish: Click here
-
REMOVE BACK DOOR UPPER TRIM PANEL ASSEMBLY (for Hatchback)
w/ Back Door Side Garnish: Click here
-
REMOVE BACK DOOR SIDE GARNISH LH (for Wagon)
-
REMOVE BACK DOOR SIDE GARNISH LH (for Hatchback)
w/ Back Door Side Garnish: Click here
-
REMOVE BACK DOOR SIDE GARNISH RH (for Wagon)
Tech Tips
Use the same procedure as for the LH side.
-
REMOVE BACK DOOR SIDE GARNISH RH (for Hatchback)
w/ Back Door Side Garnish:
Tech Tips
Use the same procedure as for the LH side.
-
REMOVE DOOR PULL HANDLE (for Wagon)
-
REMOVE DOOR PULL HANDLE (for Hatchback)
-
REMOVE BACK DOOR TRIM PANEL ASSEMBLY (for Wagon)
-
REMOVE BACK DOOR TRIM PANEL ASSEMBLY (for Hatchback)
-
REMOVE REAR LIGHT ASSEMBLY
-
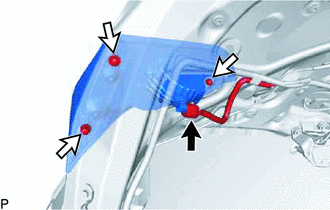
Disconnect the connector.
-
Remove the 3 nuts and rear light assembly.
-