SUB RADIATOR INSTALLATION
PROCEDURE
-
INSTALL RADIATOR ASSEMBLY
-

Temporarily install the radiator assembly with the 4 bolts.
-
Using a 10 mm union nut wrench, tighten the 2 bolts (A).
- Torque:
- 9.0 N*m { 92 kgf*cm, 80 in.*lbf }
Note
Use the torque value compensation formula to calculate the torque value for use when a torque wrench is combined with a tool such as a union nut wrench.
-
Tighten the 2 bolts (B).
- Torque:
- 9.0 N*m { 92 kgf*cm, 80 in.*lbf }
-
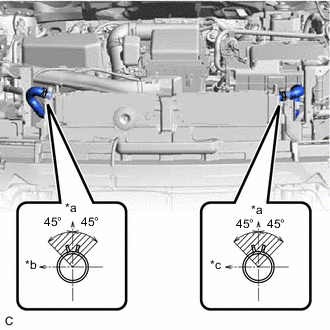
*a Upper Side *b Rear Side *c Front Side Connect the 2 water hoses to the radiator assembly and slide the 2 clips to secure them.
Note
-
Make sure that the clip is positioned as shown in the illustration.
-
Do not remove the pieces of cloth or plastic bags from the pipes and disconnected hoses until installation.
-
-
-
INSTALL NO. 2 FAN SHROUD
-
INSTALL UPPER RADIATOR SUPPORT SUB-ASSEMBLY
-
INSTALL RADIATOR SUPPORT LH
-
INSTALL RADIATOR SUPPORT RH
-
INSTALL NO. 1 INVERTER BRACKET
-
INSTALL HEADLIGHT ASSEMBLY LH
-
INSTALL HEADLIGHT ASSEMBLY RH
Tech Tips
Use the same procedure as for the LH side.
-
ADD COOLANT (for Inverter)
-
INSPECT FOR COOLANT LEAK (for Inverter)
-
INSTALL NO. 1 ENGINE UNDER COVER