HOOD LOCK CONTROL CABLE ASSEMBLY (for TMMK Made) INSTALLATION
-
INSTALL HOOD LOCK CONTROL CABLE ASSEMBLY
-
Pass the hood lock control cable assembly into the engine compartment.
-
Pass the hood lock control cable assembly through the upper radiator support.
-
Engage the hood cable grommet.
-
Engage the 5 clamps and install the hood lock control cable assembly.
-
-
INSTALL HOOD LOCK ASSEMBLY
-
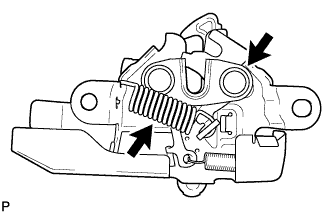
Apply MP grease to the sliding areas of the hood lock assembly.
-
Connect the hood lock control cable assembly.
-
Install the hood lock assembly with the 2 bolts and hood lock bolt.
- Torque:
- Bolt
- 7.5 N*m { 76 kgf*cm, 66 in.*lbf }
- Hood Lock Bolt
- 8.0 N*m { 82 kgf*cm, 71 in.*lbf }
-
w/ Engine Hood Courtesy Switch:
-
Connect the connector.
-
-
Install a new hood lock nut cap.
-
-
INSTALL HOOD LOCK CONTROL LEVER SUB-ASSEMBLY
-
Connect the hood lock control cable assembly and install the hood lock control lever sub-assembly.
-
-
CONNECT HOOD LOCK CONTROL LEVER SUB-ASSEMBLY
-
Engage the claw and 2 guides to connect the hood lock control lever sub-assembly.
-
-
INSTALL COWL SIDE TRIM SUB-ASSEMBLY LH
-
Engage the 2 clips.
-
Install the cowl side trim sub-assembly LH with the clip.
-
-
INSTALL FRONT DOOR SCUFF PLATE LH
-
Engage the 10 claws to install the front door scuff plate LH.
-
-
INSTALL FRONT FENDER LINER LH
Tech Tips
Use the same procedure as for the RH side Click here.
-
INSTALL FRONT WHEEL OPENING EXTENSION PAD LH
Tech Tips
Use the same procedure as for the RH side Click here.
-
INSTALL FRONT WHEEL LH
- Torque:
- 103 N*m { 1049 kgf*cm, 76 ft.*lbf }
-
INSTALL COOL AIR INTAKE DUCT SEAL
-
Install the cool air intake duct seal with the 9 clips.
-
-
ADJUST HOOD SUB-ASSEMBLY