FRONT SEATBACK HEATER (for TMC, TMMR Made Manual Seat) INSTALLATION
CAUTION:
Wear protective gloves. Sharp areas on the parts may injure your hands.
Tech Tips
-
Use the same procedure for the RH side and LH side.
-
The following procedure is for the LH side.
-
INSTALL SEPARATE TYPE FRONT SEATBACK COVER
-
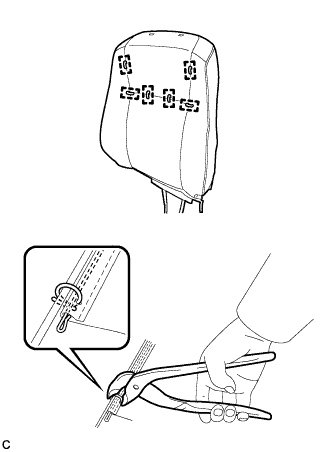
Using hog ring pliers, install the separate type front seatback cover to the separate type front seatback pad with 6 new hog rings.
Note
-
Be careful not to damage the separate type front seatback cover.
-
Be sure to securely install the hog rings as shown in the illustration while preventing wrinkles from forming on the separate type front seatback cover.
-
-
-
INSTALL SEPARATE TYPE FRONT SEATBACK COVER WITH PAD
-
Temporarily install the separate type front seatback cover with pad.
-
Engage the 4 claws to install the 2 front seat headrest supports.
-
Install the 2 brackets with the nut.
- Torque:
- 5.5 N*m { 56 kgf*cm, 49 in.*lbf }
CAUTION:
-
For vehicles with a front seat airbag assembly, the separate type front seatback cover must be securely installed. Otherwise, the front seat airbag assembly may not deploy properly.
-
Make sure that the strap is not twisted after installing the nut.
-
Install the bracket securely.
-
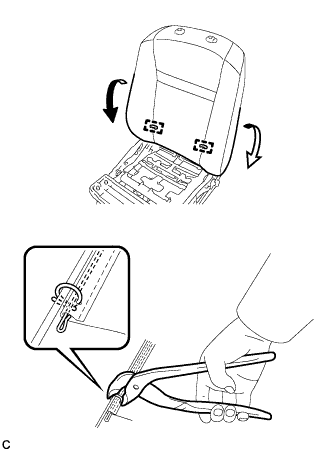
Turn back the separate type front seatback cover.
-
Using hog ring pliers, install the 2 new hog rings.
Note
-
Be careful not to damage the separate type front seatback cover.
-
Be sure to securely install the hog rings as shown in the illustration while preventing wrinkles from forming on the separate type front seatback cover.
-
-
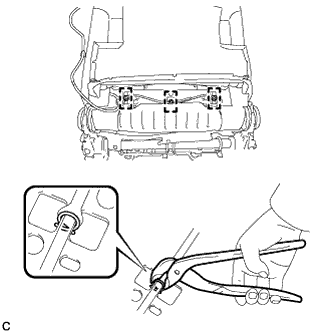
Using hog ring pliers, install 3 new hog rings.
Note
-
Be careful not to damage the separate type front seatback cover.
-
Be sure to securely install the hog rings as shown in the illustration while preventing wrinkles from forming on the separate type front seatback cover.
-
-
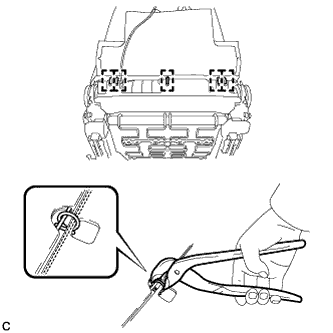
Using hog ring pliers, install 5 new hog rings.
Note
-
Be careful not to damage the separate type front seatback cover.
-
Be sure to securely install the hog rings as shown in the illustration while preventing wrinkles from forming on the separate type front seatback cover.
-
-
Engage the clamp.
-
Connect the connector.
-
-
INSTALL FRONT SEAT INNER CUSHION SHIELD (for Driver Side)
-
Engage the 5 claws and 6 guides to install the front seat inner cushion shield.
-
-
INSTALL FRONT SEAT INNER CUSHION SHIELD (for Front Passenger Side)
-
Engage the 5 claws and 7 guides to install the front seat inner cushion shield.
-
-
INSTALL FRONT SEAT CUSHION SHIELD (for Driver Side)
-
Engage the 5 claws, 6 guides and clip to install the front seat cushion shield.
-
Install the screw.
-
-
INSTALL FRONT SEAT CUSHION SHIELD (for Front Passenger Side)
-
Engage the 5 claws, 7 guides and clip to install the front seat cushion shield.
-
Install the screw.
-
-
CONNECT SEPARATE TYPE FRONT SEATBACK COVER
-
Connect the rubber band of the separate type front seatback cover.
-
-
INSTALL VERTICAL ADJUSTING HANDLE (for Driver Side)
-
Install the vertical adjusting handle with the screw.
-
-
INSTALL RECLINING ADJUSTER RELEASE HANDLE
-
Engage the claw to install the reclining adjuster release handle.
-
-
INSTALL FRONT SEAT ASSEMBLY