PARKING BRAKE PEDAL (for LHD) INSTALLATION
-
INSTALL PARKING BRAKE CONTROL PEDAL ASSEMBLY
-
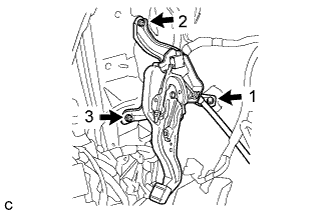
Install the parking brake control pedal assembly with the bolt and 2 nuts.
- Torque:
- 15 N*m { 153 kgf*cm, 11 ft.*lbf }
Note
Tighten the bolt and 2 nuts in the order shown in the illustration.
-
Connect the parking brake switch connector.
-
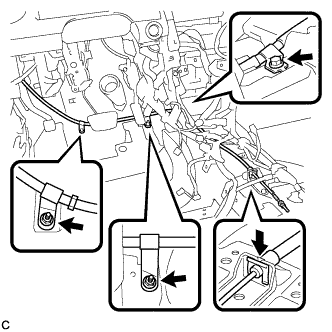
Install the No. 1 parking brake cable assembly with the bolt and 2 nuts.
- Torque:
- Bolt
- 15 N*m { 153 kgf*cm, 11 ft.*lbf }
- Nut
- 5.4 N*m { 55 kgf*cm, 48 in.*lbf }
-
Install the clip to the No. 1 parking brake cable assembly.
-
Install the floor carpet.
-
for TMC, TMMR Made:
-
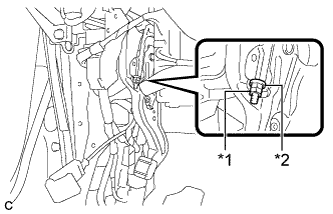
Text in Illustration *1 Lock Nut *2 Adjusting Nut Temporarily install the lock nut.
Tech Tips
After adjusting parking brake pedal travel, tighten the lock nut.
-
-
-
CONNECT NO. 4 PARKING BRAKE CABLE ASSEMBLY
-

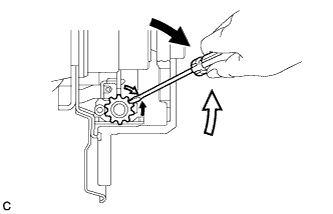
Text in Illustration *a Turn *b Hold for TMC, TMMR Made:
-
Connect the No. 4 parking brake cable assembly to the parking brake control pedal assembly as shown in the illustration.
- Torque:
- 5.4 N*m { 55 kgf*cm, 48 in.*lbf }
-
-
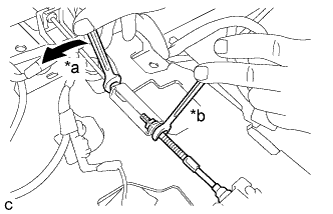
Text in Illustration *a Turn *b Hold for TMMK Made:
-
Connect the No. 4 parking brake cable assembly to the parking brake control pedal assembly as shown in the illustration.
- Torque:
- 5.4 N*m { 55 kgf*cm, 48 in.*lbf }
-
-
-
INSTALL AIRBAG SENSOR ASSEMBLY
-
for TMC, TMMR Made: Click here
-
for TMMK Made: Click here
-
-
INSTALL FLOOR CARPET BRACKET RH
-
for TMC, TMMR Made: Click here
-
for TMMK Made: Click here
-
-
INSTALL NO. 1 INDOOR ELECTRICAL KEY ANTENNA ASSEMBLY (w/ Smart Entry and Start System)
-
Connect the connector.
-
Install the No. 1 indoor electrical key antenna assembly with the bolt.
Note
Be careful when installing the No. 1 indoor electrical key antenna assembly. If the antenna is dropped, replace it with a new one.
-
Engage the clamp.
-
-
INSTALL LOWER NO. 1 INSTRUMENT PANEL AIRBAG ASSEMBLY (w/ Driver Side Knee Airbag)
-
for TMC, TMMR Made: Click here
-
for TMMK Made: Click here
-
-
INSTALL SHIFT LEVER SUPPORT
-
for U660E: Click here
-
for U760E TMC, TMMR Made: Click here
-
for U760E TMMK Made: Click here
-
for U761E: Click here
-
-
CONNECT CABLE TO NEGATIVE BATTERY TERMINAL
Note
When disconnecting the cable, some systems need to be initialized after the cable is reconnected Click here.
-
PERFORM DIAGNOSTIC SYSTEM CHECK
-
for TMC, TMMR Made: Click here
-
for TMMK Made: Click here
-
-
INSPECT SRS WARNING LIGHT
-
for TMC, TMMR Made: Click here
-
for TMMK Made: Click here
-
-
ADJUST PARKING BRAKE PEDAL TRAVEL
-
Completely release the parking brake pedal.
-
for TMC, TMMR Made:
-
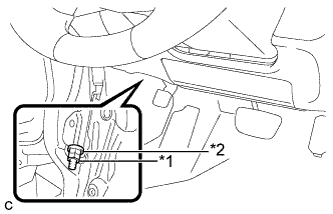
Text in Illustration *1 Lock Nut *2 Adjusting Nut Loosen the lock nut and the adjusting nut to completely release the parking brake cable.
-
-
for TMMK Made:
-
Text in Illustration *1 Lock Nut *2 Adjusting Nut Remove the lock nut and loosen the adjusting nut to completely release the parking brake cable.
Note
If the lock nut is removed or loosened, replace the lock nut with a new one.
-
-
Remove the rear wheels.
-
Temporarily install the hub nuts to the hub bolts.
Tech Tips
Securely install the hub nuts to the rear disc.
-
Remove the parking brake shoe adjusting hole plug.
-
Turn the shoe adjuster and expand the shoes until the disc locks.
Text in Illustration 
Expand 
Contract -
Turn and contract the shoe adjuster until the disc can rotate smoothly.
Standard Returns 8 notches. -
Check that there is no brake drag against the shoes.
-
Install the parking brake shoe adjusting hole plug.
-
Turn the adjusting nut until the parking brake pedal travel is corrected to be within the specified range.
Parking brake pedal travel 7 to 10 notches at 300 N (31 kgf, 67.5 lbf) -
for TMC, TMMR Made:
-
Using a wrench or an equivalent tool, hold the adjusting nut and tighten the lock nut.
- Torque:
- 9.0 N*m { 92 kgf*cm, 80 in.*lbf }
-
-
for TMMK Made:
-
Using a wrench or an equivalent tool, hold the adjusting nut and install a new lock nut.
- Torque:
- 5.0 N*m { 51 kgf*cm, 44 in.*lbf }
-
-
Operate the parking brake pedal 3 to 4 times, and check the parking brake pedal travel.
-
Check that the parking brake does not drag.
-
Remove the hub nuts from the hub bolts.
-
Install the rear wheels.
- Torque:
- 103 N*m { 1049 kgf*cm, 76 ft.*lbf }
-
-
INSPECT BRAKE WARNING LIGHT
-
When operating the parking brake pedal, check that the brake warning light illuminates.
Standard The brake warning light always illuminates at the first click.
-