CAMSHAFT OIL CONTROL SOLENOID INSTALLATION

-
INSTALL CAMSHAFT TIMING OIL CONTROL SOLENOID ASSEMBLY
-
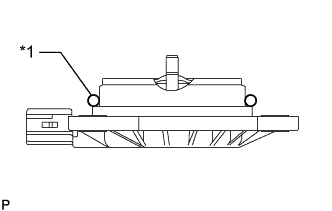
Text in Illustration *1 O-ring Apply engine oil to a new O-ring and install it to the camshaft timing oil control solenoid assembly as shown in the illustration.
Note
Do not damage the O-ring.
-
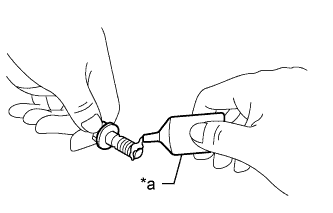
Text in Illustration *a Adhesive 1324 Apply adhesive to 2 or 3 threads of 2 new bolts.
Adhesive Toyota Genuine Adhesive 1324, Three Bond 1324 or equivalent. -
Install the camshaft timing oil control solenoid assembly to the timing chain cover sub-assembly with the 2 bolts.
- Torque:
- 10 N*m { 102 kgf*cm, 7 ft.*lbf }
Note
-
If the camshaft timing oil control solenoid assembly has been struck or dropped, replace it.
-
Make sure that the O-ring is not cracked or moved out of place when installing the camshaft timing oil control solenoid assembly.
-
Connect the camshaft timing oil control solenoid assembly connector.
-
-
INSTALL ENGINE MOVING CONTROL ROD BRACKET
-
When replacing the engine moving control rod.
-
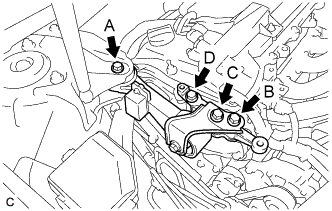
Install the engine moving control rod bracket with engine moving control rod with the 4 bolts.
- Torque:
- 38 N*m { 387 kgf*cm, 28 ft.*lbf }
Note
Temporarily tighten bolt (A) and bolt (B), and then fully tighten the 4 bolts in the order of bolt (D), bolt (C), bolt (A) and bolt (B).
-
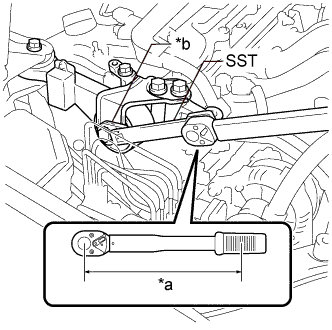
Text in Illustration *a Torque Wrench Fulcrum Length *b Union Nut Wrench Using SST and a union nut wrench (14 mm), tighten the bolt.
- SST
- 09961-00950
- Torque:
- Specified Tightening Torque
- 52 N*m { 530 kgf*cm, 38 ft.*lbf }
Note
-
Calculate the torque wrench reading when changing the fulcrum length of the torque wrench Click here.
-
When using SST (fulcrum length of 150 mm (5.91 in.)) + torque wrench (fulcrum length of 260 mm (10.2 in.)): 33 N*m (337 kgf*cm, 24 ft.*lbf)
-
-
When not replacing the engine moving control rod.
-
Install the engine moving control rod bracket with engine moving control rod with the 4 bolts.
- Torque:
- 38 N*m { 387 kgf*cm, 28 ft.*lbf }
Note
Temporarily tighten bolt (A) and bolt (B), and then fully tighten the 4 bolts in the order of bolt (D), bolt (C), bolt (A) and bolt (B).
-
-
-
INSTALL NO. 2 ENGINE MOUNTING STAY RH
-
Install the No. 2 engine mounting stay RH with the 2 bolts.
- Torque:
- 38 N*m { 387 kgf*cm, 28 ft.*lbf }
-
-
INSTALL EARTH WIRE
-
Install the earth wire with the 2 bolts.
- Torque:
- 8.0 N*m { 82 kgf*cm, 71 in.*lbf }
-
-
INSTALL NO. 1 ENGINE COVER SUB-ASSEMBLY
-
Engage the 3 grommets to install the No. 1 engine cover sub-assembly.
-