CAMSHAFT OIL CONTROL VALVE (for Intake Side) INSTALLATION

-
SET NO. 1 CYLINDER TO TDC/COMPRESSION
-
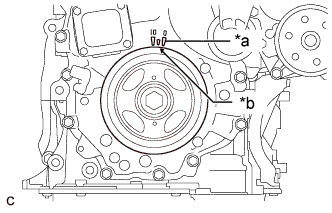
Text in Illustration *a Timing Mark "0" *b Timing Notch (Groove) Turn the crankshaft pulley until its timing notch (groove) is aligned with the timing mark "0" of the timing chain cover sub-assembly.
-
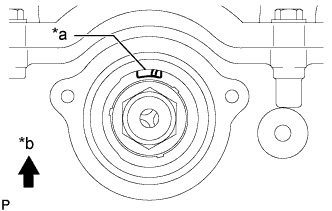
Text in Illustration *a Protrusion *b Top Check that the protrusion of the camshaft timing gear assembly is at the top.
Tech Tips
If the protrusion is not at the top, rotate the crankshaft pulley 360° clockwise and align the timing notch (groove) with the timing mark "0" again.
-
-
INSTALL CAMSHAFT TIMING GEAR BOLT

Note
There are different types of camshaft timing gear bolts. Make sure to check the identification mark to determine the tightening torque.
Identification Mark Item Identification Mark Stamp Type A A Type B D Text in Illustration *a Identification Mark Stamp
-
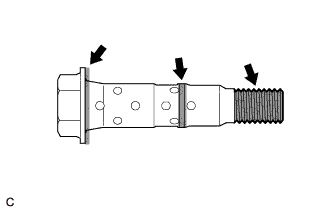
Apply engine oil to the areas of the camshaft timing gear bolt shown in the illustration.
-
Temporarily install the camshaft timing gear bolt.
- Torque:
- 10 N*m { 102 kgf*cm, 7 ft.*lbf }
Note
If the camshaft timing gear bolt has been struck or dropped, replace it.
Tech Tips
Make sure that the flange part of the camshaft timing gear bolt contacts the entire circumference of the camshaft timing gear assembly.
-
Loosen the camshaft timing gear bolt 60 to 180°.
-
Turn the crankshaft pulley clockwise 60 to 120°.
-
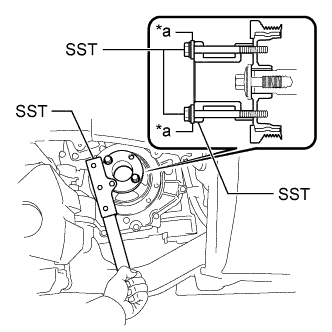
Text in Illustration *a Washers Using SST, hold the crankshaft pulley.
- SST
- 09213-54015 ( 09214-00030 )
- 09213-70011
- 09330-00021
Tech Tips
Insert a few washers (total thickness: approximately 5.0 mm (0.197 in.)) between SST (09213-70011) and SST (09214-00030).
-
Tighten the camshaft timing gear bolt.
- Torque:
- Type A
- 120 N*m { 1224 kgf*cm, 89 ft.*lbf }
- Type B
- 95 N*m { 969 kgf*cm, 70 ft.*lbf }
-
-
INSTALL CAMSHAFT TIMING OIL CONTROL SOLENOID ASSEMBLY
-
INSTALL FRONT FENDER APRON SEAL RH
-
Install the front fender apron seal RH with the 2 bolts and clip.
-
-
INSPECT FOR ENGINE OIL LEAK
-
Start the engine. Make sure that there are no engine oil leaks from the area that was worked on.
-