DIFFERENTIAL OIL SEAL REPLACEMENT

-
REMOVE FRONT WHEEL OPENING EXTENSION PAD LH
-
Remove the 3 screws and front wheel opening extension pad LH.
-
-
REMOVE ENGINE UNDER COVER LH
-
Remove the 3 screws, 2 clips and engine under cover LH.
-
-
REMOVE FRONT FENDER APRON SEAL LH
-
Remove the 2 bolts, clip and front fender apron seal LH.
-
-
DRAIN AUTOMATIC TRANSAXLE FLUID
-
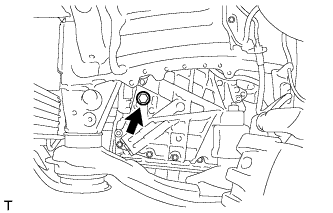
Remove the refill plug and gasket from the rear transaxle cover sub-assembly.
-

Using a 6 mm hexagon socket wrench, remove the overflow plug and gasket from the automatic transaxle oil pan sub-assembly.
-
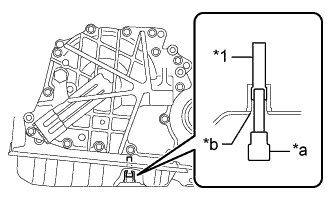
Text in Illustration *1 No. 1 Transmission Oil Filler Tube *a 6 mm Hexagon Socket Wrench *b Overflow Plug Hole Using a 6 mm hexagon socket wrench, remove the No. 1 transmission oil filler tube from the automatic transaxle oil pan sub-assembly.
-
Drain automatic transaxle fluid from the automatic transaxle assembly.
-
Text in Illustration *1 No. 1 Transmission Oil Filler Tube *a 6 mm Hexagon Socket Wrench *b Overflow Plug Hole Using a 6 mm hexagon socket wrench, install the No. 1 transmission oil filler tube to the automatic transaxle oil pan sub-assembly.
- Torque:
- 0.8 N*m { 8 kgf*cm, 7 in.*lbf }
-
Using a 6 mm hexagon socket wrench, temporarily install the gasket and overflow plug to the automatic transaxle oil pan sub-assembly.
Tech Tips
Reuse the old gasket as the overflow plug will be removed again to adjust the fluid level.
-
Temporarily install the gasket and refill plug to the automatic transaxle assembly.
Tech Tips
Reuse the old gasket as the refill plug will be removed again to adjust the fluid level.
-
-
REMOVE FRONT DRIVE SHAFT ASSEMBLY
-
REMOVE FRONT DRIVE SHAFT OIL SEAL LH
-
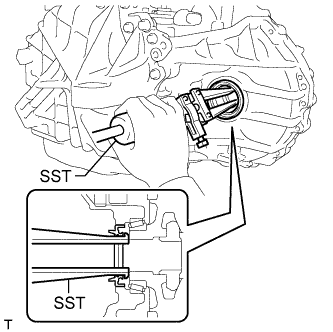
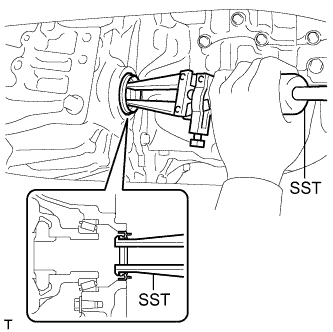
Using SST, remove the front drive shaft oil seal LH from the transaxle case sub-assembly.
- SST
- 09308-00010
Note
Be careful not to damage the transaxle case sub-assembly.
-
-
REMOVE DRIVE SHAFT BEARING BRACKET
-
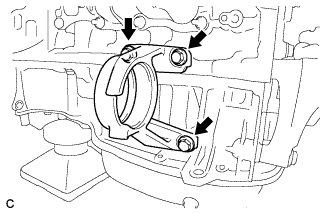
Remove the 3 bolts and drive shaft bearing bracket.
-
-
REMOVE FRONT DRIVE SHAFT OIL SEAL RH
-
Using SST, remove the front drive shaft oil seal RH from the transaxle housing.
- SST
- 09308-00010
Note
Be careful not to damage the transaxle housing.
-
-
INSTALL FRONT DRIVE SHAFT OIL SEAL RH
-
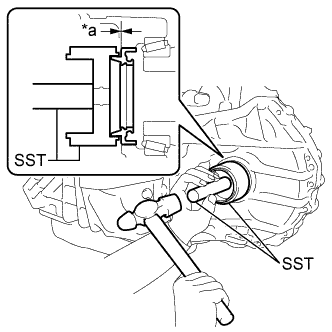
Text in Illustration *a Depth Using SST and a hammer, install a new front drive shaft oil seal RH to the transaxle housing.
- SST
- 09316-60011 ( 09316-00011 )
Standard Depth -0.5 to 0.5 mm (-0.0197 to 0.0197 in.) Note
-
Make sure that the front drive shaft oil seal RH is installed in the correct direction.
-
Do not damage the lip of the front drive shaft oil seal RH.
-
Coat the lip of the front drive shaft oil seal RH with MP grease.
-
-
INSTALL DRIVE SHAFT BEARING BRACKET
-
Install the drive shaft bearing bracket with the 3 bolts.
- Torque:
- 64 N*m { 650 kgf*cm, 47 ft.*lbf }
-
-
INSTALL FRONT DRIVE SHAFT OIL SEAL LH
-
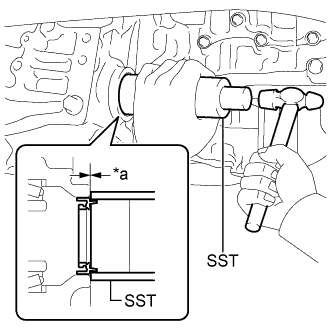
Text in Illustration *a Depth Using SST and a hammer, install a new front drive shaft oil seal LH to the transaxle case sub-assembly.
- SST
- 09316-10010
- 09950-70010 ( 09951-07150 )
Standard Depth -0.5 to 0.5 mm (-0.0197 to 0.0197 in.) Note
-
Make sure that the front drive shaft oil seal LH is installed in the correct direction.
-
Do not damage the lip of the front drive shaft oil seal LH.
-
Coat the lip of the front drive shaft oil seal LH with MP grease.
-
-
INSTALL FRONT DRIVE SHAFT HOLE SNAP RING LH
-
Install a new front drive shaft hole snap ring LH.
Note
Face the end gap of the front drive shaft hole snap ring downward.
-
-
INSTALL FRONT DRIVE SHAFT ASSEMBLY
-
ADD AUTOMATIC TRANSAXLE FLUID
-
INSTALL FRONT FENDER APRON SEAL LH
-
Install the front fender apron seal LH with the 2 bolts and clip.
-
-
INSTALL ENGINE UNDER COVER LH
-
Install the engine under cover LH with the 3 screws and 2 clips.
-
-
INSTALL FRONT WHEEL OPENING EXTENSION PAD LH
-
Install the front wheel opening extension pad LH with the 3 screws.
-