LUGGAGE COMPARTMENT DOOR OUTSIDE GARNISH INSTALLATION
PROCEDURE
-
INSTALL LUGGAGE COMPARTMENT DOOR OUTSIDE GARNISH PROTECTOR
-
Wipe off any tape adhesive residue with cleaner.
-
Remove the release paper from a new luggage compartment door outside garnish protector.
Tech Tips
After removing the release paper, keep the exposed adhesive free from foreign matter.
-
Install the new luggage compartment door outside garnish protector as shown in the illustration.
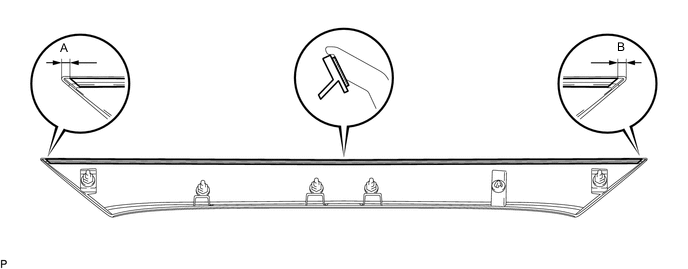
Standard Measurement Dimension Measurement A 4.5 to 5.5 mm (0.177 to 0.217 in.) B 3.0 to 9.0 mm (0.118 to 0.354 in.)
-
-
INSTALL LUGGAGE COMPARTMENT DOOR OUTSIDE GARNISH SUB-ASSEMBLY
-
Install 5 new gaskets to the luggage compartment door outside garnish sub-assembly.
-
Install a new clip to the luggage compartment door outside garnish sub-assembly.
-
Engage the clip.
-
Install the luggage compartment door outside garnish sub-assembly with the 3 nuts.
-
-
INSTALL LUGGAGE COMPARTMENT DOOR OPENING SWITCH ASSEMBLY
-
INSTALL REAR LIGHT ASSEMBLY LH
-
INSTALL REAR LIGHT ASSEMBLY RH
Tech Tips
Use the same procedure as for the LH side.