AUTOMATIC HIGH BEAM SYSTEM PRECAUTION
-
PRECAUTION FOR DISCONNECTING THE BATTERY CABLE
Note
When disconnecting the cable from the negative (-) battery terminal, initialize the following systems after the cable is reconnected.
System See Procedure Stop and Start System Simple Intelligent Parking Assist System Power Door Lock Control System (for Hatchback, Wagon) -
EXPRESSIONS OF IGNITION SWITCH
The type of ignition switch used on this model differs according to the specifications of the vehicle. The expressions listed in the table below are used in this section.
Expression Switch Type Ignition Switch (Position) Engine Switch (Condition) Ignition Switch off LOCK Off (Lock) Ignition Switch ACC ACC On (ACC) Ignition Switch ON ON On (IG) Engine Start START On (Start) -
PRECAUTION FOR AUTOMATIC HIGH BEAM SYSTEM
-
General Description
The automatic high beam system is a system that helps ensure visibility by automatically turning the high beam headlights on and off. Additionally, due to control limitations of the automatic high beam system, it may be necessary to manually turn the high beam headlights on and off. For safety reasons, make sure to turn the high beam headlights on and off manually according to the driving conditions.
-
Conditions Unsuitable for Using Automatic High Beam System
Under the following conditions, the automatic high beam system might not detect other vehicles or lights correctly, or the high beam headlights might cause glare or flash pedestrians or the occupants of other vehicles. Manual operation should be considered.
Factor Condition Weather/Climate When driving in bad weather (rain, snow, fog, sandstorms, etc.). Front windshield
-
When the windshield glass is not clear (ice, snow or frost on the glass).
-
When the windshield glass is dirty (sand, mud, water stains or bugs on the glass).
-
When the windshield glass is cracked.
-
When the windshield glass is fogged-up.
-
When the windshield glass has a film attached.
-
When an object on the instrument panel reflects off of the windshield glass.
-
When any other abnormal conditions exist with the windshield glass.
Pre-crash safety city sensor
-
When the pre-crash safety city sensor or its built-in camera is deformed.
-
When the pre-crash safety city sensor is dirty.
-
When any other abnormal conditions exist with the pre-crash safety city sensor.
Nearby vehicles or lights
-
When lights similar to headlights or taillights are in the vicinity of the vehicle.
-
When a nearby vehicle has no lights or its lights are off.
-
When a vehicle in front has misaligned lights, or its lights are changing color.
-
When a vehicle in front has extremely dirty headlights or taillights.
Road conditions
-
When driving in areas where the conditions often change between bright and dark.
-
When driving on hilly roads.
-
When driving on winding roads or around sharp curves.
-
When driving on bumpy roads (cobblestone paving, gravel roads, rough unpaved roads, etc.).
-
When highly reflective objects are in front of the vehicle (mirrors, road signs, etc.).
Own vehicle
-
When the headlights are damaged, deformed or dirty.
-
When the vehicle posture is abnormal (posture has changed due to the vehicle being fully loaded, a trailer being towed, road conditions etc.).
-
When the vehicle has other malfunctions or it has been modified.
Automatic high beam system Malfunction:
When the automatic high beam indicator light on the combination meter assembly is off and "Headlight System Malfunction Visit Your Dealer" is displayed on the multi-information display.
Others:
-
When the automatic high beam system does not seem to be turning the high beam headlights on and off properly.
-
When the automatic high beam system is frequently turning the high beam headlights on and off.
-
When the glare from the high beam headlights would disturb pedestrians or the drivers of other vehicles.
-
-
Windshield Replacement Precautions
The timing of the high beam headlights turning on and off differs depending on the light transmission rate of the glass. For this reason, when replacing the windshield, replace it with an original equipment part.
-
Precaution For Replacing Pre-crash Safety City Sensor
-
When the pre-crash safety city sensor is replaced with a new one or if it is removed and reinstalled, camera beam axis learning must be performed. If camera beam axis learning is not performed and the pre-crash safety system is operated, a DTC will be stored.
-
When replacing the pre-crash safety city sensor, replace it with a new one. If a pre-crash safety city sensor which was installed to another vehicle is used, the information stored in the pre-crash safety city sensor will not match the information from the vehicle and, as a result, a DTC may be stored.
-
When replacing or removing and installing the pre-crash safety city sensor, do not damage the camera lens or allow it to become contaminated with foreign matter.
-
Do not reuse a pre-crash safety city sensor that has been dropped or subjected to a strong impact.
-
-
-
PRECAUTION FOR REPLACING WINDSHIELD GLASS
-
When replacing the windshield glass of a vehicle equipped with a pre-crash safety city sensor, make sure to use a Toyota genuine part. If a non-Toyota genuine part is used, the pre-crash safety city sensor may not be able to be installed due to a missing bracket or the pre-crash safety system may not operate properly due to a difference in the transmissivity or black ceramic border.
-
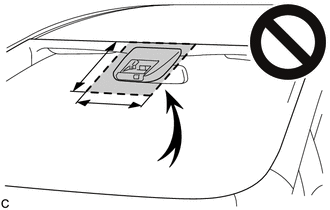
Do not attach stickers, including transparent stickers, or other items to the outer side of the windshield glass assembly within the area shown in the illustration in front of the pre-crash safety city sensor.
-
Vertical range: from the top of the windshield glass assembly to approximately 10 cm (3.94 in.) below the bottom of the pre-crash safety city sensor.
-
Horizontal range: approximately 10 cm (3.94 in.) to the left and right of the center of the pre-crash safety city sensor.
-
-
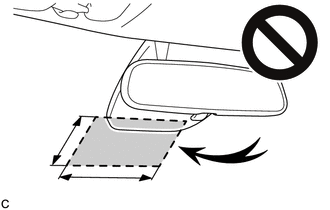
Do not install or attach anything to the inner side of the windshield glass assembly within the area shown in the illustration below the pre-crash safety city sensor.
-
Vertical range: from the bottom of the pre-crash safety city sensor to approximately 10 cm (3.94 in.) below the pre-crash safety city sensor.
-
Horizontal range: approximately 10 cm (3.94 in.) to the left and right of the center of the pre-crash safety city sensor.
-
-
Do not attach window tint to the windshield glass assembly.
-