ROOF HEADLINING(for Wagon) REMOVAL
PROCEDURE
-
REMOVE DECK BOARD SUB-ASSEMBLY (w/ Deck Board)
-
Remove the deck board sub-assembly.
-
-
REMOVE DECK BOARD ASSEMBLY (w/ Deck Board)
-
Remove the deck board assembly.
-
-
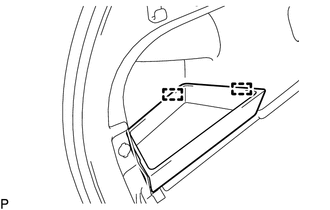
REMOVE FRONT DECK FLOOR BOX (w/ Deck Board)
-
Remove the front deck floor box.
-
-
REMOVE REAR FLOOR MAT ASSEMBLY
-
Remove the rear floor mat assembly.
-
-
REMOVE NO. 3 DECK BOARD SUB-ASSEMBLY (w/ Deck Board)
-
Remove the No. 3 deck board sub-assembly.
-
-
REMOVE DECK FLOOR BOX LH (w/o Woofer)
-
Disengage the 2 guides to remove the deck floor box LH.
-
-
REMOVE NO. 2 DECK BOARD SUB-ASSEMBLY (w/ Deck Board)
-
Remove the No. 2 deck board sub-assembly.
-
-
REMOVE DECK FLOOR BOX RH
-
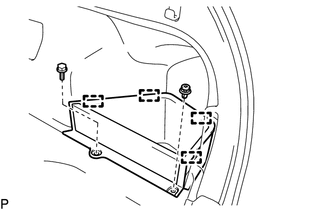
Remove the bolt and clip.
-
Disengage the 4 guides to remove the deck floor box RH.
-
-
REMOVE TONNEAU COVER ASSEMBLY
-
Remove the tonneau cover assembly.
-
-
REMOVE ROOM PARTITION NET ASSEMBLY (w/ Partition Net)
-
Remove the room partition net assembly.
-
-
REMOVE REAR DECK TRIM COVER
-
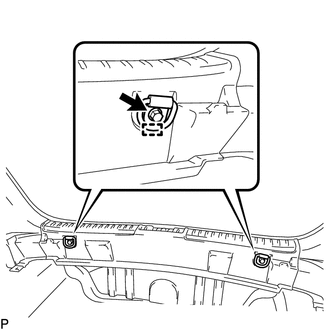
Remove the 2 bolts.
-
Disengage the 2 guides to remove the 2 luggage hold belt striker assemblies.
-
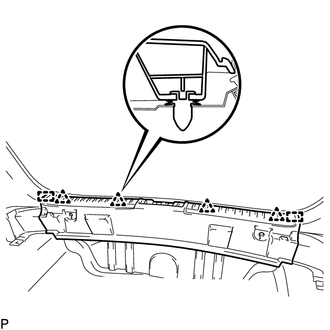
Disengage the 4 clips and 2 guides to remove the rear deck trim cover.
-
-
REMOVE REAR SEAT ASSEMBLY
-
REMOVE FRONT DOOR SCUFF PLATE LH
-
REMOVE COWL SIDE TRIM BOARD LH
-
REMOVE FRONT DOOR OPENING TRIM WEATHERSTRIP LH
-
REMOVE FRONT PILLAR GARNISH LH
-
REMOVE REAR DOOR SCUFF PLATE LH
-
REMOVE REAR DOOR OPENING TRIM WEATHERSTRIP LH
-
REMOVE LAP BELT OUTER ANCHOR COVER (for LH Side)
-
DISCONNECT FRONT SEAT OUTER BELT ASSEMBLY LH
-
REMOVE CENTER PILLAR LOWER GARNISH LH
-
REMOVE CENTER PILLAR GARNISH ASSEMBLY LH
-
REMOVE FRONT DOOR SCUFF PLATE RH
Tech Tips
Use the same procedure as for the LH side.
-
REMOVE COWL SIDE TRIM BOARD RH
Tech Tips
Use the same procedure as for the LH side.
-
REMOVE FRONT DOOR OPENING TRIM WEATHERSTRIP RH
Tech Tips
Use the same procedure as for the LH side.
-
REMOVE FRONT PILLAR GARNISH RH
Tech Tips
Use the same procedure as for the LH side.
-
REMOVE REAR DOOR SCUFF PLATE RH
Tech Tips
Use the same procedure as for the LH side.
-
REMOVE REAR DOOR OPENING TRIM WEATHERSTRIP RH
Tech Tips
Use the same procedure as for the LH side.
-
REMOVE LAP BELT OUTER ANCHOR COVER (for RH Side)
Tech Tips
Use the same procedure as for the LH side.
-
DISCONNECT FRONT SEAT OUTER BELT ASSEMBLY RH
Tech Tips
Use the same procedure as for the LH side.
-
REMOVE CENTER PILLAR LOWER GARNISH RH
Tech Tips
Use the same procedure as for the LH side.
-
REMOVE CENTER PILLAR GARNISH ASSEMBLY RH
Tech Tips
Use the same procedure as for the LH side.
-
REMOVE REAR SEATBACK HINGE SUB-ASSEMBLY LH
-
Loosen the bolt.
-
Disengage the guide to remove the rear seatback hinge sub-assembly LH.
-
-
REMOVE REAR SEAT SIDE GARNISH LH
-
REMOVE NO. 2 DECK SIDE TRIM HOOK (for LH Side)
-

Remove the screw.
-
Disengage the pin to remove the No. 2 deck side trim hook.
-
-
REMOVE RECLINING REMOTE CONTROL BEZEL LH
-

Using a moulding remover, disengage the 3 claws and remove the reclining remote control bezel LH.
-
-
REMOVE DECK TRIM SIDE PANEL ASSEMBLY LH
-
Remove the bolt.
-
Disengage the guide to remove the luggage hold belt striker assembly.
-
w/ Deck Board:
-
Remove the clip.
-
Disengage the 2 clips to remove the deck side trim box LH.
-
-
Remove the 2 bolts.
*A w/o Deck Board *B w/ Deck Board -
Disengage the 7 claws and 4 clips.
-
Disconnect each connector.
-
Disengage the clamp to remove the deck trim side panel assembly LH.
-
-
REMOVE ROOF SIDE INNER GARNISH ASSEMBLY LH
-
Remove the 2 screws.
-
Disengage the 2 claws and 4 clips to remove the roof side inner garnish assembly LH.
-
Remove the clip (A) from the roof side inner garnish assembly LH.
-
-
REMOVE REAR SEATBACK HINGE SUB-ASSEMBLY RH
Tech Tips
Use the same procedure as for the LH side.
-
REMOVE REAR SEAT SIDE GARNISH RH
Tech Tips
Use the same procedure as for the LH side.
-
REMOVE NO. 2 DECK SIDE TRIM HOOK (for RH Side)
Tech Tips
Use the same procedure as for the LH side.
-
REMOVE RECLINING REMOTE CONTROL BEZEL RH
Tech Tips
Use the same procedure as for the LH side.
-
REMOVE DECK TRIM SIDE PANEL ASSEMBLY RH
Tech Tips
Use the same procedure as for the LH side.
-
REMOVE ROOF SIDE INNER GARNISH ASSEMBLY RH
Tech Tips
Use the same procedure as for the LH side.
-
REMOVE UPPER INSTRUMENT PANEL
-
REMOVE INNER REAR VIEW MIRROR STAY HOLDER COVER (w/ EC Mirror)
-
REMOVE RAIN SENSOR COVER (w/ Rain Sensor)
-
REMOVE MAP LIGHT ASSEMBLY
-
REMOVE NO. 1 ROOM LIGHT ASSEMBLY (for Slide Switch Type)
-
REMOVE ASSIST GRIP ASSEMBLY
-
REMOVE REAR ASSIST GRIP ASSEMBLY LH
-
REMOVE REAR ASSIST GRIP ASSEMBLY RH
Tech Tips
Use the same procedure as for the LH side.
-
REMOVE VISOR ASSEMBLY LH
-
REMOVE VISOR ASSEMBLY RH
Tech Tips
Use the same procedure as for the LH side.
-
REMOVE REAR ROOM PARTITION NET HOOK LH
Tech Tips
Use the same procedure for the front side and rear side.
-
Open the cover.
-

Remove the screw.
-
Disengage the claw and guide to remove the rear room partition net hook LH.
-
-
REMOVE REAR ROOM PARTITION NET HOOK RH
Tech Tips
Use the same procedure as for the LH side.
-
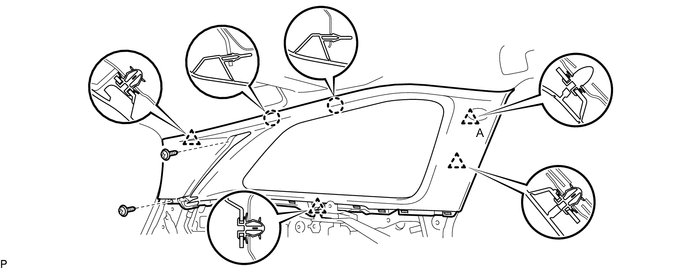
REMOVE ROOF HEADLINING ASSEMBLY (for Standard Roof)
-
w/ EC Mirror:
-
Disconnect the connector.
-
-
w/ Rain Sensor:
-
Disconnect the connector.
-
-
for LHD Front Pillar LH Side:
-
Disconnect the connector.
-
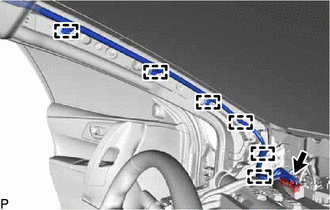
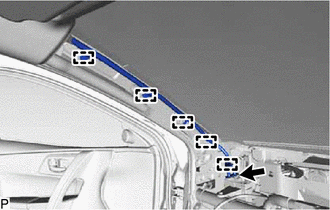
Using a clip remover, disengage the 6 clamps.
-
-
for RHD Front Pillar LH Side:
-
Disconnect the connector.
-
Using a clip remover, disengage the 5 clamps.
-
-
for Front Pillar RH Side:
-
Disconnect the connector.
-
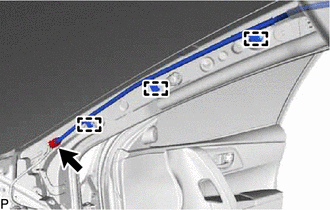
Using a clip remover, disengage the 3 clamps.
-
-
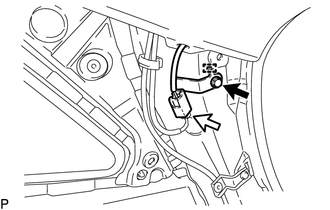
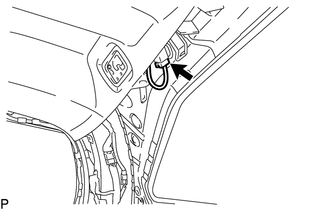
for Rear Pillar RH Side:
-
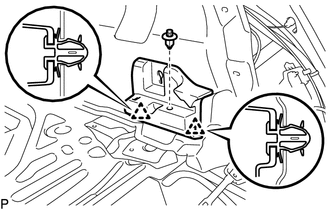
Remove the bolt.
-
Disengage the guide to disconnect the connector bracket.
-
Disconnect the connector.
-
-
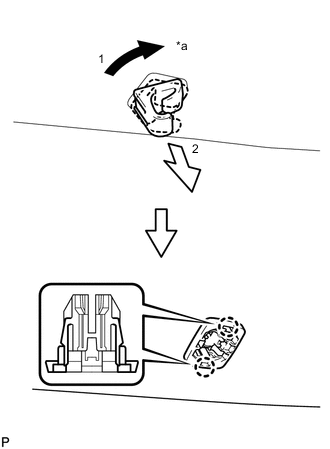
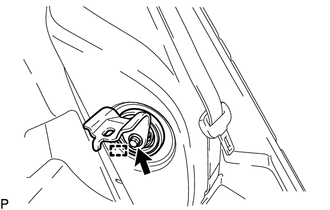
*a 45° Turn the visor holder approximately 45° and pull it out as indicated by the arrows, in the order shown in the illustration.
Tech Tips
Use the same procedure for the RH side and LH side.
-
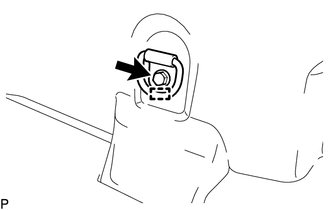
Disengage the 2 claws to remove the visor holder.
Tech Tips
Use the same procedure for the RH side and LH side.
-
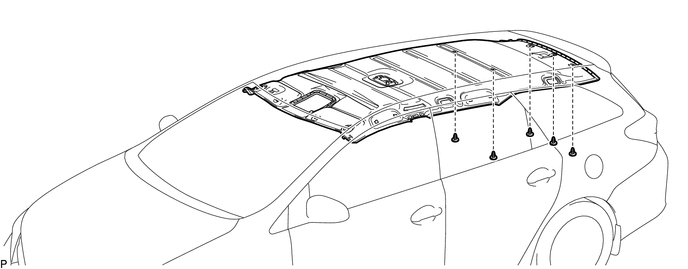
w/o Vanity Light:
-
Using a clip remover, remove the 5 clips.
-
-
w/ Vanity Light:
-
Using a clip remover, remove the 5 clips.
-
-
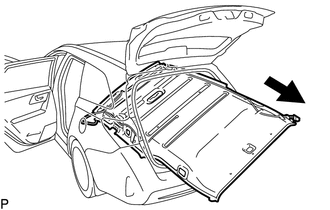
Remove the roof headlining assembly from the vehicle through the back door as shown in the illustration.
Note
Do not damage the roof headlining assembly or vehicle interior.
-
-
REMOVE ROOF HEADLINING ASSEMBLY (for Glass Roof)
-
w/ EC Mirror:
-
Disconnect the connector.
-
-
w/ Rain Sensor:
-
Disconnect the connector.
-
-
for LHD Front Pillar LH Side:
-
Disconnect the connector.
-
Using a clip remover, disengage the 6 clamps.
-
-
for RHD Front Pillar LH Side:
-
Disconnect the connector.
-
Using a clip remover, disengage the 5 clamps.
-
-
for Front Pillar RH Side:
-
Disconnect the connector.
-
Using a clip remover, disengage the 3 clamps.
-
-
for Rear Pillar LH Side:
-
Disconnect the connector.
-
-
for Rear Pillar RH Side:
-
Remove the bolt.
-
Disengage the guide to disconnect the connector bracket.
-
Disconnect the connector.
-
-
*a 45° Turn the visor holder approximately 45° and pull it out as indicated by the arrows, in the order shown in the illustration.
Tech Tips
Use the same procedure for the RH side and LH side.
-
Disengage the 2 claws to remove the visor holder.
Tech Tips
Use the same procedure for the RH side and LH side.
-
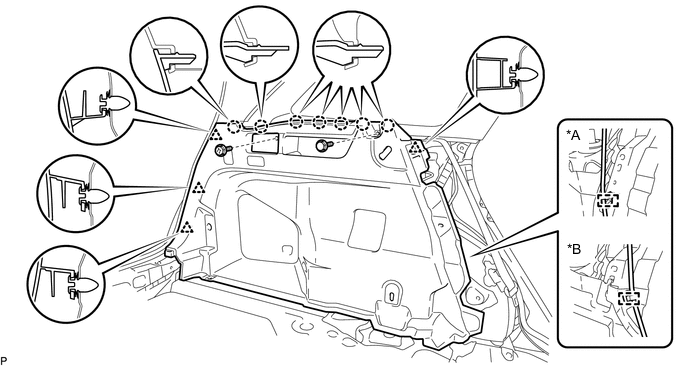
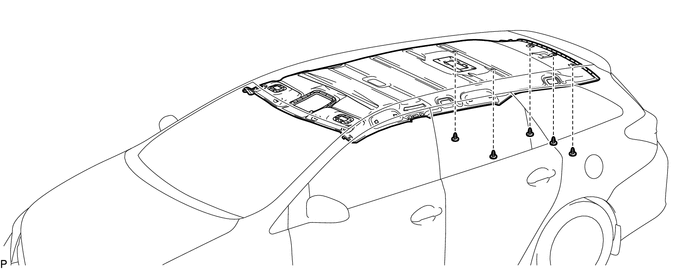
Using a clip remover, remove the 3 clips.
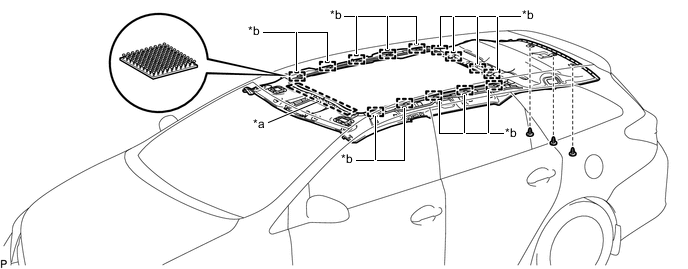
*a Guide *b Fastener -
Disengage the 14 fasteners.
Tech Tips
Disengage the fasteners from the rear side of the roof headlining assembly.
-
Pull the roof headlining assembly toward the rear of the vehicle to disengage the guide.
-
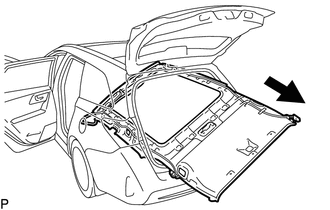
Remove the roof headlining assembly from the vehicle through the back door as shown in the illustration.
Note
Do not damage the roof headlining assembly or vehicle interior.
-