TRANSMISSION CONTROL CABLE REMOVAL
PROCEDURE
-
PRECAUTION
Note
After turning the ignition switch off, waiting time may be required before disconnecting the cable from the negative (-) battery terminal. Therefore, make sure to read the disconnecting the cable from the negative (-) battery terminal notices before proceeding with work.
-
SECURE VEHICLE
-
Fully apply the parking brake and chock a wheel.
CAUTION:
-
Make sure to apply the parking brake and chock a wheel before performing this procedure.
-
If the vehicle is not secure the vehicle may suddenly move, possibly resulting in an accident or serious injury.
-
-
-
DISCONNECT CABLE FROM NEGATIVE BATTERY TERMINAL
Note
When disconnecting the cable, some systems need to be initialized after the cable is reconnected.
-
REMOVE NO. 1 ENGINE UNDER COVER
-
REMOVE FRONT EXHAUST PIPE ASSEMBLY
-
REMOVE NO. 1 ENGINE COVER
-
DRAIN ENGINE COOLANT
-
REMOVE BATTERY
-
REMOVE BATTERY CARRIER
-
REMOVE AIR CLEANER CAP SUB-ASSEMBLY WITH AIR CLEANER HOSE ASSEMBLY
-
REMOVE AIR CLEANER CASE SUB-ASSEMBLY
-
DISCONNECT ENGINE WIRE
-
REMOVE NO. 4 WATER BY-PASS HOSE
-
DISCONNECT COMPRESSOR OUTLET ELBOW
-
SEPARATE NO. 1 AIR TUBE ASSEMBLY
-
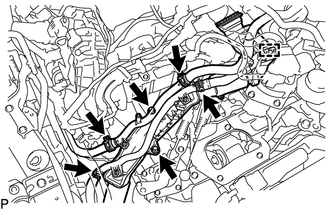
Slide the clamp and disconnect the water by-pass hose assembly from the No. 2 radiator pipe.
-
Slide the clamp and disconnect the radiator hose sub-assembly from the No. 1 radiator pipe.
-
Disengage the clamp to disconnect the water hose sub-assembly from the compressor outlet elbow.
-
Slide the clamp and disconnect the water hose sub-assembly from the No. 1 radiator pipe.
-
Slide the clamp and disconnect the outlet heater water hose from the No. 2 radiator pipe.
-
Remove the 2 bolts to separate the No. 1 air tube assembly from the manual transaxle assembly.
-
-
REMOVE FRONT NO. 1 FLOOR HEAT INSULATOR
-
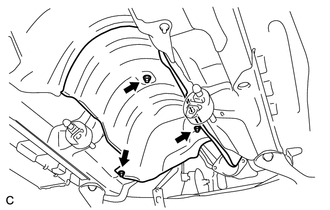
Remove the 3 nuts and front No. 1 floor heat insulator from the vehicle body.
-
-
REMOVE REAR CONSOLE BOX ASSEMBLY
-
REMOVE TRANSMISSION CONTROL CABLE ASSEMBLY
-
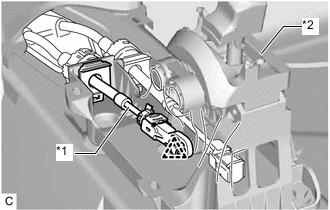
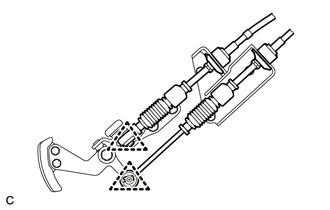
*1 Transmission Control Select Cable *2 Floor Shift Lever Assembly Remove the clip and disconnect the transmission control select cable from the floor shift lever assembly.
-
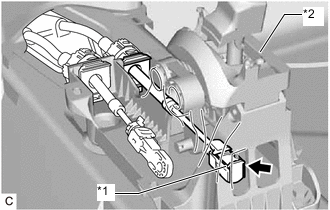
*1 Transmission Control Shift Cable *2 Floor Shift Lever Assembly Disconnect the transmission control shift cable from the floor shift lever assembly.
-
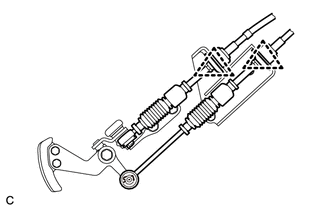
Disengage the 2 claws and disconnect the transmission control cable assembly from the floor shift lever assembly.
-
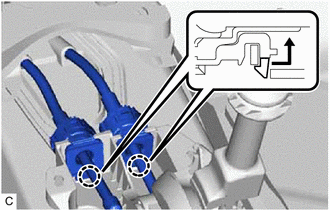
Remove the 2 clips and disconnect the transmission control cable assembly from the manual transaxle assembly.
-
Remove the 2 clips and disconnect the transmission control cable assembly from the control cable bracket.
-
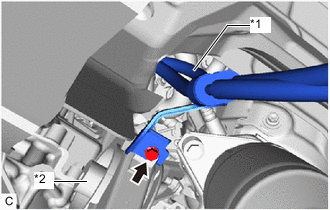
*1 Transmission Control Cable Assembly *2 Rear Engine Mounting Insulator Remove the bolt and disconnect the transmission control cable assembly from the rear engine mounting insulator.
-
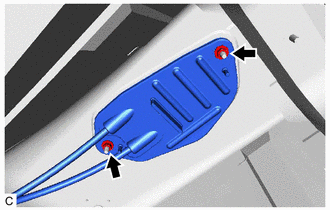
Remove the 2 nuts and transmission control cable assembly from the vehicle body.
-