PERMANENTLY ENGAGED GEAR MECHANISM ON-VEHICLE INSPECTION
PROCEDURE
-
INSPECT FOR NOISE
-
Start the engine and check for noise from the joint between the engine and transmission.
Tech Tips
Noise may occur if the crankshaft bearing or the one-way clutch assembly is malfunctioning or because of ring gear sub-assembly and flywheel sub-assembly interference due to a broken snap ring.
-
-
INSPECT PERMANENTLY ENGAGED GEAR MECHANISM
Note
When performing this inspection, use caution to prevent burning yourself. Engine-related components are extremely hot immediately after the engine is stopped.
-
Remove the starter assembly.
-
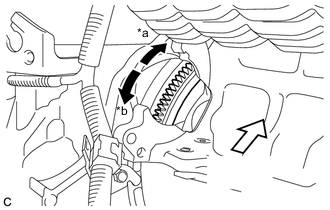
*a Lock *b Free 
Vehicle Front Side Turn the ring gear sub-assembly in the direction indicated by the arrows and check if it turns freely and locks, as shown in the illustration.
Standard When the permanently engaged gear mechanism is functioning properly, the gear turns freely counterclockwise and locks when turned clockwise, as shown in the illustration. Symptom Suspected Area See page The ring gear sub-assembly turns freely in both directions. One-way clutch assembly Noise occurs or the ring gear sub-assembly does not turn freely. One-way clutch assembly Crankshaft bearing Ring gear sub-assembly The ring gear sub-assembly turns, but has excessive axial looseness. Ring gear sub-assembly The ring gear sub-assembly does not turn. One-way clutch assembly Crankshaft bearing Ring gear sub-assembly Tech Tips
-
If it is difficult to see the ring gear sub-assembly, use a mirror or other similar tool.
-
If it is difficult to turn the ring gear sub-assembly by hand, lightly push on the gear using a screwdriver or other similar tool.
-
If excess resistance is felt, check for any foreign matter jammed in each part. Inspect each part and replace them as necessary.
-
If any malfunction is found and part replacement is required, replace the inner oil seal and rear engine oil seal as a set.
-
Since the starter may malfunction if any component listed in "Suspected Area" is broken, inspect the starter (see Starter Inspection).
-
-
Install the starter assembly.
-
-
INSPECT FOR OIL LEAK
-
Check for oil leaks from the joint between the engine and transmission.
Tech Tips
-
If any oil leaks are found, inspect the leakage point. If necessary, replace the inner oil seal and rear engine oil seal as a set.
-
If the snap ring is not installed correctly or damaged, the ring gear sub-assembly may move out from its original position and result in an oil leak. Therefore, it is necessary to confirm that the snap ring is installed correctly and undamaged when replacing the oil seals.
-
-