AUTOMATIC HIGH BEAM SYSTEM PRECAUTION
-
IGNITION SWITCH EXPRESSION
Tech Tips
The type of ignition switch used on this model differs according to the specifications of the vehicle. The expressions listed in the table below are used in this section.
Expression Ignition Switch
(Position)
Engine Switch
(Condition)
Ignition Switch off LOCK Off (Lock) Ignition Switch ACC ACC On (ACC) Ignition Switch ON ON On (IG) Engine Start START On (Start) -
PRECAUTION FOR AUTOMATIC HIGH BEAM SYSTEM
-
Precautions for replacing windshield
-
The timing for switching high and low beams varies depending on the light transmission of the windshield, so be sure to replace the windshield with genuine parts.
-
When performing removal, installation or replacement of the windshield glass, it is necessary to perform "Recognition Camera/ Target Position Memory" and "Beam Axis Learning" Click here.
-
When replacing the windshield glass of a vehicle equipped with a pre-collision city sensor, make sure to use a Toyota genuine part. If a non-Toyota genuine part is used, the pre-collision city sensor may not be able to be installed due to a missing bracket or the pre-collision system may not operate properly due to a difference in the transmissivity or black ceramic border.
-
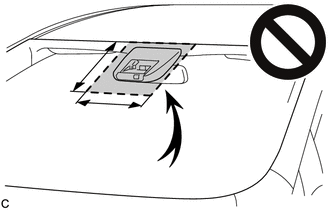
Do not attach stickers, including transparent stickers, or other items to the outer side of the windshield glass within the area shown in the illustration in front of the pre-collision city sensor.
-
Vertical range: from the top of the windshield glass to approximately 10 cm (3.94 in.) below the bottom of the pre-collision city sensor.
-
Horizontal range: approximately 10 cm (3.94 in.) to the left and right of the center of the pre-collision city sensor.
-
-
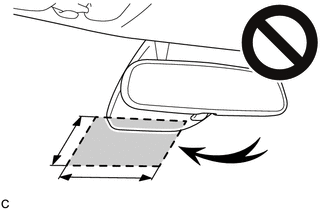
Do not install or attach anything to the inner side of the windshield glass within the area shown in the illustration below the pre-collision city sensor.
-
Vertical range: from the bottom of the pre-collision city sensor to approximately 10 cm (3.94 in.) below the pre-collision city sensor.
-
Horizontal range: approximately 10 cm (3.94 in.) to the left and right of the center of the pre-collision city sensor.
-
-
Do not attach window tint to the windshield
-
-
-
PRECAUTION FOR REPLACING PRE-COLLISION CITY SENSOR
-
Be careful of burns and injuries, as the pre-collision city sensor reaches high temperatures.
-
When replacing the pre-collision city sensor with a new one, it is necessary to perform "Recognition Camera/Target Position Memory" and "Beam Axis Learning" (See page ). If the system is operated when "Recognition Camera/Target Position Memory" and "Beam Axis Learning" have not been performed, C1AA9 is output Click here.
-
When replacing the pre-collision city sensor, replace it with a new one. If an ECU which was installed to another vehicle is used, the information stored in the pre-collision city sensor will not match the information from the vehicle and, as a result, a DTC may be output.
-
When replacing or removing and installing the pre-collision city sensor, do not damage the camera lens or allow it to become contaminated with foreign matter.
-
Do not reuse a pre-collision city sensor that has been dropped or subjected to a strong impact.
-