SEAT BELT WARNING LIGHT(for Rear) INSPECTION
PROCEDURE
-
INSPECT TELLTALE LIGHT ASSEMBLY
-
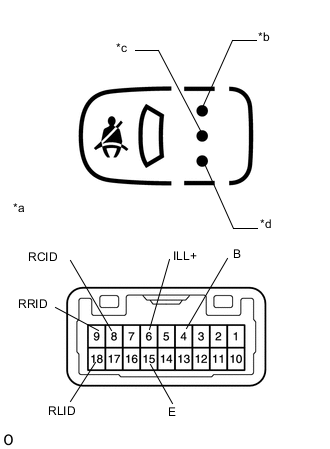
Text in Illustration *a Component without harness connected
(Telltale Light Assembly)
*b Rear No. 1 seat RH indicator *c Rear No. 1 center seat indicator *d Rear No. 1 seat LH indicator w/o Rear No. 2 Seat:
-
Inspect the indicator operation.
Apply battery voltage to the telltale light assembly connector, and check that the telltale light assembly indicator illuminates.
OK Measurement Condition Specified Condition Battery positive (+) → Terminal 4 (B)
Battery negative (-) → Terminal 8 (RCID)
Rear No. 1 center seat indicator illuminates Battery positive (+) → Terminal 4 (B)
Battery negative (-) → Terminal 9 (RRID)
Rear No. 1 seat RH indicator illuminates Battery positive (+) → Terminal 4 (B)
Battery negative (-) → Terminal 18 (RLID)
Rear No. 1 seat LH indicator illuminates If the result is not as specified, replace the telltale light assembly.
-
Inspect the illumination operation.
Apply battery voltage to the telltale light assembly connector, and check that the telltale light assembly illuminates.
OK Measurement Condition Specified Condition Battery positive (+) → Terminal 6 (ILL+)
Battery negative (-) → Terminal 15 (E)
Illuminates If the result is not as specified, replace the telltale light assembly.
-
-
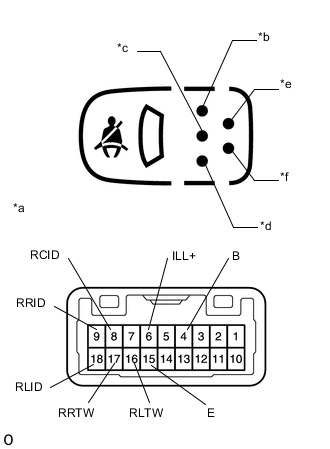
Text in Illustration *a Component without harness connected
(Telltale Light Assembly)
*b Rear No. 1 seat RH indicator *c Rear No. 1 center seat indicator *d Rear No. 1 seat LH indicator *e Rear No. 2 seat RH indicator *f Rear No. 2 seat LH indicator w/ Rear No. 2 Seat:
-
Inspect the indicator operation.
Apply battery voltage to the telltale light assembly connector, and check that the telltale light assembly indicator illuminates.
OK Measurement Condition Specified Condition Battery positive (+) → Terminal 4 (B)
Battery negative (-) → Terminal 8 (RCID)
Rear No. 1 center seat indicator illuminates Battery positive (+) → Terminal 4 (B)
Battery negative (-) → Terminal 9 (RRID)
Rear No. 1 seat RH indicator illuminates Battery positive (+) → Terminal 4 (B)
Battery negative (-) → Terminal 16 (RLTW)
Rear No. 2 seat LH indicator illuminates Battery positive (+) → Terminal 4 (B)
Battery negative (-) → Terminal 17 (RRTW)
Rear No. 2 seat RH indicator illuminates Battery positive (+) → Terminal 4 (B)
Battery negative (-) → Terminal 18 (RLID)
Rear No. 1 seat LH indicator illuminates If the result is not as specified, replace the telltale light assembly.
-
Inspect the illumination operation.
Apply battery voltage to the telltale light assembly connector, and check that the telltale light assembly illuminates.
OK Measurement Condition Specified Condition Battery positive (+) → Terminal 6 (ILL+)
Battery negative (-) → Terminal 15 (E)
Illuminates If the result is not as specified, replace the telltale light assembly.
-
-