POWER WINDOW REGULATOR MOTOR(for Rear Door) REMOVAL
CAUTION / NOTICE / HINT
Tech Tips
-
Use the same procedures for the LH side and RH side.
-
The procedures listed below are for the LH side.
PROCEDURE
-
REMOVE UPPER RADIATOR SUPPORT SEAL
-
DISCONNECT CABLE FROM NEGATIVE BATTERY TERMINAL
CAUTION:
Wait at least 90 seconds after disconnecting the cable from the negative (-) battery terminal to disable the SRS system.
Note
When disconnecting the cable, some systems need to be initialized after the cable is reconnected Click here.
-
REMOVE REAR DOOR INSIDE HANDLE BEZEL PLUG LH
-
REMOVE REAR DOOR UPPER ARMREST BASE PANEL LH
-
REMOVE REAR DOOR TRIM COVER
-
REMOVE COURTESY LIGHT ASSEMBLY
-
REMOVE DOOR ASSIST GRIP COVER LH
-
REMOVE REAR DOOR TRIM BOARD SUB-ASSEMBLY LH
-
REMOVE REAR DOOR INNER GLASS WEATHERSTRIP LH
-
REMOVE REAR SPEAKER SET
-
REMOVE REAR DOOR SERVICE HOLE COVER LH
-
REMOVE REAR DOOR GLASS RUN LH
-
REMOVE REAR DOOR REAR LOWER WINDOW FRAME SUB-ASSEMBLY LH
-
REMOVE REAR DOOR QUARTER WINDOW GLASS LH
-
REMOVE REAR DOOR GLASS SUB-ASSEMBLY LH
-
REMOVE REAR DOOR WINDOW REGULATOR SUB-ASSEMBLY LH
-
REMOVE POWER WINDOW REGULATOR MOTOR ASSEMBLY LH
-
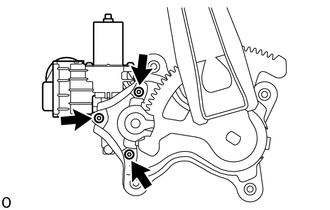
Using a T25 "TORX" driver, remove the 3 screws and power window regulator motor assembly LH.
Note
Be careful when removing the screws as the motor may fall and become damaged.
-