AIR CONDITIONING AMPLIFIER INSTALLATION
CAUTION / NOTICE / HINT
Tech Tips
-
Use the same procedures for LHD and RHD vehicles.
-
The procedures listed below are for LHD vehicles.
PROCEDURE
-
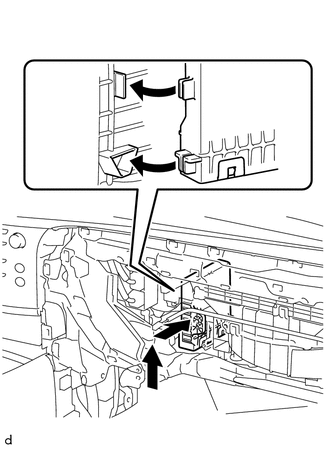
INSTALL AIR CONDITIONING AMPLIFIER ASSEMBLY
-
Install the air conditioning amplifier assembly.
-
Install the screw.
-
Connect the connector.
Text in Illustration 
Screw 
Connector
-
-
INSTALL NO. 2 AIR DUCT SUB-ASSEMBLY

-
Install the No. 2 air duct sub-assembly with the screw.
-
-
INSTALL LOWER NO. 2 INSTRUMENT PANEL FINISH PANEL
-
INSTALL INSTRUMENT PANEL BOX DOOR KNOB
-
INSTALL LOWER NO. 2 INSTRUMENT PANEL AIR BAG ASSEMBLY
-
INSTALL NO. 2 INSTRUMENT PANEL UNDER COVER SUB-ASSEMBLY
-
INSTALL INSTRUMENT SIDE PANEL RH
-
INSTALL FRONT DOOR SCUFF PLATE RH
-
INSTALL INNER NO. 1 INSTRUMENT PANEL BRACKET COVER RH
-
INSTALL LOWER INSTRUMENT PANEL PAD SUB-ASSEMBLY RH
-
CONNECT CABLE TO NEGATIVE BATTERY TERMINAL
Note
When disconnecting the cable, some systems need to be initialized after the cable is reconnected Click here.
-
INSTALL UPPER RADIATOR SUPPORT SEAL
-
CHECK SRS WARNING LIGHT