SEAT POSITION SENSOR INSTALLATION
CAUTION / NOTICE / HINT
Tech Tips
-
Use the same procedure for RHD and LHD vehicles.
-
The procedure listed below is for LHD vehicles.
-
Use the same procedure for the RH and LH sides.
-
The procedure listed below is for the LH side.
PROCEDURE
-
INSTALL SEAT POSITION SENSOR
-
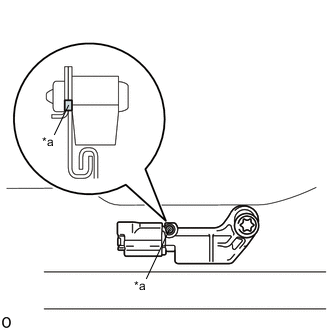
Text in Illustration *a Adjustment Support Align the adjustment support and set the seat position sensor into place.
-
Using a T30 "TORX" socket wrench, temporarily install the seat position sensor with a new "TORX" bolt.
-
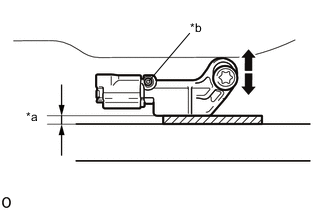
Text in Illustration *a 1.0 mm (0.0393in.) *b Adjustment Support 
Feeler Gauge Insert a 1.0 mm (0.0393 in.) feeler gauge between the seat position sensor and seat rail.
Note
-
If the seat position sensor has been dropped, or there are any cracks, dents or other defects in the case or connector, replace the seat position sensor with a new one.
-
When installing the seat position sensor, be careful that the SRS wiring does not interfere with other parts and that it is not pinched between other parts.
-
-
Move the seat position sensor up and down to adjust the clearance between it and seat rail.
Tech Tips
-
Using the adjustment support as an axis, move the seat position vertically to adjust the gap.
-
Move the feeler gauge back and forth and adjust the position of the seat position sensor so that a small amount of resistance can be felt.
-
-
Using a T30 "TORX" socket wrench, tighten the "TORX" bolt.
- Torque:
- 8.0 N*m { 82 kgf*cm, 71 in.*lbf }
-
Check the clearance between the seat position sensor and seat rail.
OK 0.6 to 1.4 mm (0.0236 to 0.0551 in.) -
Check that there is no looseness in the installation parts of the seat position sensor.
-
Connect the connector.
-
-
INSTALL SEAT SLIDE POSITION SENSOR PROTECTOR
-
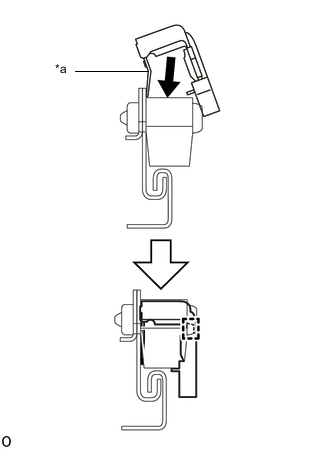
Text in Illustration *a Tab Slide in the tab of the seat slide position sensor protector between the seat position sensor and seat rail.
-
Attach the guide to install the seat slide position sensor protector.
-
-
INSTALL FRONT SEAT ASSEMBLY LH
-
Install the front seat assembly LH Click here.
-
-
CHECK SRS WARNING LIGHT
-
Check the SRS warning light Click here.
-