MULTI-DISPLAY INSTALLATION
PROCEDURE
-
INSTALL ACCESSORY METER ASSEMBLY
-
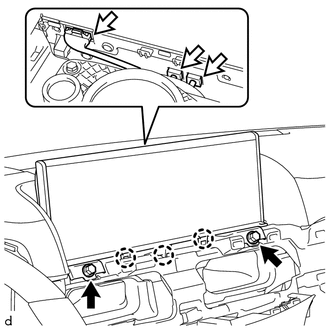
Connect the connectors on backside.
-
Attach the 3 claws to install the accessory meter assembly .
-
Install the 2 bolts.
-
-
INSTALL CENTER NO. 1 INSTRUMENT CLUSTER FINISH PANEL
-
INSTALL NO. 1 SPEAKER OPENING COVER ASSEMBLY
-
INSTALL INSTRUMENT PANEL MOULDING SUB-ASSEMBLY
-
INSTALL NO. 2 INSTRUMENT CLUSTER FINISH PANEL SUB-ASSEMBLY
-
INSTALL NO. 1 SWITCH HOLE BASE
-
INSTALL INSTRUMENT SIDE PANEL LH
-
INSTALL INSTRUMENT SIDE PANEL RH
-
INSTALL LOWER INSTRUMENT PANEL PAD SUB-ASSEMBLY LH
-
INSTALL LOWER INSTRUMENT PANEL PAD SUB-ASSEMBLY RH
-
CONNECT CABLE TO NEGATIVE BATTERY TERMINAL
Note
When disconnecting the cable, some systems need to be initialized after the cable is reconnected Click here.
-
INSTALL UPPER RADIATOR SUPPORT SEAL