ELECTRIC PARKING BRAKE ACTUATOR REMOVAL
CAUTION / NOTICE / HINT
Tech Tips
When replacing the parking brake actuator assembly, install an integrated type parking brake actuator assembly.
PROCEDURE
-
RELEASE PARKING BRAKE
-
With the engine switch on (IG), operate the electric parking brake switch to release the parking brake. Then turn the engine switch off.
Tech Tips
If the parking brake cannot be released, manually release the parking brake Click here.
-
-
PRECAUTION
Note
After turning the engine switch off, waiting time may be required before disconnecting the cable from the battery terminal. Therefore, make sure to read the disconnecting the cable from the battery terminal notice before proceeding with work Click here.
-
DISCONNECT CABLE FROM NEGATIVE BATTERY TERMINAL
Note
When disconnecting the cable, some systems need to be initialized after the cable is reconnected Click here.
-
REMOVE MUDGUARD
-
REMOVE SIDE STEP
-
REMOVE HEIGHT CONTROL UNIT PROTECTOR ASSEMBLY LH
-
REMOVE HEIGHT CONTROL UNIT PROTECTOR ASSEMBLY RH
Tech Tips
Use the same procedure described for the LH side.
-
REMOVE HEIGHT CONTROL CYLINDER BRACKET ASSEMBLY LH
-
REMOVE HEIGHT CONTROL CYLINDER BRACKET ASSEMBLY RH
Tech Tips
Use the same procedure described for the LH side.
-
DRAIN SUSPENSION FLUID
-
REMOVE FRONT NO. 2 EXHAUST PIPE ASSEMBLY (for 1VD-FTV)
-
w/ DPF:
-
w/o DPF:
-
-
REMOVE FRONT NO. 2 EXHAUST PIPE ASSEMBLY (for 3UR-FE)
-
REMOVE NO. 1 FUEL TUBE PROTECTOR (for 3UR-FE)
-
REMOVE FUEL COOLER ASSEMBLY (for 1VD-FTV)
-
for Under Floor Side:
-
-
REMOVE FUEL TANK SUB-ASSEMBLY
-
for 3UR-FE:
-
for 1VD-FTV:
-
-
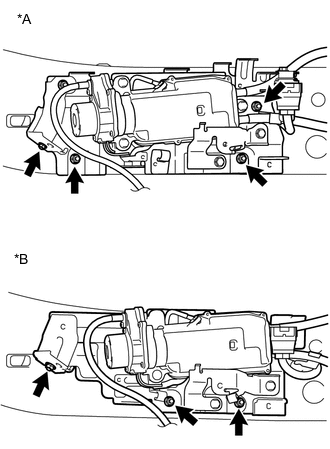
REMOVE PARKING BRAKE CABLE HEAT INSULATOR
-
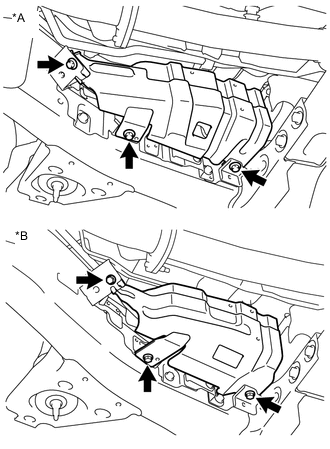
Text in Illustration *A for 3UR-FE *B for 1VD-FTV Remove the 3 bolts and parking brake cable heat insulator.
-
-
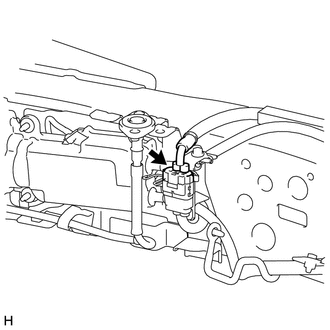
REMOVE ELECTRIC PARKING BRAKE ACTUATOR CAP
-
Remove the 2 nuts and electric parking brake actuator cap.
-
Remove the electric parking brake actuator cap from the 2 clamps.
-
-
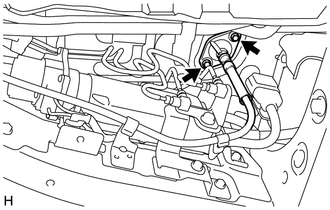
DISCONNECT BRAKE TUBE WAY BRACKET
-

Disconnect the bolt and brake tube way bracket form the front No. 1 brake tube way.
Note
Do not bend or damage the brake tube.
-
-
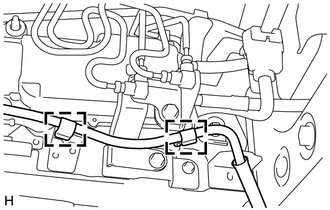
REMOVE FRONT NO. 4 FLOOR HEAT INSULATOR
-

Remove the 4 nuts and front No. 4 floor heat insulator.
-
-
REMOVE REAR WHEEL
-
DISCONNECT REAR DISC BRAKE CYLINDER ASSEMBLY LH
-
DISCONNECT REAR DISC BRAKE CYLINDER ASSEMBLY RH
Tech Tips
Use the same procedure described for the LH side.
-
REMOVE REAR DISC LH
-
REMOVE REAR DISC RH
Tech Tips
Use the same procedure described for the LH side.
-
DISCONNECT PARKING BRAKE CABLE
-
REMOVE REAR SUSPENSION CONTROL ACCUMULATOR LH
-
REMOVE REAR NO. 3 SUSPENSION CONTROL ACCUMULATOR LH
-
REMOVE REAR NO. 2 SUSPENSION CONTROL ACCUMULATOR BRACKET LH
-
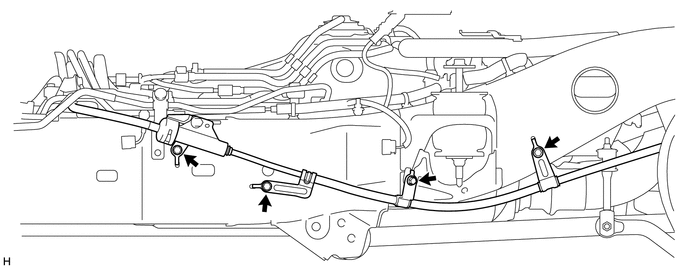
REMOVE NO. 3 PARKING BRAKE CABLE ASSEMBLY
-
Remove the 4 bolts and disconnect the No. 3 parking brake cable assembly.
-
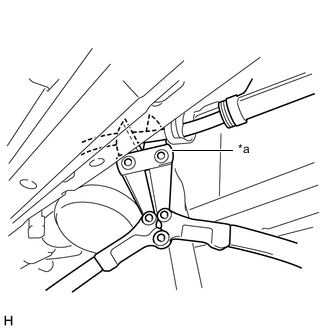
Text in Illustration *a Bolt Clipper Pull out the parking brake actuator cable assembly LH of the parking brake actuator assembly with bracket, use bolt clippers to cut it, and then remove the No. 3 parking brake cable assembly.
-
-
REMOVE NO. 2 CABLE SUPPORT BRACKET
-
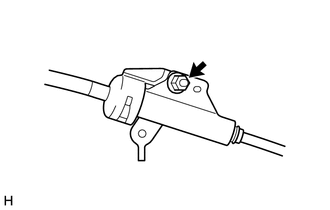
Remove the nut and No. 2 cable support bracket.
-
-
REMOVE REAR SUSPENSION CONTROL ACCUMULATOR RH
Tech Tips
Use the same procedure described for the rear suspension control accumulator LH.
-
REMOVE REAR NO. 3 SUSPENSION CONTROL ACCUMULATOR RH
Tech Tips
Use the same procedure described for the rear No. 3 suspension control accumulator LH.
-
REMOVE REAR NO. 2 SUSPENSION CONTROL ACCUMULATOR BRACKET RH
Tech Tips
Use the same procedure described for the rear No. 2 suspension control accumulator bracket LH.
-
REMOVE NO. 2 PARKING BRAKE CABLE ASSEMBLY
-
Remove the 4 bolts and disconnect the No. 2 parking brake cable assembly.
-
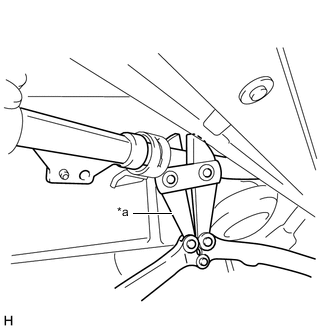
Text in Illustration *a Bolt Clipper Pull out the parking brake actuator cable assembly RH of the parking brake actuator assembly with bracket, use bolt clippers to cut it, and then remove the No. 2 parking brake cable assembly.
-
-
REMOVE CABLE SUPPORT BRACKET
Tech Tips
Use the same procedure described for the No. 2 cable support bracket.
-
REMOVE FRONT NO. 2 SUSPENSION CONTROL ACCUMULATOR RH
-
REMOVE NO. 2 HEIGHT CONTROL TUBE
-
DISCONNECT NO. 1 SUSPENSION CONTROL PRESSURE HOSE
-
REMOVE FRONT SHOCK ABSORBER CONTROL VALVE ASSEMBLY RH
-
REMOVE FRONT SUSPENSION CONTROL ACCUMULATOR RH
-
REMOVE FRONT SUSPENSION CONTROL VALVE ASSEMBLY RH
-
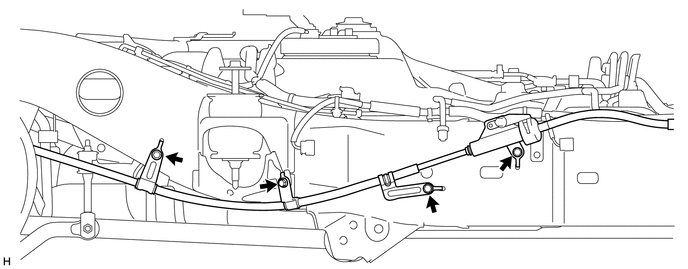
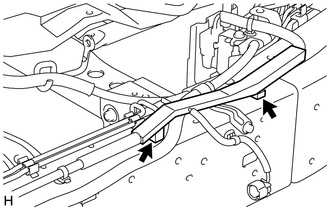
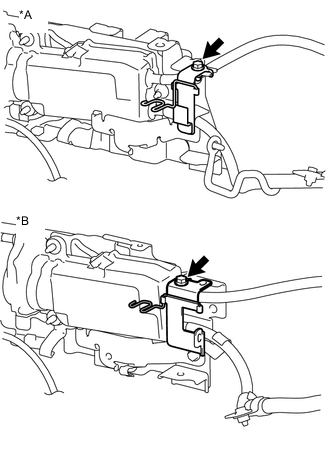
DISCONNECT PARKING BRAKE ACTUATOR ASSEMBLY WITH BRACKET
-
Disconnect the connector.
-
Text in Illustration *A for 3UR-FE *B for 1VD-FTV for 3UR-FE:
Remove the 4 bolts ant disconnect the parking brake actuator assembly with bracket.
Tech Tips
Hang the parking brake actuator assembly with a piece of wire.
-
for 1VD-FTV:
Remove the 3 bolts ant disconnect the parking brake actuator assembly with bracket.
Tech Tips
Hang the parking brake actuator assembly with a piece of wire.
-
-
REMOVE CHARCOAL CANISTER ASSEMBLY (for 3UR-FE)
-
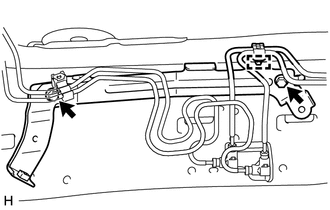
REMOVE WIRE HARNESS PROTECTOR
-
Detach the 2 clamps and disconnect the wire harness protector.
-
-
REMOVE PARKING BRAKE ACTUATOR ASSEMBLY WITH BRACKET
-
for 1VD-FTV:
Remove the 4 bolts, parking brake actuator cable pipe LH and parking brake actuator cable LH of the parking brake actuator assembly with bracket.
-
for 3UR-FE:
Remove the 3 bolts, parking brake actuator cable pipe LH and parking brake actuator cable LH of the parking brake actuator assembly with bracket.
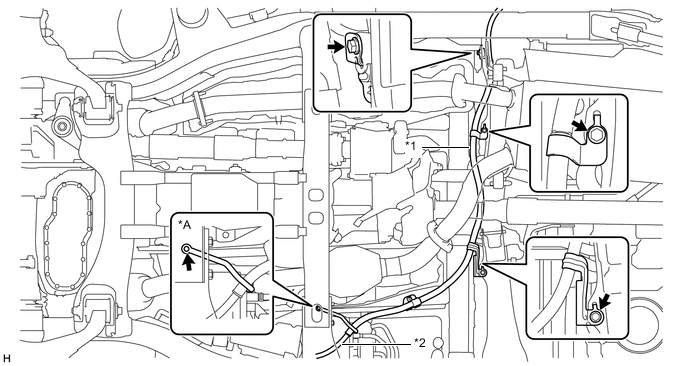
Text in Illustration *A for 1VD-FTV - - *1 Parking Brake Actuator Cable Pipe LH *2 Parking Brake Actuator Cable LH -
Remove the 2 bolts, parking brake actuator cable pipe RH and parking brake actuator cable RH of the parking brake actuator assembly with bracket.
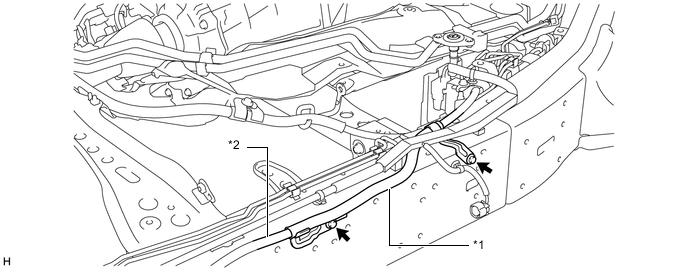
Text in Illustration *1 Parking Brake Actuator Cable Pipe RH *2 Parking Brake Actuator Cable RH -
Remove the parking brake actuator assembly with bracket.
-
-
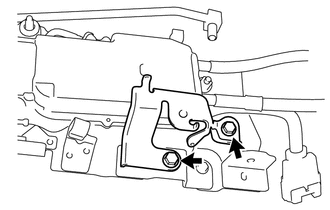
REMOVE NO. 2 PARKING BRAKE SUPPORT BRACKET
-
Remove the 2 bolts and No. 2 parking brake support bracket.
-
Remove the clamp from the No. 2 parking brake support bracket.
-
-
REMOVE HOLDER BRACKET
-
Text in Illustration *A for 3UR-FE *B for 1VD-FTV Remove the bolt and holder bracket from the parking brake actuator assembly with bracket.
-
-
REMOVE BRAKE TUBE WAY BRACKET
-
Remove the 2 bolts and brake tube way bracket.
-