FRONT BUMPER REMOVAL
CAUTION / NOTICE / HINT
Tech Tips
When the front bumper is damaged or deformed due to an accident or contact with other objects, etc., or the bumper installation area on the body is repaired, it is necessary to perform millimeter wave radar sensor adjustment.
PROCEDURE
-
REMOVE FRONT FENDER SPLASH SHIELD SUB-ASSEMBLY LH
-

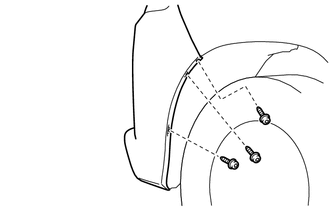
Remove the 3 bolts and 2 screws.
-
Turn the clip indicated by the arrow in the illustration to remove the front fender splash shield sub-assembly LH.
-
-
REMOVE FRONT FENDER SPLASH SHIELD SUB-ASSEMBLY RH
Tech Tips
Use the same procedure described for the LH side.
-
REMOVE UPPER RADIATOR SUPPORT SEAL
-
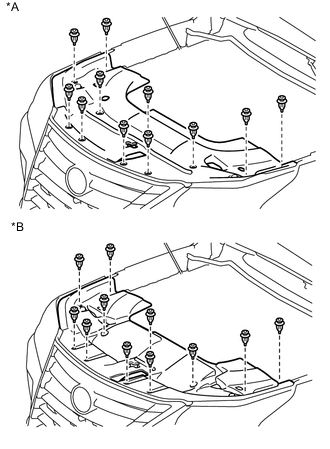
*A for Gasoline *B for Diesel Remove the 11 clips and upper radiator support seal.
-
-
REMOVE FRONT BUMPER COVER
-
Using a T30 "TORX" socket, remove the 3 "TORX" screws.
Tech Tips
Use the same procedure for the other side.
-
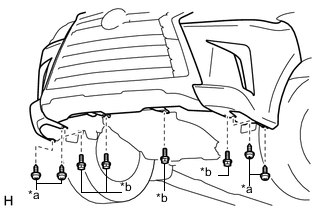
*a Screw *b Bolt Remove the 4 screws and 4 bolts.
-
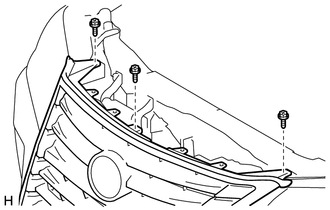
Remove the 3 screws.
-
w/ Dynamic Radar Cruise Control System:
Disconnect the connector
-
Disconnect the front television camera assembly connector.
-
Disconnect the No. 4 engine room wire connector.
-
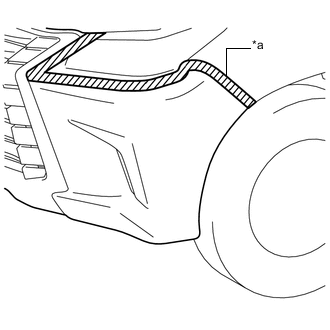
*a Protective Tape Put protective tape around the front bumper cover.
Tech Tips
Use the same procedure for the other side.
-
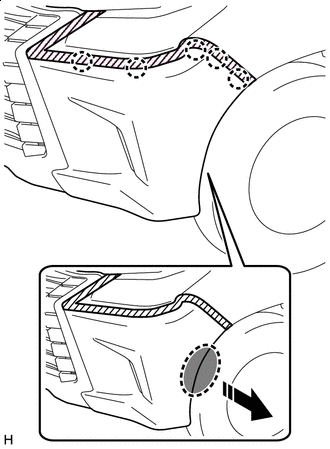

Place Hands Here 
Remove in this Direction Detach the 5 claws.
Tech Tips
Use the same procedure for the other side.
-
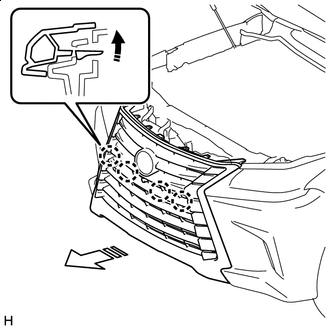
Remove in this Direction (1) 
Remove in this Direction (2) Detach the 4 claws and remove the front bumper cover.
-
w/ Headlight Cleaner System:
Disconnect the headlight cleaner hose.
-
-
REMOVE FRONT BUMPER ENERGY ABSORBER
-
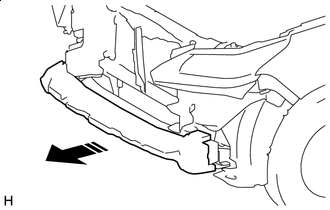
Remove in this Direction Remove the front bumper energy absorber.
-
-
REMOVE FRONT BUMPER REINFORCEMENT SUB-ASSEMBLY
-

Remove in this Direction Remove the 6 nuts and front bumper reinforcement sub-assembly.
-
-
REMOVE PERFORMANCE DAMPER
-
REMOVE FRONT BUMPER NO. 2 EXTENSION SUB-ASSEMBLY LH
-

*A w/o Performance Dumper *B w/ Performance Dumper Remove in this Direction w/o Performance Dumper:
-
Remove the 2 nuts and front No. 2 bumper extension sub-assembly LH.
-
-
w/ Performance Dumper:
-
Remove the 4 nuts and front No. 2 bumper extension sub-assembly LH.
-
-
-
REMOVE FRONT BUMPER NO. 2 EXTENSION SUB-ASSEMBLY RH
Tech Tips
Use the same procedure described for the LH side.
-
REMOVE FRONT BUMPER SIDE SUPPORT LH
-
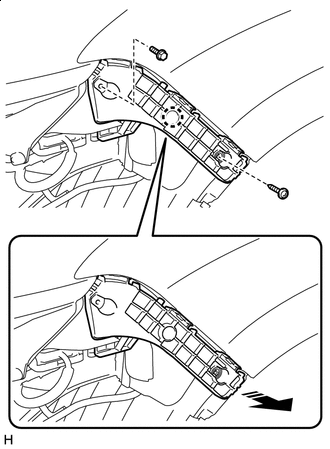
Remove in this Direction Remove the bolt.
-
Remove the screw.
-
Detach the claw and remove the front bumper side support LH.
-
-
REMOVE FRONT BUMPER SIDE SUPPORT RH
Tech Tips
Use the same procedure described for the LH side.
-
REMOVE FRONT FENDER MAIN SEAL LH
-
REMOVE FRONT FENDER MAIN SEAL RH
Tech Tips
Use the same procedure described for the LH side.
-
REMOVE HEADLIGHT ASSEMBLY LH
-
REMOVE HEADLIGHT ASSEMBLY RH
Tech Tips
Use the same procedure described for the LH side.
-
REMOVE FRONT BUMPER UPPER CENTER RETAINER
-
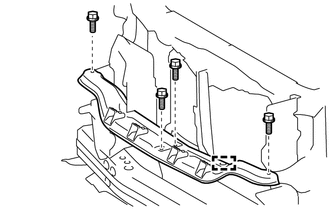
Remove the 4 bolts.
-
Detach the guide and remove the front bumper upper center retainer.
-
-
REMOVE FRONT BUMPER LOWER NO. 2 RETAINER
-
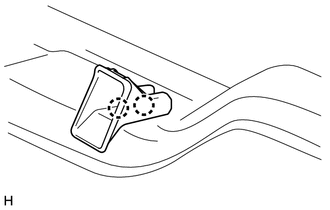
Detach the 2 claws and remove the front bumper lower No. 2 retainer.
Tech Tips
Use the same procedure for all front bumper lower No. 2 retainers.
-