FRONT SEAT ASSEMBLY(for Luxury Seat Type) REASSEMBLY
CAUTION / NOTICE / HINT
CAUTION:
Wear protective gloves. Sharp areas on the parts may injure your hands.
Tech Tips
-
Use the same procedure for RHD and LHD vehicles.
-
The procedure listed below is for LHD vehicles.
-
Use the same procedure for the RH and LH sides.
-
The procedure listed below is for the LH side.
PROCEDURE
-
INSTALL FRONT SEATBACK FRAME SUB-ASSEMBLY LH
-
Install the front seatback frame sub-assembly LH to the front seat adjuster LH with the 4 bolts.
- Torque:
- 42 N*m { 428 kgf*cm, 31 ft.*lbf }
-
-
INSTALL SEATBACK SPRING DAMPER LH
-
Install the seatback spring damper LH with the 2 nuts.
- Torque:
- 14 N*m { 143 kgf*cm, 10 ft.*lbf }
-
-
INSTALL FRONT SEAT WIRE
-
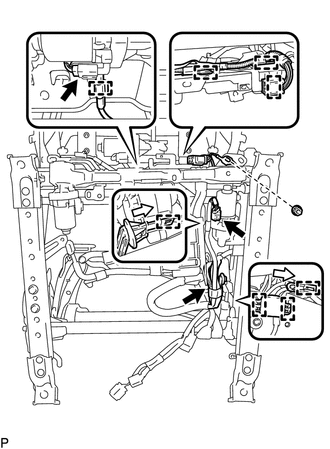
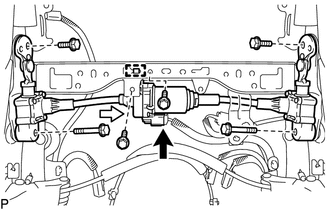
Attach the 8 wire harness clamps to install the front seat wire.
-
Connect the ground wire with the nut.
- Torque:
- 8.0 N*m { 82 kgf*cm, 71 in.*lbf }
-
Connect the 3 connectors.
-
Attach the 7 wire harness clamps.
-
-
INSTALL SEPARATE TYPE FRONT SEAT CUSHION SPRING ASSEMBLY
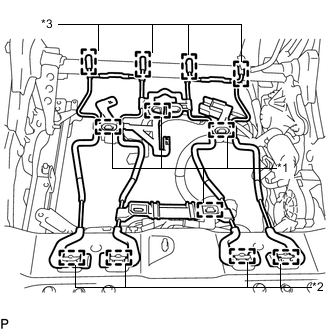
Text in Illustration *1 Wire Harness Clamp *2 Hook A *3 Hook B
-
Attach the 4 hooks B to install the separate type front seat cushion spring assembly.
-
Attach the 4 hooks A.
-
Attach the 4 wire harness clamps.
-
-
INSTALL SEAT CUSHION CLIMATE CONTROL DUCT LH
-
INSTALL SEAT CLIMATE CONTROL BLOWER LH
-
INSTALL SEAT HEATER CONTROL SUB-ASSEMBLY LH
-
INSTALL RECLINING ADJUSTER INSIDE COVER LH
-
INSTALL RECLINING ADJUSTER INSIDE COVER RH
Tech Tips
Use the same procedure described for the LH side.
-
INSTALL POSITION CONTROL ECU ASSEMBLY
-
INSTALL RECLINING ADJUSTER INSIDE COVER
-
INSTALL POWER SEAT MOTOR ASSEMBLY
-
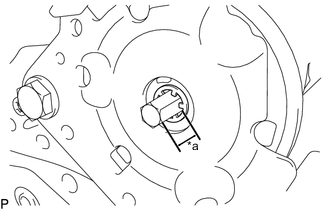
Temporarily install the power seat motor assembly with the bolt.
-
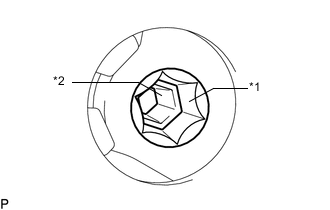
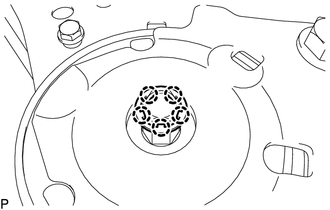
Text in Illustration *1 Front Seat Adjuster Assembly LH Hole *2 Power Seat Motor Assembly Drive Portion 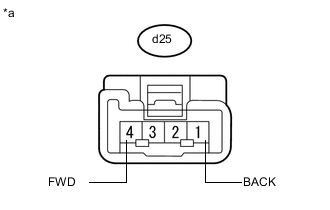
Text in Illustration *a Component without harness connected
(Power Seat Motor Assembly)

Text in Illustration *a Component without harness connected
(Power Seat Motor Assembly)

Text in Illustration *a Component without harness connected
(Power Seat Motor Assembly)

Text in Illustration *a Component without harness connected
(Power Seat Motor Assembly)
Check that the hole in the front seat adjuster assembly LH and the drive portion of the power seat motor assembly are aligned as shown in the illustration.
Note
If the reclining connecting pipe is pushed in when the front seat adjuster assembly LH hole and power seat motor assembly drive portion are not aligned, the power seat motor assembly drive portion will be damaged.
Tech Tips
If the front seat adjuster assembly LH hole and power seat motor assembly drive portion are not aligned, apply auxiliary battery voltage to the power seat motor assembly and align the drive portion of the power seat motor assembly with the hole of the front seat adjuster assembly LH as shown in the illustration.
for LHD, for Driver Side: Measurement Condition Specified Condition Auxiliary battery positive (+) → d25 - 1 (BACK)
Auxiliary battery negative (-) → d25 - 4 (FWD)
Backward Auxiliary battery positive (+) → d25 - 4 (FWD)
Auxiliary battery negative (-) → d25 - 1 (BACK)
Forward for LHD, for Front Passenger Side: Measurement Condition Specified Condition Auxiliary battery positive (+) → c25 - 1 (BACK)
Auxiliary battery negative (-) → c25 - 4 (FWD)
Backward Auxiliary battery positive (+) → c25 - 4 (FWD)
Auxiliary battery negative (-) → c25 - 1 (BACK)
Forward for RHD, for Driver Side: Measurement Condition Specified Condition Auxiliary battery positive (+) → c25 - 1 (BACK)
Auxiliary battery negative (-) → c25 - 4 (FWD)
Backward Auxiliary battery positive (+) → c25 - 4 (FWD)
Auxiliary battery negative (-) → c25 - 1 (BACK)
Forward for RHD, for Front Passenger Side: Measurement Condition Specified Condition Auxiliary battery positive (+) → d25 - 1 (BACK)
Auxiliary battery negative (-) → d25 - 4 (FWD)
Backward Auxiliary battery positive (+) → d25 - 4 (FWD)
Auxiliary battery negative (-) → d25 - 1 (BACK)
Forward -
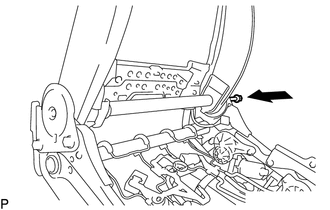
Insert the reclining connecting pipe into the hole of the front seat adjuster assembly LH and tap it in using a plastic-faced hammer until the push nut makes contact with the front seat adjuster assembly LH.
-
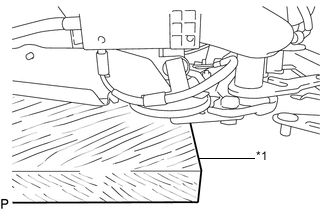
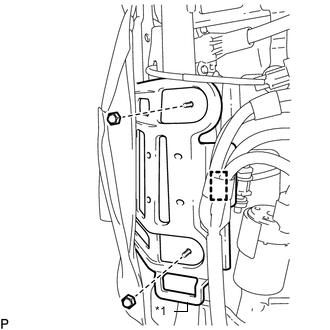
Text in Illustration *1 Wooden Block Place a wooden block as shown in the illustration and lay the seat down so that the reclining connecting pipe contacts the wooden block.
-
Attach the 5 claws to temporarily install the push nut to the reclining connecting pipe.
-
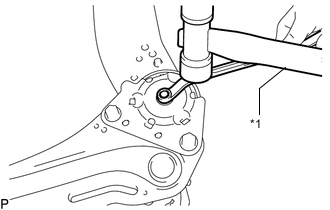
Text in Illustration *1 Plastic-faced Hammer Attach an 8 mm offset wrench, and then tap the wrench using a plastic-faced hammer until the push nut contacts the front seat adjuster assembly LH to install the push nut.
-
Try to move the reclining connecting pipe left and right and check that there is no rattle.
-
Text in Illustration *a 9.1 mm or more Check that the reclining connecting pipe protrudes the same amount on the left and right sides.
Standard 9.1 mm or more -
Tighten the bolt.
- Torque:
- 5.0 N*m { 51 kgf*cm, 44 in.*lbf }
-
Connect the connector.
-
-
INSTALL INNER SEAT BRACKET ASSEMBLY LH
-
Install the inner seat bracket assembly LH with the 2 nuts.
-
-
INSTALL FRONT SEAT AIRBAG ASSEMBLY LH
-
INSTALL FRONT SEATBACK SUPPORT LH
-
Install the front seatback support LH with the nut.
- Torque:
- 21 N*m { 214 kgf*cm, 15 ft.*lbf }
-
Install both paddles of the front seatback support LH with the 4 nuts.
- Torque:
- 8.5 N*m { 87 kgf*cm, 75 in.*lbf }
-
Connect the connector.
-
-
INSTALL FRONT SEATBACK ADJUSTER ASSEMBLY
-
Slide the front seatback adjuster to attach the guide as shown in the illustration and install it.
Text in Illustration 
Slide -
Install the 2 bolts.
-
Install the left and right ends of the front seatback adjuster assembly with the 4 bolts.
- Torque:
- 14 N*m { 143 kgf*cm, 10 ft.*lbf }
Note
Make sure that the left and right ends of the front seatback adjuster assembly do not become detached from the motor.
-
Connect the connector.
-
-
INSTALL LUMBAR SUPPORT ADJUSTER ASSEMBLY LH
-
INSTALL REAR AIR DUCT LH
-
INSTALL SEATBACK CLIMATE CONTROL BLOWER LH
-
INSTALL NO. 1 INTERIOR ILLUMINATION LIGHT ASSEMBLY
-
INSTALL SEPARATE TYPE FRONT SEATBACK COVER
-
INSTALL SEATBACK COVER WITH PAD
-
Install the seatback cover with pad.
-
Text in Illustration *1 Seatback Cover Bracket Attach the seatback cover bracket with the 2 nuts
- Torque:
- 5.5 N*m { 56 kgf*cm, 49 in.*lbf }
CAUTION:
After the seatback cover bracket is attached, make sure the seatback cover bracket is not twisted.
-
Attach the wire harness clamp.
-
Attach the 4 claws to install the 2 front seat headrest supports.
-
Attach the hooks.
-
-
INSTALL FRONT POWER SEAT SWITCH ASSEMBLY RH (w/ Shoulder Switch)
-
INSTALL SEAT CUSHION SPRING DAMPER
-
INSTALL SEPARATE TYPE FRONT SEAT CUSHION COVER (except Ottoman)
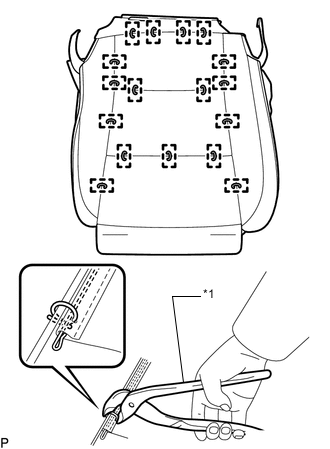
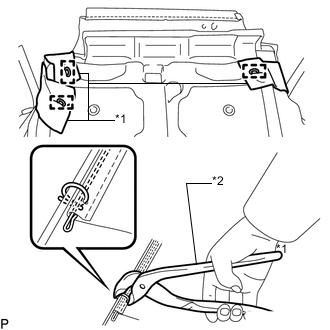
Text in Illustration *1 Hog Ring Pliers
-
Using hog ring pliers, install the separate type front seat cushion cover to the separate type front seat cushion pad with new hog rings.
Note
-
Be careful not to damage the cover.
-
When installing the hog rings, avoid wrinkling the cover.
-
-
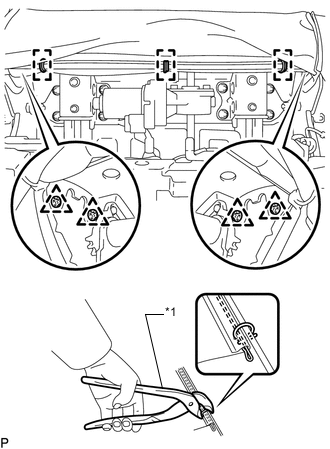
Text in Illustration *1 Strap *2 Hog Ring Pliers Using hog ring pliers, connect the 3 straps to the separate type front seat cushion pad with new hog rings.
Note
Be careful not to damage the cover.
-
-
INSTALL SEPARATE TYPE FRONT SEAT CUSHION COVER (for Ottoman)

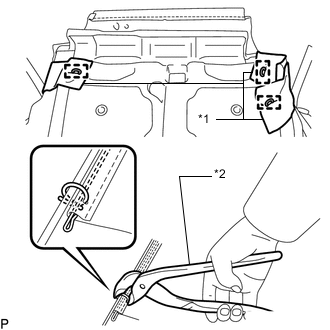
Text in Illustration *1 Hog Ring Pliers
-
Using hog ring pliers, install the separate type front seat cushion cover to the separate type front seat cushion pad with new hog rings.
Note
-
Be careful not to damage the cover.
-
When installing the hog rings, avoid wrinkling the cover.
-
-
Text in Illustration *1 Strap *2 Hog Ring Pliers Using hog ring pliers, connect the 3 straps to the separate type front seat cushion pad with new hog rings.
Note
Be careful not to damage the cover.
-
-
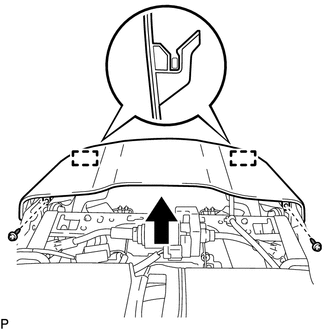
INSTALL SEAT CUSHION COVER WITH PAD
-
Set the seat cushion cover with pad in place.
-
Attach the hooks to install the seat cushion cover with pad.
-
Text in Illustration *1 Hog Ring Pliers Attach the 4 clips to connect the front part of the separate type front seat cushion cover.
-
Using hog ring pliers, install new hog rings.
-
except Ottoman:
Close the front part of the separate type front seat cushion cover with the 2 clips.
-
for Front Passenger Side:
Connect the connector.
-
Install the 4 clips.
-
Connect the connector and install the connector lock to the seat heater control sub-assembly LH connector.
-
Connect the 2 connectors.
-
-
INSTALL FRONT SEAT LOWER CUSHION SHIELD LH
-
INSTALL FRONT SEAT LEG COVER LH
-
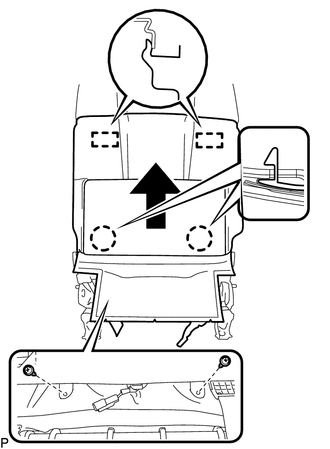
INSTALL FRONT SEATBACK BOARD
-
Slide the front seatback board upward to attach the 2 hooks and install it.
-
Install the 2 screws.
-
-
INSTALL FRONT SEATBACK BOARD SUB-ASSEMBLY LH
-
Slide the front seatback board sub-assembly LH upward to attach the 2 hooks and install it.
-
Attach the 2 claws.
-
Open the lower part of the front seatback board sub-assembly LH and install the 2 screws.
-
Install the clip.
-
Attach the hook to connect the rubber band.
-
Connect the rubber band with the clip.
-
-
INSTALL FRONT SEAT INNER BELT ASSEMBLY LH
-
INSTALL SEAT POSITION AIRBAG SENSOR (for Driver Side)
-
INSTALL UPPER SEAT TRACK RAIL COVER LH
-
INSTALL POWER SEAT SWITCH ASSEMBLY
-
INSTALL FRONT POWER ADJUSTER SHIELD LH
-
Install 2 new clips to the front power adjuster shield LH.
-
Install the switch bezel to the front power adjuster shield LH with the 4 screws.
-
Connect the connector.
-
Attach the 2 clips to install the front power adjuster shield LH.
-
Install the 2 screws.
-
-
INSTALL POWER SEAT SWITCH KNOB LH (for Reclining)
-
INSTALL POWER SEAT SWITCH KNOB LH (for Slide)
-
INSTALL FRONT SEAT INNER CUSHION SHIELD LH
-
INSTALL FRONT SEAT CUSHION SHIELD LH
-
INSTALL FRONT SEAT INNER NO. 1 CUSHION SHIELD LH
-
INSTALL SEAT ADJUSTER COVER CAP LH