REAR PACKAGE TRAY SPEAKER REMOVAL
PROCEDURE
-
PRECAUTION
Note
After turning the power switch off, waiting time may be required before disconnecting the cable from the auxiliary battery terminal. Therefore, make sure to read the disconnecting the cable from the auxiliary battery terminal notice before proceeding with work Click here.
-
REMOVE LUGGAGE COMPARTMENT FLOOR MAT
-
REMOVE LUGGAGE COMPARTMENT TRIM COVER LH
-
DISCONNECT CABLE FROM NEGATIVE AUXILIARY BATTERY TERMINAL
Note
When disconnecting the cable, some systems need to be initialized after the cable is reconnected Click here.
-
REMOVE BENCH TYPE REAR SEAT CUSHION ASSEMBLY
-
REMOVE REAR SEAT HEADREST ASSEMBLY
-
REMOVE REAR SEAT CENTER HEADREST ASSEMBLY
-
REMOVE BENCH TYPE REAR SEATBACK ASSEMBLY
-
REMOVE REAR DOOR SCUFF PLATE LH
-
REMOVE REAR DOOR SCUFF PLATE RH
-
REMOVE REAR SEAT SIDE GARNISH LH
-
REMOVE REAR SEAT SIDE GARNISH RH
-
REMOVE INNER ROOF SIDE GARNISH LH
-
REMOVE INNER ROOF SIDE GARNISH RH
-
REMOVE CENTER STOP LIGHT COVER
-
REMOVE PACKAGE TRAY TRIM PANEL ASSEMBLY
-
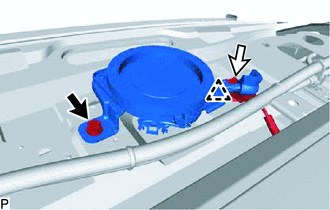
REMOVE REAR NO. 3 SPEAKER ASSEMBLY
-
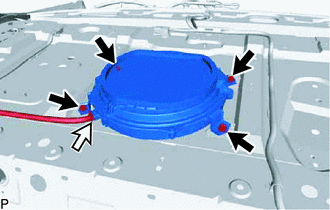
Disconnect the connector.
-
Remove the 4 bolts and rear No. 3 speaker assembly.
Note
Do not touch the cone of the speaker.
-
-
REMOVE NO. 2 PACKAGE TRAY TRIM PANEL ASSEMBLY
-
REMOVE REAR HEADER SPEAKER ASSEMBLY (w/ Mark Levinson Speaker System)
Tech Tips
Use the same procedure for both rear header speaker assemblies.
-
Remove the bolt.
-
Disconnect the connector.
-
Detach the clip and remove the rear header speaker assembly.
Note
Do not touch the cone of the speaker.
-