REAR BRAKE REMOVAL
CAUTION / NOTICE / HINT
Tech Tips
-
Use the same procedure for the RH and LH sides.
-
The following procedure is for the LH side.
PROCEDURE
-
REMOVE REAR WHEEL
-
DRAIN BRAKE FLUID
Note
Wash off the brake fluid immediately if it comes into contact with a painted surface.
-
DISCONNECT REAR FLEXIBLE HOSE LH
-
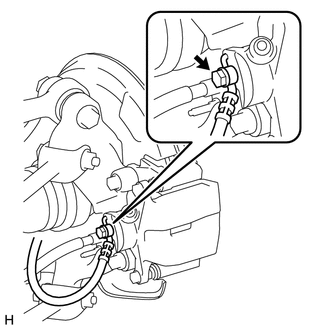
Remove the union bolt and gasket.
-
Disconnect the rear flexible hose from the rear disc brake cylinder assembly.
-
-
REMOVE REAR DISC BRAKE CYLINDER ASSEMBLY
-
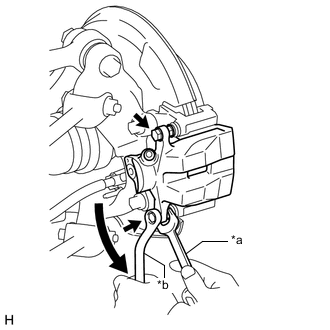
Text in Illustration *a Hold *b Turn Hold the rear disc brake cylinder slide pins and remove the 2 bolts and rear disc brake cylinder assembly.
-
-
REMOVE REAR DISC BRAKE PAD
-
Remove the 2 disc brake pads from the disc brake cylinder mounting.
-
-
REMOVE REAR DISC BRAKE ANTI-SQUEAL SHIM KIT
-
for Type A:
-
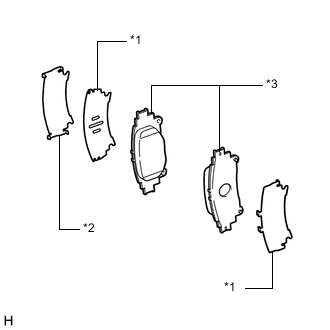
Text in Illustration *1 No. 1 Anti-squeal Shim *2 No. 2 Anti-squeal Shim *3 Rear Disc Brake Pad Remove the 2 No. 1 anti-squeal shims and No. 2 anti-squeal shim from the rear disc brake pad.
-
-
for Type B:
-
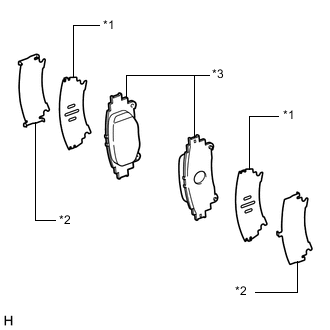
Text in Illustration *1 No. 1 Anti-squeal Shim *2 No. 2 Anti-squeal Shim *3 Rear Disc Brake Pad Remove the 2 No. 1 anti-squeal shims and 2 No. 2 anti-squeal shims from the rear disc brake pad.
-
-
Remove the pad wear indicator plates from the rear disc brake pads.
-
-
REMOVE REAR NO. 1 DISC BRAKE PAD SUPPORT PLATE
Note
As the rear No. 1 disc brake pad support plates and rear No. 2 disc brake pad support plates have a different shape, be sure to place identification marks so that the pad support plates can be reinstalled to the correct locations.
-
Text in Illustration *1 Rear No. 1 Disc Brake Pad Support Plate *2 Rear No. 2 Disc Brake Pad Support Plate Remove the 2 pad support plates from the disc brake cylinder mounting.
-
-
REMOVE REAR NO. 2 DISC BRAKE PAD SUPPORT PLATE
Note
As the rear No. 1 disc brake pad support plates and rear No. 2 disc brake pad support plates have a different shape, be sure to place identification marks so that the pad support plates can be reinstalled to the correct locations.
-
Remove the 2 pad support plates from the disc brake cylinder mounting.
-
-
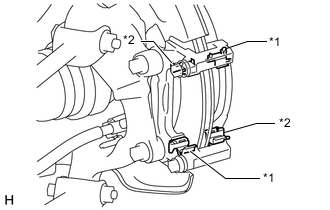
REMOVE REAR NO. 1 DISC BRAKE CYLINDER SLIDE PIN
-
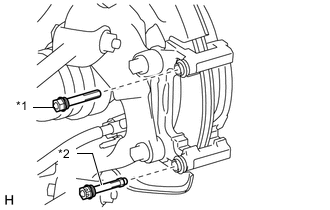
Text in Illustration *1 Rear No. 1 Disc Brake Cylinder Slide Pin *2 Rear Disc Brake Rear Cylinder Slide Pin Remove the rear No. 1 disc brake cylinder slide pins from the disc brake cylinder mounting.
-
-
REMOVE REAR DISC BRAKE REAR CYLINDER SLIDE PIN
-
Remove the rear disc brake rear cylinder slide pins from the disc brake cylinder mounting.
-
-
REMOVE REAR DISC BRAKE CYLINDER SLIDE BUSH
-

Text in Illustration *1 Protective Tape Using a screwdriver, remove the rear disc brake cylinder slide bush from the rear disc brake rear cylinder slide pin.
Tech Tips
Tape the screwdriver tip before use.
Note
Do not damage the rear disc brake rear cylinder slide pin.
-
-
REMOVE REAR DISC BRAKE BUSH DUST BOOT
-
Remove the 2 rear disc brake bush dust boots from the disc brake cylinder mounting.
-
-
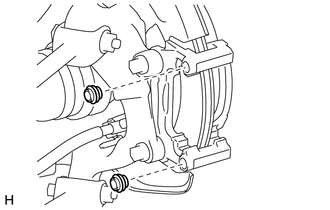
REMOVE DISC BRAKE CYLINDER MOUNTING LH
-
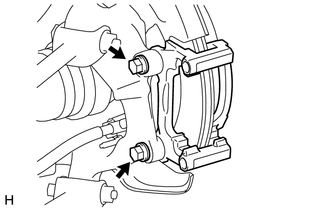
Remove the 2 bolts and disc brake cylinder mounting from the rear axle.
-
-
REMOVE REAR NO. 1 DISC BRAKE CALIPER PLATE
-
Remove the 2 rear No. 1 disc brake caliper plates from the disc brake cylinder mounting.
-
-
REMOVE PARKING BRAKE SHOE ADJUSTING HOLE PLUG
-
Remove the parking brake shoe adjusting hole plug from the rear disc.
-
-
REMOVE REAR DISC
-
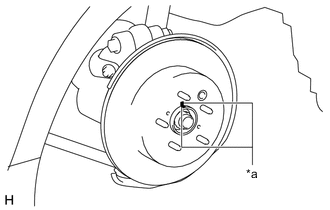
Text in Illustration *a Matchmark Place matchmarks on the rear disc and axle hub.
-
Release the parking brake.
-

Turn the shoe adjuster until the disc turns freely, and then remove the rear disc.
-
Install the shoe adjusting hole plug to the rear disc.
-