NAME PLATE INSTALLATION
PROCEDURE
-
INSTALL SYMBOL EMBLEM
Tech Tips
When installing the symbol emblem, heat the vehicle body and symbol emblem using a heat light.
Standard Item Temperature Vehicle Body 40 to 60°C (104 to 140°F) Symbol Emblem 20 to 30°C (68 to 86°F) Note
Do not heat the vehicle body or symbol emblem excessively.
-
Clean the vehicle body surface.
-
Using a heat light, heat the vehicle body surface.
-
Remove the double-sided tape from the vehicle body.
-
Wipe off any tape adhesive residue with cleaner.
-
-

Text in Illustration *a Boss Install a new symbol emblem.
-
Using a heat light, heat the vehicle body and a new symbol emblem.
-
Remove the peeling paper from the face of the symbol emblem.
Tech Tips
After removing the peeling paper, keep the exposed adhesive free from foreign matter.
-
Align the boss positions and install the symbol emblem.
Tech Tips
Press the symbol emblem firmly to install it.
-
-
-
INSTALL NO. 1 LUGGAGE COMPARTMENT DOOR NAME PLATE
Tech Tips
When installing the No. 1 luggage compartment door name plate, heat the vehicle body and No. 1 luggage compartment door name plate using a heat light.
Standard Item Temperature Vehicle Body 40 to 60°C (104 to 140°F) No. 1 Luggage Compartment Door Name Plate 20 to 30°C (68 to 86°F) Note
Do not heat the vehicle body or No. 1 luggage compartment door name plate excessively.
-
Clean the vehicle body surface.
-
Using a heat light, heat the vehicle body surface.
-
Remove the double-sided tape from the vehicle body.
-
Wipe off any tape adhesive residue with cleaner.
-
-
Text in Illustration *a Reference Values Install a new No. 1 luggage compartment door name plate.
-
Using a heat light, heat the vehicle body and a new No. 1 luggage compartment door name plate.
-
Remove the peeling paper from the face of the No. 1 luggage compartment door name plate.
Tech Tips
After removing the peeling paper, keep the exposed adhesive free from foreign matter.
-
Install the No. 1 luggage compartment door name plate in the position shown in the illustration.
Tech Tips
Press the No. 1 luggage compartment door name plate firmly to install it.
Standard Area Specified Condition A 15.5 mm (0.610 in.) B 21.8 mm (0.858 in.) C 27.6 mm (1.09 in.)
-
-
-
INSTALL NO. 3 LUGGAGE COMPARTMENT DOOR PLATE (for 2GR-FXE)
Tech Tips
When installing the No. 3 luggage compartment door plate, heat the vehicle body and No. 3 luggage compartment door plate using a heat light.
Standard Item Temperature Vehicle Body 40 to 60°C (104 to 140°F) No. 3 Luggage Compartment Door Plate 20 to 30°C (68 to 86°F) Note
Do not heat the vehicle body or No. 3 luggage compartment door plate excessively.
-
Clean the vehicle body surface.
-
Using a heat light, heat the vehicle body surface.
-
Remove the double-sided tape from the vehicle body.
-
Wipe off any tape adhesive residue with cleaner.
-
-

Text in Illustration *a Reference Values Install a new No. 3 luggage compartment door plate.
-
Using a heat light, heat the vehicle body and a new No. 3 luggage compartment door plate.
-
Remove the peeling paper from the face of the No. 3 luggage compartment door plate.
Tech Tips
After removing the peeling paper, keep the exposed adhesive free from foreign matter.
-
Install the No. 3 luggage compartment door plate in the position shown in the illustration.
Tech Tips
Press the No. 3 luggage compartment door plate firmly to install it.
Standard Area Specified Condition A 27.7 mm (1.09 in.) B 15.9 mm (0.626 in.) C 11.8 mm (0.465 in.)
-
-
-
INSTALL NO. 3 LUGGAGE COMPARTMENT DOOR PLATE (for 2AR-FSE)
Tech Tips
When installing the No. 3 luggage compartment door plate, heat the vehicle body and No. 3 luggage compartment door plate using a heat light.
Standard Item Temperature Vehicle Body 40 to 60°C (104 to 140°F) No. 3 Luggage Compartment Door Plate 20 to 30°C (68 to 86°F) Note
Do not heat the vehicle body or No. 3 luggage compartment door plate excessively.
-
Clean the vehicle body surface.
-
Using a heat light, heat the vehicle body surface.
-
Remove the double-sided tape from the vehicle body.
-
Wipe off any tape adhesive residue with cleaner.
-
-

Text in Illustration *a Reference Values Install a new No. 3 luggage compartment door plate.
-
Using a heat light, heat the vehicle body and a new No. 3 luggage compartment door plate.
-
Remove the peeling paper from the face of the No. 3 luggage compartment door plate.
Tech Tips
After removing the peeling paper, keep the exposed adhesive free from foreign matter.
-
Install the No. 3 luggage compartment door plate in the position shown in the illustration.
Tech Tips
Press the No. 3 luggage compartment door plate firmly to install it.
Standard Area Specified Condition A 27.6 mm (1.09 in.) B 16.0 mm (0.630 in.) C 11.6 mm (0.457 in.)
-
-
-
INSTALL BODY SIDE NAME PLATE
Tech Tips
-
Use the same procedure for both body side name plates.
-
When installing the body side name plate, heat the vehicle body and body side name plate using a heat light.
Standard Item Temperature Vehicle Body 40 to 60°C (104 to 140°F) Body Side Name Plate 20 to 30°C (68 to 86°F) Note
Do not heat the vehicle body or body side name plate excessively.
-
Clean the vehicle body surface.
-
Using a heat light, heat the vehicle body surface.
-
Remove the double-sided tape from the vehicle body.
-
Wipe off any tape adhesive residue with cleaner.
-
-
Install a new body side name plate.

-
Using a heat light, heat the vehicle body and a new body side name plate.
-
Remove the peeling paper from the face of the body side name plate.
Tech Tips
After removing the peeling paper, keep the exposed adhesive free from foreign matter.
-
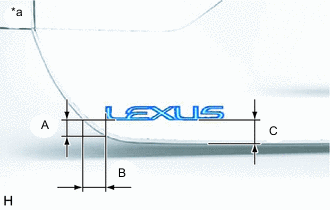
Install the body side name plate in the position shown in the illustration.
Tech Tips
Press the body side name plate firmly to install it.
Standard Area Specified Condition A 45.7 mm (1.80 in.) B 69.2 mm (2.72 in.) C 68.7 mm (2.70 in.) D 46.2 mm (1.82 in.) E 62.7 mm (2.47 in.) F 69.3 mm (2.73 in.) Text in Illustration *a Reference Values
-
-
-
INSTALL FRONT FENDER NO. 2 NAME PLATE (for Sport Package)
Tech Tips
-
Use the same procedure for both front fender No. 2 name plates.
-
When installing the front fender No. 2 name plate, heat the vehicle body and front fender No. 2 name plate using a heat light.
Standard Item Temperature Vehicle Body 40 to 60°C (104 to 140°F) Front Fender No. 2 Name Plate 20 to 30°C (68 to 86°F) Note
Do not heat the vehicle body or front fender No. 2 name plate excessively.
-
Clean the vehicle body surface.
-
Using a heat light, heat the vehicle body surface.
-
Remove the double-sided tape from the vehicle body.
-
Wipe off any tape adhesive residue with cleaner.
-
-
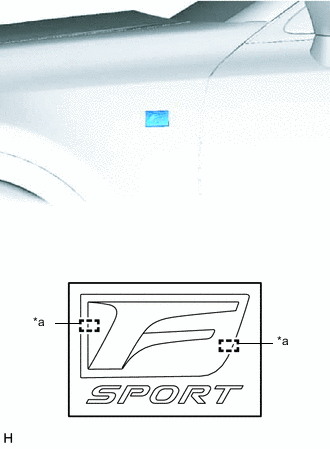
Text in Illustration *a Boss Install a new front fender No. 2 name plate.
-
Using a heat light, heat the vehicle body and a new front fender No. 2 name plate.
-
Remove the peeling paper from the face of the front fender No. 2 name plate.
Tech Tips
After removing the peeling paper, keep the exposed adhesive free from foreign matter.
-
Align the boss positions and install the front fender No. 2 name plate.
Tech Tips
Press the front fender No. 2 name plate firmly to install it.
-
-