FRONT BUMPER(for Sport Package) DISASSEMBLY
PROCEDURE
-
REMOVE NO. 4 ENGINE ROOM WIRE (w/ LEXUS Parking Assist-sensor System)
-
REMOVE NO. 1 ULTRASONIC SENSOR (w/ LEXUS Parking Assist-sensor System)
-
REMOVE NO. 2 ULTRASONIC SENSOR (w/ LEXUS Parking Assist-sensor System)
-
REMOVE NO. 1 ULTRASONIC SENSOR CLIP (w/ LEXUS Parking Assist-sensor System)
-
REMOVE NO. 1 ULTRASONIC SENSOR RETAINER (w/ LEXUS Parking Assist-sensor System)
-
REMOVE ULTRASONIC SENSOR CLIP (w/ LEXUS Parking Assist-sensor System)
-
REMOVE HEADLIGHT CLEANER WASHER NOZZLE COVER LH (w/ Headlight Cleaner System)
-
REMOVE HEADLIGHT CLEANER WASHER NOZZLE COVER RH (w/ Headlight Cleaner System)
Tech Tips
Use the same procedure described for the LH side.
-
REMOVE HEADLIGHT WASHER ACTUATOR SUB-ASSEMBLY LH (w/ Headlight Cleaner System)
-
REMOVE HEADLIGHT WASHER ACTUATOR SUB-ASSEMBLY RH (w/ Headlight Cleaner System)
Tech Tips
Use the same procedure described for the LH side.
-
REMOVE HEADLIGHT CLEANER HOSE (w/ Headlight Cleaner System)
-
REMOVE ULTRASONIC SENSOR CLIP (w/ Headlight Cleaner System)
-
REMOVE NO. 2 WASHER BRACKET (w/ Headlight Cleaner System)
-
REMOVE WASHER BRACKET (w/ Headlight Cleaner System)
Tech Tips
Use the same procedure described for the No. 2 washer bracket.
-
REMOVE FOG LIGHT ASSEMBLY LH
-
REMOVE FOG LIGHT ASSEMBLY RH
Tech Tips
Use the same procedure described for the LH side.
-
REMOVE FOG LIGHT MOUNTING BRACKET LH
-
REMOVE FOG LIGHT MOUNTING BRACKET RH
Tech Tips
Use the same procedure described for the LH side.
-
REMOVE FRONT BUMPER SIDE SUPPORT LH
-
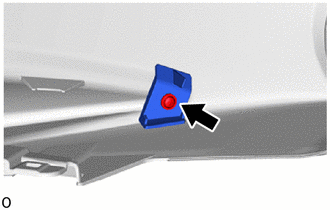
Remove the screw and front bumper side support LH.
-
-
REMOVE FRONT BUMPER SIDE SUPPORT RH
Tech Tips
Use the same procedure described for the LH side.
-
REMOVE NO. 2 RADIATOR GRILLE GARNISH
-
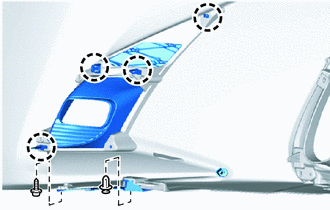
Remove the bolt and clip.
-
Detach the 4 claws and remove the No. 2 radiator grille garnish.
-
-
REMOVE RADIATOR GRILLE GARNISH
Tech Tips
Use the same procedure described for the No. 2 radiator grille garnish.
-
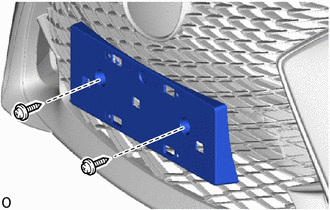
REMOVE FRONT BUMPER EXTENSION MOUNTING BRACKET
-
for Type A:
-
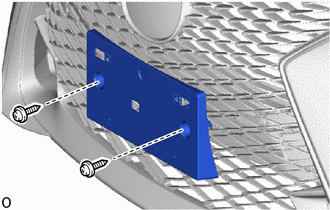
Remove the 2 screws and front bumper extension mounting bracket.
-
-
for Type B:
-
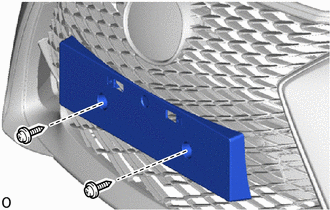
Remove the 2 screws and front bumper extension mounting bracket.
-
-
for Type C:
-
Remove the 2 screws and front bumper extension mounting bracket.
-
-
-
REMOVE RADIATOR GRILLE PROTECTOR
-
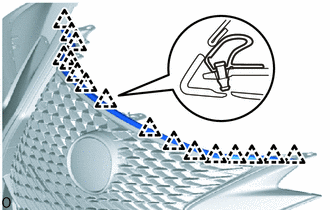
Detach the 16 clips and remove the radiator grille protector.
-
-
REMOVE NO. 2 COOL AIR INTAKE DUCT
-
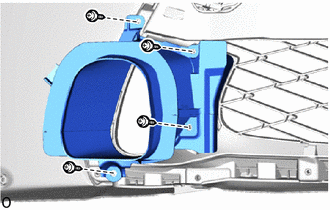
Remove the 4 screws and No. 2 cool air intake duct.
-
-
REMOVE NO. 1 COOL AIR INTAKE DUCT
Tech Tips
Use the same procedure described for the No. 2 cool air intake duct.
-
REMOVE RADIATOR GRILLE SUB-ASSEMBLY
-
REMOVE NO. 1 MOULDING TAPE