FRONT LOWER SUSPENSION ARM INSTALLATION

PROCEDURE
-
TEMPORARILY TIGHTEN LOWER ARM NO. 2 BRACKET SUB-ASSEMBLY
-
Temporarily tighten the lower arm No. 2 bracket sub-assembly to the front suspension lower arm with the nut and washer.
-
-
INSTALL FRONT LOWER BALL JOINT
-
Install the front lower ball joint to the front suspension lower arm assembly with the castle nut.
- Torque:
- 125 N*m { 1275 kgf*cm, 92 ft.*lbf }
-
Install a new clip to the front lower ball joint.
Note
If it is necessary to align the holes for the clip after installing the nut, the nut can be tightened up to an additional 60°.
-
-
TEMPORARILY TIGHTEN FRONT SUSPENSION LOWER ARM ASSEMBLY
-
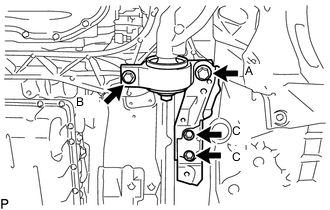
Install the front suspension lower arm and side rail plate with the 4 bolts.
- Torque:
- for bolt A
- 194 N*m { 1978 kgf*cm, 143 ft.*lbf }
- for bolt B
- 86 N*m { 877 kgf*cm, 63 ft.*lbf }
- for bolt C
- 57 N*m { 581 kgf*cm, 42 ft.*lbf }
-
Temporarily tighten the bolt, washer and nut.
-
Install the front lower ball joint with the 2 bolts.
- Torque:
- 150 N*m { 1530 kgf*cm, 111 ft.*lbf }
-
-
TEMPORARILY TIGHTEN FRONT SHOCK ABSORBER WITH COIL SPRING
-
INSTALL ABSORBER CONTROL ACTUATOR
-
INSTALL UPPER SHOCK ABSORBER CAP
-
CONNECT FRONT STABILIZER LINK ASSEMBLY
-
CONNECT TIE ROD ASSEMBLY
-
CONNECT FRONT SUSPENSION UPPER ARM ASSEMBLY
-
CONNECT SKID CONTROL SENSOR WIRE
-
STABILIZE SUSPENSION
-
FULLY TIGHTEN FRONT SHOCK ABSORBER WITH COIL SPRING
-
FULLY TIGHTEN FRONT SUSPENSION LOWER ARM ASSEMBLY
-
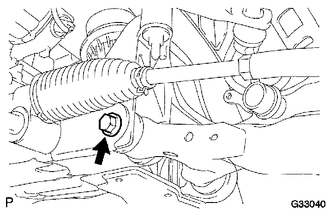
Fully tighten the bolt on the front of the front suspension lower arm.
- Torque:
- 135 N*m { 1377 kgf*cm, 100 ft.*lbf }
-
Fully tighten the installation nut of the lower arm No. 2 bracket sub-assembly.
- Torque:
- 113 N*m { 1152 kgf*cm, 83 ft.*lbf }
-
-
INSTALL NO. 2 ENGINE UNDER COVER
-
INSTALL FRONT SUSPENSION MEMBER BRACE
-
INSTALL ENGINE UNDER COVER
-
INSTALL FRONT WHEEL
-
INSPECT AND ADJUST FRONT WHEEL ALIGNMENT