REAR DIFFERENTIAL CARRIER ASSEMBLY INSTALLATION

PROCEDURE
-
INSTALL REAR DIFFERENTIAL CARRIER ASSEMBLY
Note
-
Do not damage the installation surface when installing the rear differential carrier assembly.
-
The remaining oil may leak out when installing the rear differential carrier assembly.
-
Securely support the rear differential carrier assembly while performing this step to avoid excessively tilting or dropping the rear differential carrier assembly.
-
Install the bolts with the rear differential carrier assembly secured.
-
Attach an engine sling device and hang the rear differential carrier assembly with a chain block.
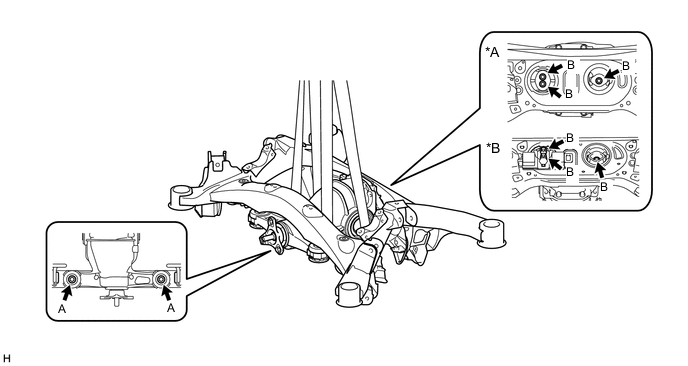
Text in Illustration *A for 2GR-FXE *B for 2AR-FSE CAUTION:
The rear differential carrier assembly is a heavy component. Make sure that it is supported securely.
-
Install the 2 rear upper differential mount stoppers and 2 rear lower differential mount stoppers.
-
Temporarily install the rear differential carrier to the suspension member with 2 new bolts (labeled A).
-
for 2GR-FXE:
Using a 12 mm hexagon wrench, temporarily install the rear differential carrier assembly to the rear suspension member sub-assembly with the 3 new bolts (labeled B).
-
for 2AR-FSE:
Using a 12 mm hexagon wrench, temporarily install the rear differential carrier assembly and rear differential dynamic damper to the rear suspension member sub-assembly with the 3 new bolts (labeled B).
-
Using a 12 mm hexagon wrench and torque wrench, tighten the 3 bolts (labeled B) to the specified torque.
- Torque:
- 103 N*m { 1050 kgf*cm, 76 ft.*lbf }
-
Using a torque wrench, tighten the 2 bolts (A) to the specified torque.
- Torque:
- 95 N*m { 970 kgf*cm, 70 ft.*lbf }
Note
Do not tilt the inner tube or rubber parts when tightening the differential mount stopper.
-
-
INSTALL REAR SUSPENSION MEMBER
-
INSTALL PARKING BRAKE WITH BRACKET ACTUATOR ASSEMBLY
-
INSTALL PROPELLER SHAFT WITH CENTER BEARING ASSEMBLY
-
INSTALL REAR DRIVE SHAFT ASSEMBLY LH
-
INSTALL REAR DRIVE SHAFT ASSEMBLY RH
Tech Tips
Use the same procedure described for the LH side.
-
ADD DIFFERENTIAL OIL