SHIFT LEVER INSTALLATION
PROCEDURE
-
INSTALL TRANSMISSION FLOOR SHIFT ASSEMBLY
-
Temporarily install the transmission floor shift assembly to the body with the 4 bolts.
Note
Do not pinch the wire harness.
-
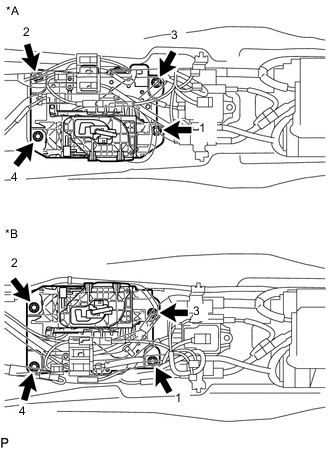
Text in Illustration *A for LHD *B for RHD Tighten the 4 bolts in the order shown in the illustration.
- Torque:
- 8.3 N*m { 85 kgf*cm, 73 in.*lbf }
-
Connect the 3 connectors and 5 clamps to the transmission floor shift assembly.
-
-
INSTALL NO. 1 CONSOLE BOX DUCT
-
Install the No. 1 console box duct with the 2 clips.
-
-
CONNECT CENTER AIRBAG SENSOR ASSEMBLY
-
CONNECT FLOOR SHIFT GEAR SHIFTING ROD SUB-ASSEMBLY
-
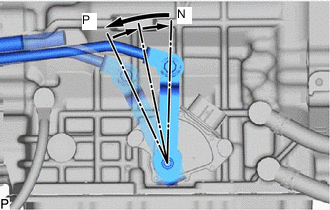
Turn the transmission control shaft lever of the shift lever position sensor counterclockwise until it stops, and then turn it clockwise 2 notches to set it to N.
-
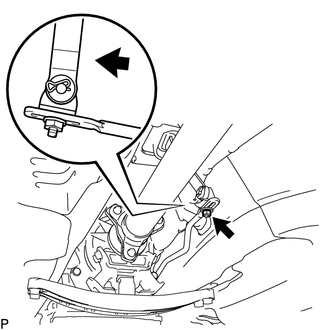
Move the shift lever to N and tighten the nut while lightly pushing the lever toward R.
Text in Illustration 
Push Note
Do not push the shift lever too hard.
-
After adjustment, check that the shift lever moves smoothly and the shift lever and gear operate correctly.
-
Tighten the floor shift gear shifting rod sub-assembly with the nut.
- Torque:
- 13 N*m { 130 kgf*cm, 9 ft.*lbf }
-
-
INSTALL FRONT NO. 1 FLOOR HEAT INSULATOR
-
INSTALL FRONT EXHAUST PIPE ASSEMBLY
-
INSPECT SHIFT LEVER POSITION