FUEL TANK(w/o Canister Pump Module) REMOVAL
PROCEDURE
-
REMOVE FUEL SUCTION TUBE ASSEMBLY WITH PUMP AND GAUGE
-
REMOVE FUEL TANK VENT TUBE ASSEMBLY
-
DRAIN FUEL
-
REMOVE PROPELLER SHAFT WITH CENTER BEARING ASSEMBLY
-
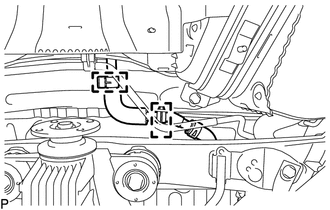
DISCONNECT FUEL TUBE
-
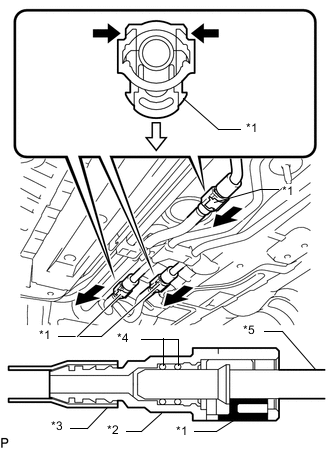
Text in Illustration *1 Retainer *2 Fuel Tube Connector *3 Nylon Tube *4 O-Ring *5 Pipe Detach the 2 claws of the fuel tube connector retainer, push down the retainer and disconnect the fuel tank main tube sub-assembly and fuel tank return tube as shown in the illustration.
Note
-
Remove any dirt and foreign objects on the fuel tube connector before performing this work.
-
Do not allow any scratches or foreign objects on the parts when disconnecting, as the fuel tube connector has O-rings that seal the pipe.
-
Perform this work by hand. Do not use any tools.
-
Do not forcibly bend, twist or turn the nylon tube.
-
Protect the disconnected part by covering it with a plastic bag after disconnecting the fuel pump tube.
-
If the fuel tube connector and pipe are stuck, push and pull on them to release them.
-
-
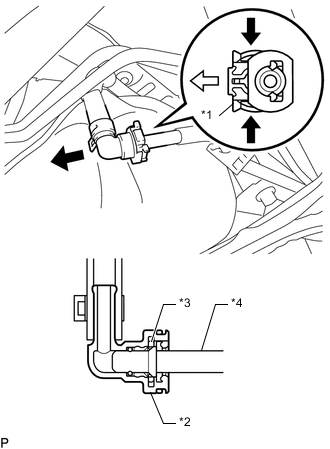
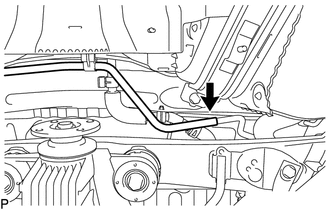
Text in Illustration *1 Retainer *2 Fuel Tube Connector *3 O-Ring *4 Pipe Detach the 2 claws of the fuel tube connector retainer, and then pull the retainer to disconnect the No. 1 fuel evaporation tube sub-assembly as shown in the illustration.
Note
-
Remove any dirt and foreign objects on the fuel tube connector before performing this work.
-
Do not allow any scratches or foreign objects on the parts when disconnecting, as the fuel tube connector has O-rings that seal the pipe.
-
Perform this work by hand. Do not use any tools.
-
Do not forcibly bend, twist or turn the nylon tube.
-
Protect the disconnected part by covering it with a plastic bag after disconnecting the fuel pump tube.
-
If the fuel tube connector and pipe are stuck, push and pull on them to release them.
-
-
-
DISCONNECT FUEL TANK TO FILLER PIPE HOSE
-
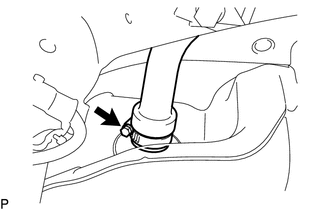
Loosen the hose clamp and disconnect the fuel tank to filler pipe hose.
-
-
DISCONNECT FUEL TANK BREATHER TUBE
-
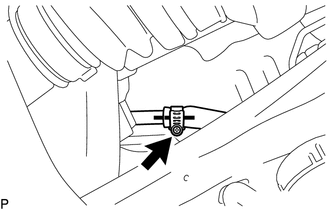
Loosen the hose clamp and disconnect the fuel tank breather tube from the fuel tank filler pipe sub-assembly.
-
Disconnect the fuel tank breather tube from the 2 hose clamps.
-
-
DISCONNECT CHARCOAL CANISTER OUTLET HOSE
-
Disconnect the charcoal canister outlet hose from the fuel tank filler pipe sub-assembly.
-
-
REMOVE REAR SUSPENSION MEMBER BRACE
-
REMOVE FUEL TANK ASSEMBLY
-
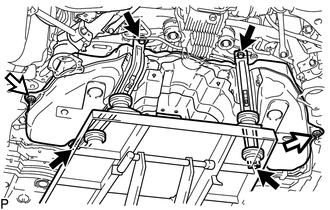
Using an engine lifter and attachments, support the fuel tank assembly.
Text in Illustration 
Bolt 
Nut -
Remove the 2 nuts, 4 bolts and 2 No. 1 fuel tank bands.
-
Using an engine lifter, lower the fuel tank assembly and remove it.
-
-
REMOVE NO. 1 FUEL EVAPORATION TUBE SUB-ASSEMBLY
-

Remove the No. 1 fuel evaporation tube sub-assembly from the fuel tank assembly.
-
-
REMOVE CHARCOAL CANISTER OUTLET HOSE
-
Remove the charcoal canister outlet hose and No. 4 fuel tube clamp from the fuel tank assembly.
-
-
REMOVE FUEL TUBE
-
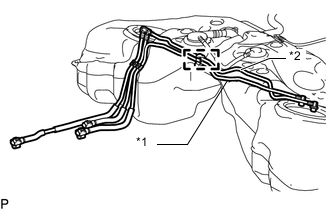
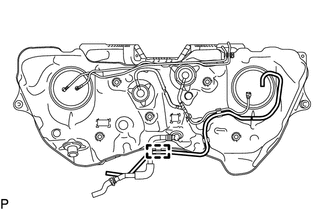
Text in Illustration *1 Fuel Tank Return Tube *2 Fuel Tank Main Tube Sub-assembly Detach the clamp and remove the fuel tank return tube and fuel tank main tube sub-assembly from the fuel tank assembly.
-
Remove the No. 5 fuel tube clamp from the fuel tank assembly.
-
-
REMOVE FUEL TANK CUSHION
-
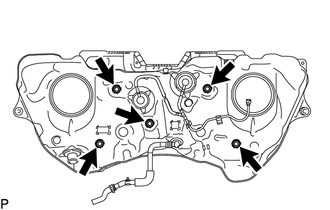
Remove the 5 No. 6 fuel tank cushions from the fuel tank assembly.
-
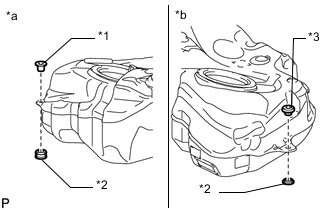
Text in Illustration *1 Fuel Tank Bracket *2 Fuel Tank Cushion *3 Fuel Tank Cushion Set *a RH side *b LH side Remove the fuel tank bracket, 2 fuel tank cushions and fuel tank cushion set from the fuel tank assembly.
-
-
REMOVE NO. 1 FUEL TANK PROTECTOR SUB-ASSEMBLY
-
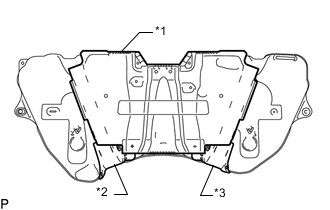
Text in Illustration *1 No. 1 Fuel Tank Protector Sub-assembly *2 No. 2 Fuel Tank Protector *3 No. 3 Fuel Tank Protector Remove the No. 1 fuel tank protector sub-assembly from the fuel tank assembly.
-
Remove the No. 2 fuel tank protector and No. 3 fuel tank protector from the fuel tank assembly.
-