BATTERY COOLING DUCT(w/ Filter) INSPECTION
PROCEDURE
-
INSPECT NO. 6 HYBRID BATTERY INTAKE DUCT
-
Inspect the No. 6 hybrid battery intake duct.
-
Visually inspect the No. 6 hybrid battery intake duct.
Standard No deformation or cracks. Note
If the result is not as specified, replace the No. 6 hybrid battery intake duct.
-
Inspect the filter.
Standard No clogs or damage. Note
-
If the filter is damaged, replace the No. 6 hybrid battery intake duct.
-
If the filter is damaged, check that there are no foreign objects in the No. 3 hybrid battery intake duct, and clean or replace parts if necessary.
-
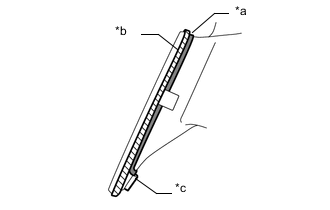
Install the rubber part of the filter as shown in the illustration so that it covers the parts of the seal sponge and bond urethane form indicated by the arrows.
Text in Illustration *a Rubber Part *b Seal Sponge *C Bond Urethane Form -
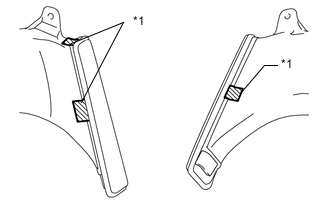
If the tape is not sticky, replace it with new black tape.
Text in Illustration *1 Black Tape -
Apply the black tape so that it cannot be seen from the duct opening.
-
-
-
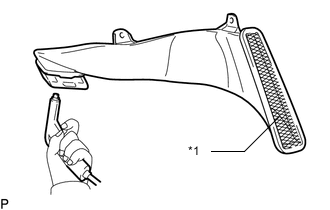
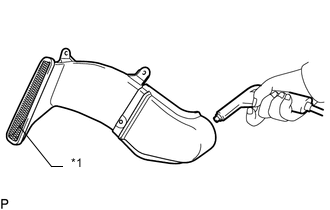
Text in Illustration *1 Filter Clean the filter.
Note
-
Make sure to only use compressed air because an abnormal odor may occur if liquid enters the silencer inside the No. 6 hybrid battery intake duct.
-
Do not blow compressed air at a distance closer than 30 cm from the filter as it may damage the filter.
-
Do not use wire brushes, etc. when cleaning as they may damage the filter.
-
Make sure dust does not enter from the hybrid battery side.
-
Blow compressed air on the filter as shown in the illustration.
-
-
-
INSPECT NO. 1 HYBRID BATTERY INTAKE DUCT
-
Inspect the No. 1 hybrid battery intake duct.
-
Visually inspect the No. 1 hybrid battery intake duct.
Standard No deformation or cracks. Note
If the result is not as specified, replace the No. 1 hybrid battery intake duct.
-
Inspect the filter.
Standard No clogs or damage. Note
-
If the filter is damaged, replace the No. 1 hybrid battery intake duct.
-
If the filter is damaged, check that there are no foreign objects in the battery cooling blower assembly, and clean or replace parts if necessary.
-
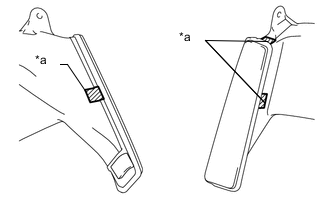
Install the rubber part of the filter as shown in the illustration so that it covers the parts of the seal sponge and bond urethane form indicated by the arrows.
Text in Illustration *a Rubber Part *b Seal Sponge *C Bond Urethane Form -
If the tape is not sticky, replace it with new black tape.
Text in Illustration *a Black Tape -
Apply the black tape so that it cannot be seen from the duct opening.
-
-
-
Text in Illustration *1 Filter Clean the filter.
Note
-
Make sure to only use compressed air because an abnormal odor may occur if liquid enters the silencer inside the No. 1 hybrid battery intake duct.
-
Do not blow compressed air at a distance closer than 30 cm from the filter as it may damage the filter.
-
Do not use wire brushes, etc. when cleaning as they may damage the filter.
-
Make sure dust does not enter from the hybrid battery side.
-
Blow compressed air on the filter as shown in the illustration.
-
-