SUB RADIATOR INSTALLATION
PROCEDURE
-
INSTALL RADIATOR ASSEMBLY
-
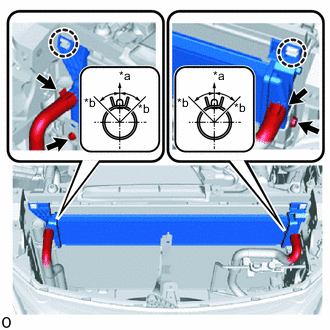
Text in Illustration *a Upper *b 30° Attach the 2 claws to temporarily install the radiator assembly.
-
Install the radiator assembly with the 2 bolts.
- Torque:
- 9.0 N*m { 92 kgf*cm, 80 in.*lbf }
-
Connect the 2 water hoses.
Note
-
Make sure that the clip is positioned as shown in the illustration.
-
Do not remove the tape or plastic bags from the pipes and disconnected hoses until installation.
-
-
-
INSTALL HOOD LOCK CONTROL CABLE COVER (w/ Cover)
-
INSTALL UPPER RADIATOR SUPPORT
-
CONNECT HOOD LOCK CONTROL CABLE COVER (w/ Cover)
-
CONNECT NO. 2 ENGINE ROOM WIRE
-
INSTALL HOOD LOCK ASSEMBLY (for RHD)
-
INSTALL HOOD LOCK ASSEMBLY (for LHD)
-
INSTALL HOOD LOCK RELEASE LEVER PROTECTOR
-
ADD COOLANT (for Inverter)
-
INSPECT FOR COOLANT LEAK (for Inverter)
-
INSTALL NO. 1 AIR CLEANER INLET
-
INSTALL COOL AIR INTAKE DUCT SEAL
-
INSTALL ENGINE ROOM SIDE COVER
-
INSTALL NO. 2 ENGINE UNDER COVER
-
INSTALL FRONT SUSPENSION MEMBER BRACE
-
INSTALL ENGINE UNDER COVER