BATTERY SMART UNIT REMOVAL
PROCEDURE
-
CHECK PART NUMBER OF BATTERY SMART UNIT
If the battery smart unit had been replaced just before the malfunction occurred, check the part number of the battery smart unit.
Note
-
The type of battery smart unit to be used varies depending on the vehicle model.
-
If the wrong type of battery smart unit is installed, the power switch cannot be turned on (READY).
-
After installing the battery smart unit, perform the following to check that the power switch can be turned on (READY).
-
Turn the power switch on (READY).
-
Turn the power switch off and wait for 30 seconds or more.
-
Turn the power switch on (READY) again.
-
-
PRECAUTION
CAUTION:
Be sure to read Precaution thoroughly before servicing Click here.
Note
After turning the power switch off, waiting time may be required before disconnecting the cable from the auxiliary battery negative (-) terminal. Therefore, make sure to read the disconnecting the cable from the auxiliary battery negative (-) terminal notices before proceeding with work Click here.
-
READ OUTPUT DTC
-
Check for DTCs Click here.
Note
Confirm that P0AA6 (Hybrid Battery Voltage System Isolation Fault) is not output before performing removal or installation work on the internal parts of the battery. If the DTC is output, perform troubleshooting procedures first.
-
-
REMOVE LUGGAGE COMPARTMENT FLOOR MAT
-
REMOVE LUGGAGE COMPARTMENT TRIM COVER LH
-
DISCONNECT CABLE FROM AUXILIARY BATTERY TERMINAL
-
REMOVE NO. 1 SEAT ARMREST CAP
-
REMOVE LOWER HYBRID VEHICLE BATTERY COVER PANEL
-
REMOVE SERVICE PLUG GRIP
-
REMOVE INVERTER COVER
-
REMOVE CONNECTOR COVER ASSEMBLY
-
CHECK TERMINAL VOLTAGE
-
INSTALL CONNECTOR COVER ASSEMBLY
-
INSTALL INVERTER COVER
-
REMOVE REAR SEAT ASSEMBLY
-
REMOVE REAR DOOR SCUFF PLATE LH
-
REMOVE REAR SEAT SIDE GARNISH LH
-
REMOVE INNER ROOF SIDE GARNISH LH
-
REMOVE REAR DOOR SCUFF PLATE RH
-
REMOVE REAR SEAT SIDE GARNISH RH
-
REMOVE INNER ROOF SIDE GARNISH RH
-
REMOVE PACKAGE TRAY TRIM PANEL ASSEMBLY
-
REMOVE CENTER STOP LIGHT COVER (w/ Rear Sunshade)
-
REMOVE NO. 2 PACKAGE TRAY TRIM PANEL ASSEMBLY (w/ Rear Sunshade)
-
REMOVE NO. 2 ROOM PARTITION PAD
-
REMOVE NO. 1 ROOM PARTITION PAD
-
REMOVE LUGGAGE COMPARTMENT TRIM COVER RH
-
REMOVE SIDE TRIM BOX
-
REMOVE LUGGAGE COMPARTMENT SIDE TRAY (w/ Spare Tire)
-
REMOVE LUGGAGE COMPARTMENT TRIM BOX (w/o Spare Tire)
-
REMOVE SPARE WHEEL COVER TRAY (w/o Spare Tire)
-
REMOVE ROPE HOOK ASSEMBLY
-
REMOVE REAR LUGGAGE COMPARTMENT TRAY BRACKET LH
-
REMOVE REAR LUGGAGE COMPARTMENT TRAY BRACKET RH
-
REMOVE NO. 1 LUGGAGE COMPARTMENT TRIM HOOK
-
REMOVE NO. 1 LUGGAGE COMPARTMENT LIGHT ASSEMBLY
-
REMOVE REAR LUGGAGE COMPARTMENT TRIM COVER
-
REMOVE REAR FLOOR FINISH PLATE
-
REMOVE FRONT LUGGAGE COMPARTMENT TRIM COVER
-
REMOVE ROPE HOOK
-
REMOVE INNER LUGGAGE COMPARTMENT TRIM COVER LH
-
REMOVE INNER LUGGAGE COMPARTMENT TRIM COVER RH
-
REMOVE NO. 6 HYBRID BATTERY INTAKE DUCT
-
REMOVE NO. 1 HYBRID BATTERY INTAKE DUCT
-
REMOVE NO. 3 HYBRID BATTERY INTAKE DUCT
-
REMOVE NO. 4 HYBRID VEHICLE BATTERY SHIELD SUB-ASSEMBLY
-
DISCONNECT NO. 4 FLOOR WIRE
-
REMOVE NO. 1 HYBRID BATTERY CARRIER BRACKET
-
REMOVE UPPER HYBRID BATTERY COVER SUB-ASSEMBLY
CAUTION:
Perform work using insulated gloves and insulated tools.
-
Detach the wire harness clamp.
-
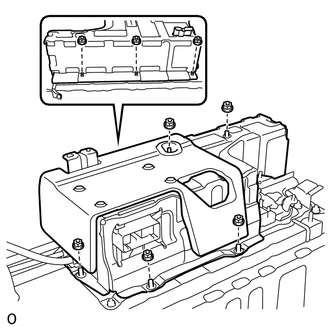
Remove the 8 nuts and upper hybrid battery cover sub-assembly.
-
-
REMOVE HYBRID BATTERY JUNCTION BLOCK ASSEMBLY
-
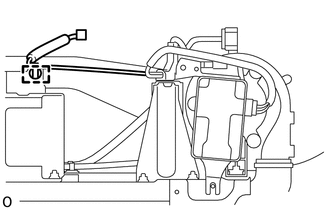
REMOVE BATTERY SMART UNIT
CAUTION:
Perform work using insulated gloves and insulated tools.
-
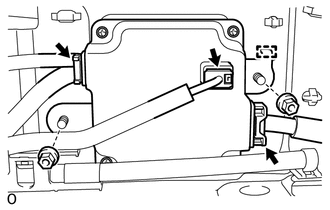
Disconnect the 3 connectors.
Note
Insulate the disconnected high voltage connectors with insulating tape.
Tech Tips
High voltage wiring connectors are orange.
-
Remove the 2 nuts.
-
Detach the guide and remove the battery smart unit.
-