COMPRESSOR(for 2GR-FXE) REMOVAL
PROCEDURE
-
REMOVE ENGINE ROOM SIDE COVER
-
REMOVE COOL AIR INTAKE DUCT SEAL
-
RECOVER REFRIGERANT FROM AIR CONDITIONING SYSTEM
-
for HFC-134a(R134a):
-
for HFO-1234yf(R1234yf):
-
-
REMOVE LUGGAGE COMPARTMENT FLOOR MAT
-
REMOVE LUGGAGE COMPARTMENT TRIM COVER LH
-
PRECAUTION
Note
After turning the power switch off, waiting time may be required before disconnecting the cable from the auxiliary battery terminal. Therefore, make sure to read the disconnecting the cable from the auxiliary battery terminal notice before proceeding with work Click here.
-
DISCONNECT CABLE FROM NEGATIVE AUXILIARY BATTERY TERMINAL
Note
When disconnecting the cable, some systems need to be initialized after the cable is reconnected Click here.
-
REMOVE SERVICE PLUG GRIP
-
REMOVE V-BANK COVER SUB-ASSEMBLY
-
REMOVE ENGINE UNDER COVER
-
REMOVE REAR ENGINE UNDER COVER LH
-
REMOVE ENGINE ROOM ECU BOX
-
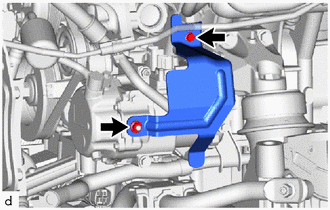
REMOVE COOLER COMPRESSOR COVER (w/ Cover)
-
Remove the bolt, nut and cooler compressor cover.
-
-
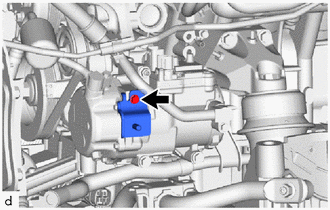
REMOVE COOLER PROTECTOR (w/ Cover)
-
Remove the bolt and cooler protector.
-
-
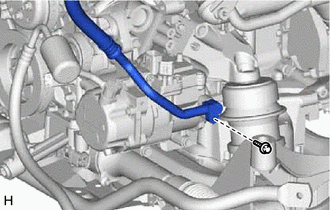
DISCONNECT SUCTION HOSE
-
Remove the bolt and disconnect the suction hose from the compressor with motor assembly.
-
Remove the O-ring from the suction hose.
Note
Seal the openings of the disconnected parts using vinyl tape to prevent moisture and foreign matter from entering them.
-
-
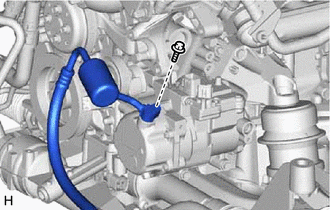
DISCONNECT NO. 1 COOLER REFRIGERANT DISCHARGE HOSE
-
Remove the bolt and disconnect the No. 1 cooler refrigerant discharge hose from the compressor with motor assembly.
-
Remove the O-ring from the No. 1 cooler refrigerant discharge hose.
Note
Seal the openings of the disconnected parts using vinyl tape to prevent moisture and foreign matter from entering them.
-
-
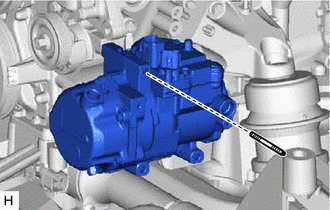
REMOVE COMPRESSOR WITH MOTOR ASSEMBLY
-
Disconnect the connector.
-
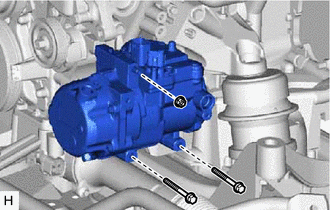
Remove the 2 bolts and nut.
-
Using an E8 "TORX" socket, remove the stud bolt and compressor with motor assembly.
-