HEADLIGHT ECU INSTALLATION

CAUTION / NOTICE / HINT
Note
-
Be sure to read Precaution thoroughly before servicing.
-
Handle components indoors as much as possible to prevent foreign matter from entering and adhering to headlight assembly components.
-
Do not reuse parts which have reduced fastening ability due to thread damage.
-
When installing components, make sure that the wire harness is not pinched or pulled.
Tech Tips
-
Use the same procedure for the RH and LH sides.
-
The procedure listed below is for the LH side.
PROCEDURE
-
INSTALL HEADLIGHT GASKET
Note
-
Prevention of static electricity is required during this procedure.
-
Use static electricity countermeasures SST (desktop antistatic mat set) and observe all precautions to prevent damage to the system by electrostatic discharge (ESD).
-
If the headlight gasket has been removed, replace it with a new one.
- SST
- 09890-47010 ( 09891-04010, 09891-04020, 09891-04030, 09891-04040 )
-
Install a new headlight gasket to the headlight ECU sub-assembly LH.
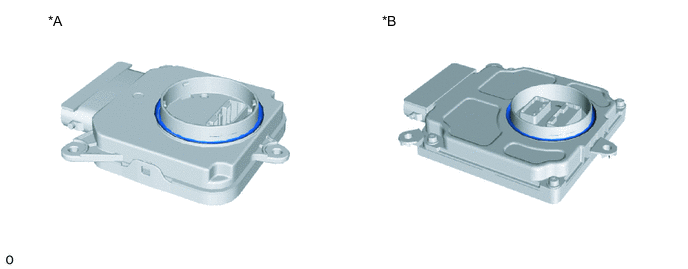
Text in Illustration *A for Single Beam Headlight, w/o AFS *B for Single Beam Headlight, w/ AFS
for Triple Beam Headlight
-
-
INSTALL HEADLIGHT ECU SUB-ASSEMBLY LH
Note
-
Prevention of static electricity is required during this procedure.
-
Use static electricity countermeasures SST (desktop antistatic mat set) and observe all precautions to prevent damage to the system by electrostatic discharge (ESD).
-
If the headlight light control ECU sub-assembly LH has been dropped , replace it with a new one.
-
If the headlight light control ECU sub-assembly LH has been removed, replace the headlight gasket with a new one.
- SST
- 09890-47010 ( 09891-04010, 09891-04020, 09891-04030, 09891-04040 )
-
Connect each connector.
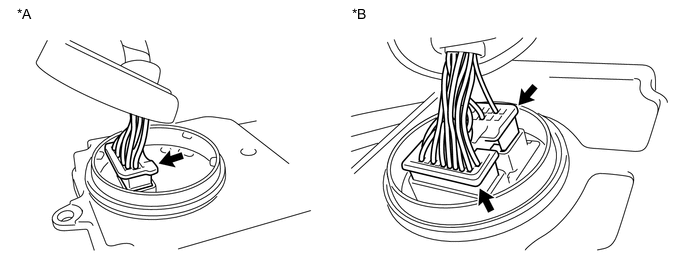
Text in Illustration *A for Single Beam Headlight, w/o AFS *B for Single Beam Headlight, w/ AFS
for Triple Beam Headlight
-
Return the connector cover to its original position.
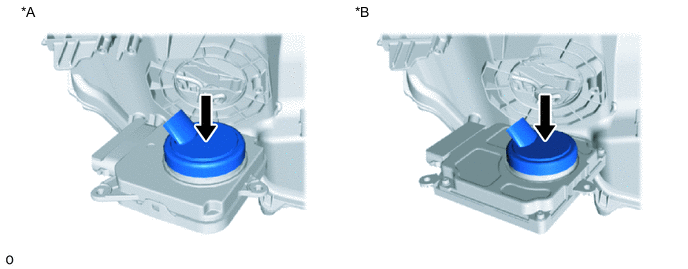
Text in Illustration *A for Single Beam Headlight, w/o AFS *B for Single Beam Headlight, w/ AFS
for Triple Beam Headlight
-
Install the headlight ECU sub-assembly LH with the 3 screws.
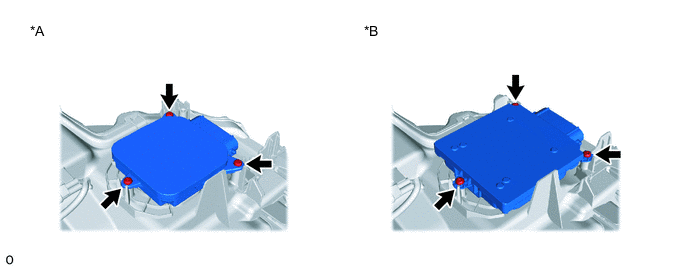
Text in Illustration *A for Single Beam Headlight, w/o AFS *B for Single Beam Headlight, w/ AFS
for Triple Beam Headlight
-
-
INSTALL HEADLIGHT ASSEMBLY LH
for Single Beam Headlight:
for Triple Beam Headlight:
-
PERFORM INITIALIZATION (When Replacing the Headlight ECU Sub-assembly LH)
Note
-
If any of the work in the table below has been performed, vehicle information registration and initialization of the headlight ECU sub-assembly LH is necessary.
Performed Work or System Condition Necessary Procedures Replacement of the headlight ECU sub-assembly LH Vehicle information registration for the headlight ECU sub-assembly LH Initialization of the headlight ECU sub-assembly LH -
A new headlight ECU sub-assembly LH cannot operate until the vehicle information is registered.
-
After replacing the headlight ECU sub-assembly LH, it is necessary to register the vehicle information and then perform initialization.
-
Even if the headlight ECU sub-assembly RH is replaced with a new one, vehicle information registration and initialization are not necessary.
-
Vehicle information registration must be performed with the multiplex network body ECU (main body ECU) and hybrid vehicle control ECU connected via CAN communication.
-