NAME PLATE INSTALLATION
CAUTION / NOTICE / HINT
Tech Tips
When installing the emblem and name plate, heat the vehicle body, emblem and name plate using a heat light.
| Standard | ||||||||
|---|---|---|---|---|---|---|---|---|
|
Note
Do not heat the vehicle body, emblem or name plate excessively.
PROCEDURE
-
INSTALL SYMBOL EMBLEM
-
Clean the vehicle body surface.
-
Using a heat light, heat the vehicle body surface.
-
Remove the double-sided tape from the vehicle body.
-
Wipe off any tape adhesive residue with cleaner.
-
-
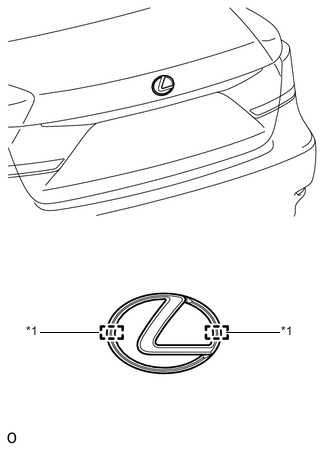
Text in Illustration *1 Boss Install a new symbol emblem.
Tech Tips
Attach the symbol emblem using sufficient pressure.
-
Using a heat light, heat the vehicle body and a new symbol emblem.
-
Remove the peeling paper from the face of the symbol emblem.
Tech Tips
After removing the peeling paper, keep the exposed adhesive free from foreign matter.
-
Install the symbol emblem.
Tech Tips
Press the symbol emblem firmly to install it.
-
-
-
INSTALL NO. 1 LUGGAGE COMPARTMENT DOOR NAME PLATE
-
Clean the vehicle body surface.
-
Using a heat light, heat the vehicle body surface.
-
Remove the double-sided tape from the vehicle body.
-
Wipe off any tape adhesive residue with cleaner.
-
-
Cut notches into the application sheet along the cut lines on both sides.
-
Fold the cut parts of the application sheet toward the front of the vehicle along the fold lines on both sides.
-
Peel off the peeling paper, taking care not to touch the adhesive surface.
-
Insert the folded part closer towards the outer side of the vehicle between the luggage compartment door and the rear light assembly LH.
-
Insert the folded part closer towards the inner side of the vehicle between the luggage compartment door and the luggage compartment door outside garnish.
-
Install a new No. 1 luggage compartment door name plate, aligning the edge of the hole closer towards the outer side of the vehicle with the edge of the rear light assembly LH.
Tech Tips
Press the No. 1 luggage compartment door name plate firmly to install it.
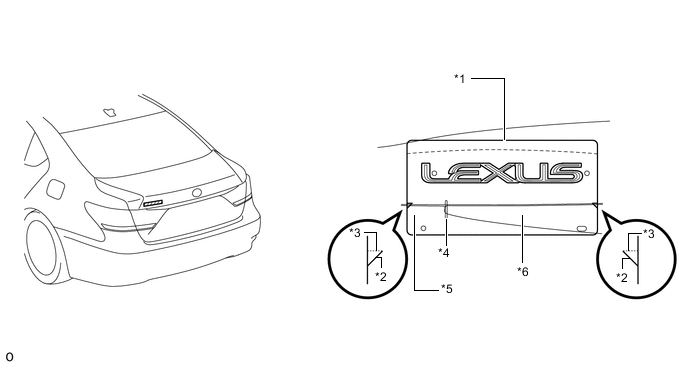
Text in Illustration *1 Application Sheet *2 Cut Line *3 Fold Line *4 Position Alignment Hole *5 Rear Light Assembly LH *6 Luggage Compartment Door Outside Garnish
-
-
INSTALL NO. 3 LUGGAGE COMPARTMENT DOOR NAME PLATE
-
Clean the vehicle body surface.
-
Using a heat light, heat the vehicle body surface.
-
Remove the double-sided tape from the vehicle body.
-
Wipe off any tape adhesive residue with cleaner.
-
-
Cut notches into the application sheet along the cut lines on both sides.
-
Fold the cut parts of the application sheet toward the front of the vehicle along the fold lines on both sides.
-
Peel off the peeling paper, taking care not to touch the adhesive surface.
-
Insert the folded part closer towards the outer side of the vehicle between the luggage compartment door and the rear light assembly RH.
-
Insert the folded part closer towards the inner side of the vehicle between the luggage compartment door and the luggage compartment door outside garnish.
-
Install a new No. 3 luggage compartment door name plate, aligning the edge of the hole closer towards the outer side of the vehicle with the edge of the rear light assembly RH.
Tech Tips
Press the No. 3 luggage compartment door name plate firmly to install it.
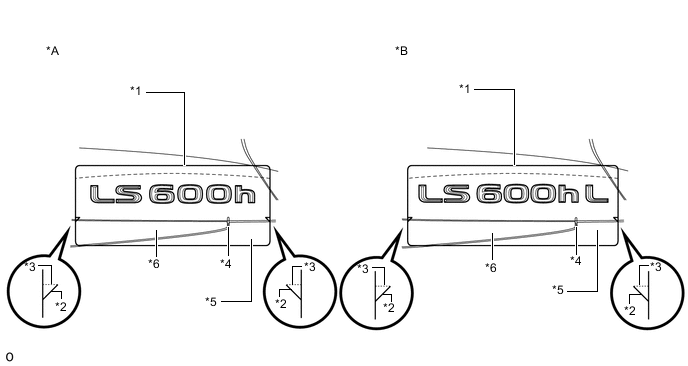
Text in Illustration *A for Standard Body *B for Long Body *1 Application Sheet *2 Cut Line *3 Fold Line *4 Position Alignment Hole *5 Rear Light Assembly RH *6 Luggage Compartment Door Outside Garnish
-
-
INSTALL FRONT FENDER NO. 2 NAME PLATE
Tech Tips
-
Use the same procedure for both front fender No. 2 name plates.
-
When installing the front fender No. 2 name plate, heat the vehicle body and front fender No. 2 name plate using a heat light.
Standard Item Temperature Vehicle Body 40 to 60°C (104 to 140°F) Front Fender No. 2 Name Plate 20 to 30°C (68 to 86°F) Note
Do not heat the vehicle body or front fender No. 2 name plate excessively.
-
Clean the vehicle body surface.
-
Using a heat light, heat the vehicle body surface.
-
Remove the double-sided tape from the vehicle body.
-
Wipe off any tape adhesive residue with cleaner.
-
-
Text in Illustration *1 Boss Install a new front fender No. 2 name plate.
-
Using a heat light, heat the vehicle body and a new front fender No. 2 name plate.
-
Remove the peeling paper from the face of the front fender No. 2 name plate.
Tech Tips
After removing the peeling paper, keep the exposed adhesive free from foreign matter.
-
Align the boss positions and install the front fender No. 2 name plate.
Tech Tips
Press the front fender No. 2 name plate firmly to install it.
-
-
-
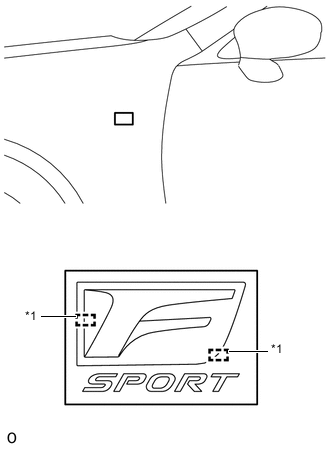
INSTALL FRONT FENDER NO. 1 NAME PLATE
Tech Tips
-
Use the same procedure for both front fender No. 1 name plates.
-
When installing the front fender No. 1 name plate, heat the vehicle body and front fender No. 1 name plate using a heat light.
Standard Item Temperature Vehicle Body 40 to 60°C (104 to 140°F) Front Fender No. 1 Name Plate 20 to 30°C (68 to 86°F) Note
Do not heat the vehicle body or front fender No. 1 name plate excessively.
-
Clean the vehicle body surface.
-
Using a heat light, heat the vehicle body surface.
-
Remove the double-sided tape from the vehicle body.
-
Wipe off any tape adhesive residue with cleaner.
-
-
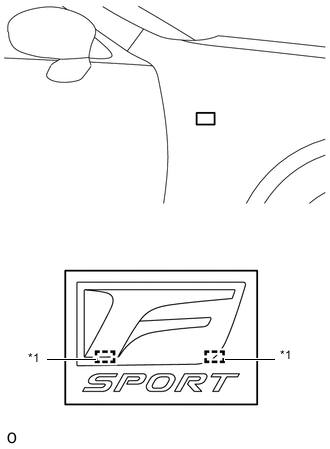
Text in Illustration *1 Boss Install a new front fender No. 1 name plate.
-
Using a heat light, heat the vehicle body and a new front fender No. 1 name plate.
-
Remove the peeling paper from the face of the front fender No. 1 name plate.
Tech Tips
After removing the peeling paper, keep the exposed adhesive free from foreign matter.
-
Align the boss positions and install the front fender No. 1 name plate.
Tech Tips
Press the front fender No. 1 name plate firmly to install it.
-
-