AMPLIFIER ANTENNA REMOVAL
PROCEDURE
-
PRECAUTION
CAUTION:
After turning the power switch off, waiting time may be required before disconnecting the cable from the auxiliary battery negative (-) terminal. Therefore, make sure to read the disconnecting the cable from the auxiliary battery negative (-) terminal notices before proceeding with work Click here.
-
REMOVE LUGGAGE COMPARTMENT MAT SUB-ASSEMBLY (w/ Spare Tire)
-
REMOVE DECK BOARD ASSEMBLY (w/o Spare Tire)
-
REMOVE DECK TRIM SIDE BOARD LH (w/o Spare Tire)
-
REMOVE BATTERY SERVICE HOLE COVER LH
-
DISCONNECT CABLE FROM NEGATIVE AUXILIARY BATTERY TERMINAL
Note
When disconnecting the cable, some systems need to be initialized after the cable is reconnected Click here.
-
REMOVE REAR SEAT ASSEMBLY
-
for Power Seat:
-
for 4-Passenger with Ottoman:
-
for 5-Passenger with Ottoman:
-
for Fixed seat:
-
-
REMOVE ROOF HEADLINING
-
Partially remove the roof headlining.
Tech Tips
It is not necessary to completely remove the roof headlining. Slightly lower the rear section of the roof headlining so that the amplifier antenna can be removed.
for Standard Body:
Refer to the following procedures Click here.
for Long Body:
Refer to the following procedures Click here.
-
-
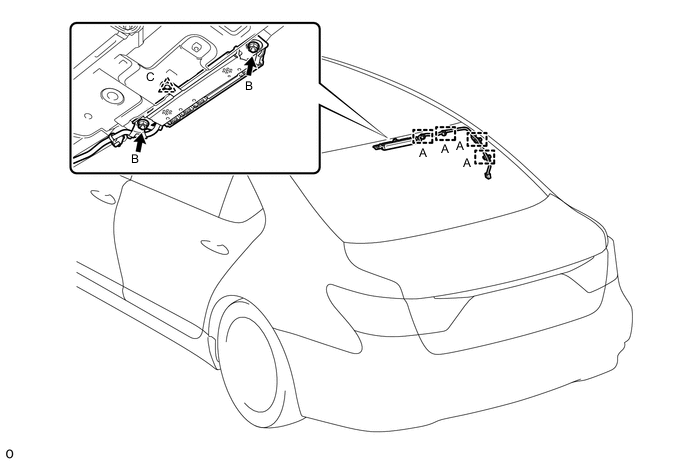
REMOVE AMPLIFIER ANTENNA ASSEMBLY NO.1
-
Disconnect each connector.
-
Detach the 4 clamps labeled A and remove the 2 nuts labeled B.
-
Detach the clip labeled C and remove the amplifier antenna.
Tech Tips
-
Remove the clip if it is damaged.
-
The clip is used when the vehicle is assembled at the factory and is not needed for the reinstallation.
-
-